|
Proper thawing is necessary to discourage growth of harmful organisms, and proper cleaning of the work area prevents contamination of other food or preparation surfaces. Ham preparation can consist of trimming excess fat, scoring the ham, and applying a glaze. With a dry-cured country ham, preparation involves soaking the ham to reduce the saltiness. These preparation steps are taken to produce a flavorful moist ham to serve family and friends on Easter, Christmas, or any special occasion.
Thawing | Cleaning | Ham Preparation
Thawing
There are several methods that can be used for thawing ham safely. Ham should never be thawed out on the kitchen counter because the outside of the meat will reach a temperature of above 40°F while the inside is still frozen. The area that reaches a temperature above 40°F would be susceptible to bacterial growth. Use one of the methods described below.
Refrigerator
(Recommended Method) |
|
Approximate Thawing Times: 4 to 6 hours per pound |
Thawing ham in the refrigerator is the only reliable and safe method. It is the recommended method of thawing. It is the slowest but safest method you can use and is the best method for maintaining quality. The temperature of the refrigerator should be maintained at 35°F to 40°F to discourage growth of harmful organisms as the meat thaws. Leave the meat wrapped in its original packaging to prevent dehydration and place on a platter or a tray to catch the drippings as it thaws. Place the ham on the lowest shelf away from other foods in the refrigerator. It may take 3 to 4 days to thaw, so be sure to plan ahead to remove the ham from the freezer and place it in the refrigerator, giving it sufficient time to thaw.
After thawing in the refrigerator the ham can be refrigerated safely for 3 to 5 days. If you decide to not cook the meat within this time, the meat can be refrozen. Just remember that each time the meat is frozen it loses some of its quality. The meat should not be refrozen when thawed using the cold water or microwave methods. |
| Cold Water |
|
Approximate Thawing Times: 30 minutes per pound |
Thawing ham in cold water is a faster method of thawing than the refrigerator method, but because of increased awareness of illness due to bacterial growth, it is generally not recommended. If you need to use this method there are precautions that should be taken to provide a safe environment for this method of thawing. Fill the sink with enough cold tap water to cover the cut of meat, place the ham in a leak proof bag and put it into the cold water. Be sure that the meat is sealed tightly so that the meat is not exposed to the water. Meat exposed to the water will result in flavor and color loss, and will have a greater chance of bacteria growth. The water should be changed every 30 minutes. Do not use warm or hot water, even though it will thaw the meat faster, it will also encourage the growth of bacteria. Do not use the sink for other purposes during the thawing period and be sure the water does not splash onto other preparation surfaces or food. Once the ham is thawed, remove it from the sink and sanitize all utensils and surfaces affected during the thawing period. The ham should be cooked immediately after thawing and should not be stored for any period of time. Do not refreeze the meat that has been thawed using this method unless it has been cooked first. |
| Microwave |
|
See manual for defrosting instructions
and thawing times. |
Thawing large items, such as ham, in the microwave does not work well and should be avoided. Uncooked hams that have been thawed in the microwave should be cooked immediately because some of the meat may have started to cook during defrosting, resulting in some areas of the meat being at a temperature of over 40°F, which would encourage growth of bacteria. Do not refreeze the meat that has been thawed using this method unless it has been cooked first.
Defrosting ham in a microwave is a quick method but is hard to determine the proper thawing time. Thawing times vary according to different microwaves and the size and structure of the ham. If the ham is to be defrosted in the microwave, the ham should have the store wrapping and foam tray removed and then placed on a plate or tray and loosely wrapped with material suitable for the microwave. Generally it is best to start out by microwaving at a defrost or medium-low setting for 2 or 3 minutes and then letting it stand for 2 minutes before checking progress. Turn the meat and repeat this procedure until the ham is sufficiently defrosted, being careful that it does not start to cook.
Meat can be cooked without thawing first. You will need to increase the cooking time when starting with frozen meat. A ham may require up to 1 ½ times the cooking time of an unfrozen ham. |
Other Thawing Guidelines
- Plan ahead so that you will have adequate time to defrost the frozen ham using one of the methods above. Having the meat slowly thaw in the refrigerator will result in the best quality of meat and is the safest method for preventing food borne disease.
- When thawing in the refrigerator, realize that food placed in the coldest area of the refrigerator will take longer to thaw than if placed in another area. Also, food place in a refrigerator set at 35°F will take longer to thaw than one set at 40°F.
- While thawing, be sure that drippings do not contaminate other food or preparation surfaces.
- To store ham after it has been thawed in the refrigerator, remove from wrapping and blot dry with a paper towel. Place on a tray with sides to catch drippings, cover loosely and place in the refrigerator in an area where there is no danger of the juices dripping onto food that will be eaten with out cooking, such as raw vegetables and salad fixings.
- As the ham is thawing in the refrigerator, it may have juices that accumulate on the tray where the meat is sitting. These juices should be drained off as they accumulate. The juices will deteriorate and go bad faster than the meat and will then contaminate the meat.
Cleaning
Hands should be washed before and after handling the meat. Be sure all utensils, cutting boards and work areas are cleaned and sanitized properly after being exposed to the ham. The platter used to hold a uncooked ham should not be used for serving the ham once it is cooked. The same plate can be used if it is washed in hot soapy water and sanitized properly first.
Ham Preparation
Wet-Cured Ham | Dry-Cured Ham | Trimming | Scoring | Glazing | Raw Ham
Ham preparation will depend on the type of ham you select and whether it is uncooked, partially cooked or fully cooked. Preparing ham ranges from being as simple as placing the ham in a pan and covering with foil to as time consuming as the soaking and cleaning of a country ham. The ham should be allowed to set at room temperature for 1½ to 2 hours before cooking.
Wet-Cured Hams
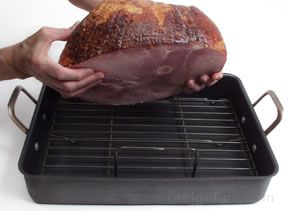
Fully Cooked Ham: A fully cooked ham is ready to eat and does not require cooking before eating. It can be unwrapped, sliced and served immediately. A fully cooked ham can also be heated to produce a richer flavor. To warm a fully cooked ham, remove its wrapper and if necessary, trim rind and fat.
|
- Place the ham on a rack in a shallow pan with the cut side down.
|
|
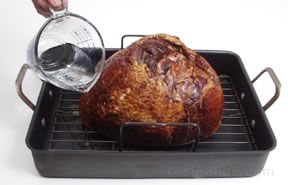
- Add approximately one cup of water to the roasting pan.
|
After the water is added, cover the pan tightly with foil. Bake as directed on the label or see Ham Cooking Guide.
Uncooked or Partially Cooked Ham: A ham that is not fully cooked can be prepared in the same manner as a fully cooked ham, but it will have to cook longer and reach a higher internal temperature. If the ham has a layer of fat and/or the rind on it, they can be removed before or after cooking. Most hams today have already had the rind and fat trimmed. If it still has its rind and fat, follow the steps below for Trimming the Ham. Cook as directed on the label or see Ham Cooking Guide.
Dry-Cured Hams
There are several varieties of dry-cured hams. Some are uncooked and must be cooked before serving and others are cured and processed in a manner that allows them to be eaten raw. Most dry-cured hams are very salty and can be soaked prior to cooking to help reduce the saltiness. Generally, the dry-cured hams will also have some mold on the surface that should be removed.
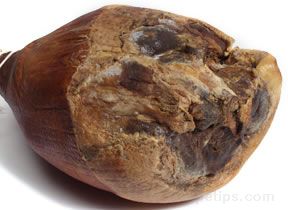
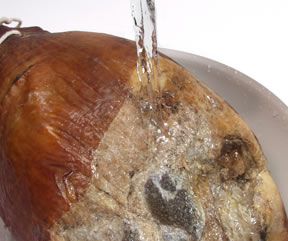
Remove Mold:
- Most dry-cured country hams form a mold on their outer surface because of the long curing and drying process of these uncooked hams. This mold is not harmful but should be removed before the ham is cooked.
|
|
|
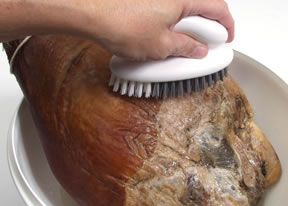
- Remove the mold by washing the ham in warm water and scrub the mold off with a stiff brush.
|
|
|
|
|
|
 |
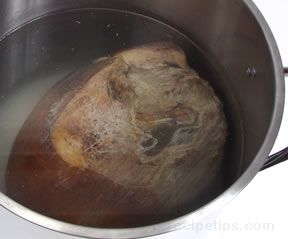
Soaking:
- Two days before you are going to serve the ham, place it in a large pan. If necessary, saw off the hock to get it to fit in the pan.
|
|
- Cover the ham with cold water and let it stand at room temperature. If the ham is very salty, there will be salt crystals visible on the ham and the water should be changed every 4 to 6 hours and may be soaked up to 72 hours. If salt crystals are not visible on the ham, change the water every 6 to 10 hours and it is only necessary to soak for 6 to 12 hours.
|
- Soaking will reduce the saltiness of the ham but it will still be fairly salty in comparison to a wet-cured ham because the salt curing penetrates through the entire ham.
|
After the dry-cured ham has the mold removed and is soaked to reduce the saltiness, it is ready to cook. See Ham Cooking Guide.
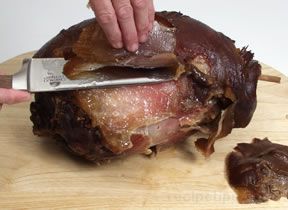
Trimming the Ham
The rind and fat can be trimmed before cooking the ham or it can be trimmed at the end of cooking, just before glazing. Leaving the fat and rind on during the cooking time will provide for a more moist ham and the rind and fat will be easier to trim than if trimmed before cooking.
- Using a sharp knife, make a slit in the rind and begin trimming parallel to the surface of the ham. Trim rind and fat at the same time, leaving approximately 1/4-inch layer of fat.
|
|
|
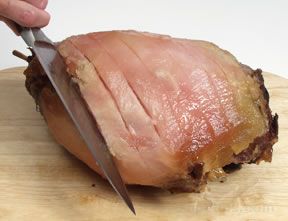
- Check the thickness of the layer of fat by gently inserting the tip of the knife into the fat. If it is deeper than the desired thickness, trim additional fat off. Continue to trim around the entire surface of the ham until all the rind is trimmed off and the layer of fat is the desired thickness.
|
|

|
|
To trim before cooking:
- Hold the ham in place, standing upright, by holding on to the bone and applying pressure. If it is a half ham, place the cut side down. Using a sharp knife, make downward slices through the fat.
- Leave approximately ¼-inch of fat as you are trimming. Turn the ham after each slice and make another cut, slightly overlapping the previous cut.
- Continue to turn and slice until you have trimmed around the entire ham.
|
Scoring
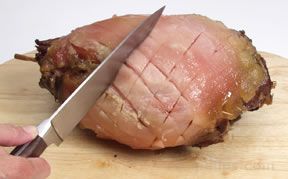
The scores allow the glazing to penetrate the ham. Cloves can be added for flavor and to make the ham more decorative.
|
- Score the ham by making diagonal cuts in the fat along the sides of the ham at approximately 1 inch intervals.
|
|
- Then make cuts in the opposite direction to form diamond shapes in the fat.
|
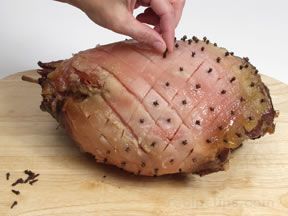 |
- Insert a clove into each diamond if desired.
|
Glazing
Wet-cured and dry-cured hams, whether they are uncooked, partially cooked or fully cooked, can have their flavor enhanced by preparing a ham glaze recipe to added if desired. The glazing is most often applied towards the end of the cooking process. The fat on the ham can be scored before the glaze is added. It can be scored before cooking the ham or at the end of the cooking process, just before adding the glaze. During the last 20 to 30 minutes of cooking time, the glaze is applied and then the ham is returned to the oven until the glaze starts to caramelize and turn a golden brown. For more information on glazing, see Ham Cooking Guide - Glazing.
Raw Ham
Raw ham is ham that is first treated with a salt mixture and then exposed to a natural air-curing process that dries and flavors the meat. During the air-drying process the salt draws out the moisture in the meat and the flesh absorbs the salt, preserving the meat and stopping the growth of disease causing bacterium. This air-dried curing process produces a ham that does not require cooking. Preparing the raw cured ham consists basically of slicing it into paper thin pieces before serving and allowing the slices to sit at room temperature for 10 to 15 minutes. This allows it to develop its full flavor before it is eaten. Examples of raw ham varieties are prosciutto, Jamon Serrano, Ardennes, Black Forest, and Westphalian. |


