|
Construction | Handles | Blade Material | Cutting Edges | Knife Varieties
Choosing the Right Knife | Maintaining and Storing | Sharpening
To choose a knife that is of good quality and best fits your needs, you need a basic knowledge of the various parts and construction of a knife. It is also beneficial to be familiar with the varieties of knives that are available. The information below should be helpful in selecting and maintaining your knives.
Knife Construction
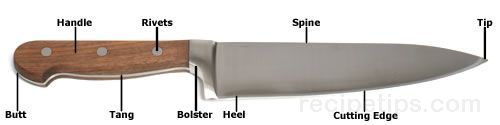
Parts of a Knife
|
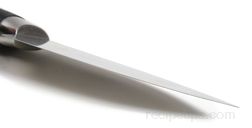
Tip
 |
The tip of the knife is at the opposite end of the handle and is pointed, sharp and fairly thin. It is typically pointed but there are some knives with ends that are cut off straight, rounded or at a slant. The tip is used for cutting small items, cutting food into thin strips, and carving. It is also used for making incisions, such as would be used when making a slit in the side of pork chops or chicken breasts where stuffing would be added. |
|
Cutting Edge
 |
The cutting edge is the bottom edge of the blade that runs from the heel to the tip of the blade. It is very sharp and can be straight cut or serrated. The cutting edge is used to slice, cut or chop food items both large and small, with the middle of the blade being used most often.
The blade edges are available with different grinds, which have different purposes. See Blade Cutting Edges for the different grinds that are available. |
|
Spine or Back
|
The spine is the edge opposite the cutting edge on the blade. It is thicker than the cutting edge and adds strength to the blade. It has a smooth, blunt edge to allow the user to grip it with thumb and forefinger or to be able to apply pressure with fingers or the palm of a hand to add control to the task being performed. |
|
Heel
 |
The heel is approximately the last two inches of the blade's cutting edge at the opposite end from the tip. It is used for cutting thick or coarse items that require extra pressure or strength. It assists in making faster more efficient cuts when the task calls for it. |
|
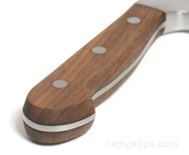
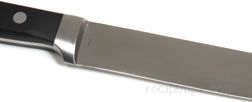
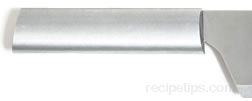
Bolster
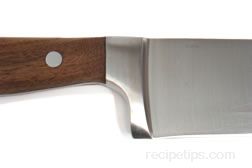 |
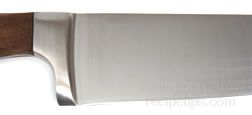
A bolster is a thick piece of metal (collar or shank) that is at the end of the blade, just before the handle. It generally runs the full length from the spine of the blade down to the cutting edge. The bolster, along with the tang, gives the knife balance, which provides for better control of the knife when cutting. It also provides a place for fingers to be placed for comfort and also provides protection from the blade. The bolster is an indication that the blade was formed using the forged process rather than being stamped. |
|
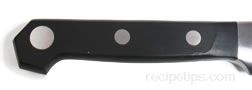
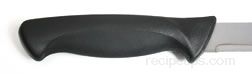
Handle
|
The handle is the part of the knife that holds the blade. The tang of the blade extends down in the handle to attach the blade to the handle. The tang is riveted into the handle or is sometimes enclosed in a plastic or metal handle. It is important to get a good feel of the handle before purchasing a knife to be sure it fits your hand properly. If it is too big or small, it can result in inefficient use and can cause tired and aching hands. |
|
Tang
|
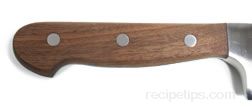
The tang is the part of the knife blade that extends into the handle. The better quality knives have a full tang that runs the entire length of the handle. It is sandwiched in between the outside layers of the handle and generally contains several holes where it is riveted to the handle for durability. The tang takes the same shape as the handle and can generally be seen on both edges. A full tang is best for adding strength and balance to the knife but there are also some good quality knives whose tang only runs part way into the handle. Molded handles contain a pointed rat tail tang, which is a long narrow shaft that is completely contained in the handle with which it forms a bond. This type of tang adds balance and strength to the knife but also provides for a little lighter weight knife. |
|
Butt
|
The butt end of the knife is at the opposite end of the tip. If the knife has a full tang it is where the tang ends. Sometimes the butt of the knife is used to tenderize or grind ingredients so it is important that the butt is of stable construction. |
Metal Rivets
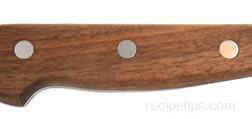 |
Metal rivets are used to secure the tang to the handle of the knife. To prevent irritation to the hand, the rivets should be completely smooth and lie flush with the surface of the handle. In addition, this will help prevent debris and microorganisms from collecting in the spaces between the handle and the rivets. |
Blade Manufacturing
There are basically two methods that are used to manufacture blades. The blades are either forged or stamped. It is felt that the forging process produces a better quality blade. The two processes are explained below.
|
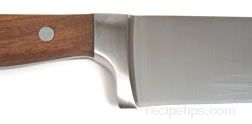
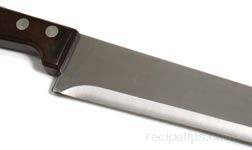
Forged Knife Blades
|
In manufacturing a forged blade, a hot piece of steel is pressed into a blade mold and then hammered into shape. The blade goes through different processes that enhance its flexibility and hardness. The blade is machined into shape, which typically includes a bolster. The forged blade is generally thicker than a blade that has been stamped. The thickness of the blade and the bolster of the forged blade add strength and balance to the knife. Not all forged blades have a bolster but generally a forged blade can be recognized by the presents of a bolster. Forged blades create better quality knives and are more expensive than stamped blade knives. |
|
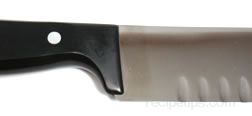
Stamped Knife Blades
|
In manufacturing a stamped blade, the blade is cut out of a flat sheet of steel. The blade is then ground, tempered, polished and sharpened. Stamped blades are thinner and flatter than forged blades and will have a tendency to make the knife handle feel heavy and off balance. They are easier to sharpen than forged blades and easy to recognize because they do not have a bolster. A knife with a forged blade is thought to be better quality than a knife with a stamped blade but there are also some good quality knives with stamped blades. A stamped blade knife will generally be less expensive than a forged blade knife. |
Knife Blade Materials
The material a knife blade is made from will affect the durability and maintenance of the knife. Factors to consider when determining if the blade material will suit your needs are how the knife will be used, how easy it is to sharpen, how well it keeps a sharp edge, and how susceptible is it to corrosion. The information below should help in understanding the qualities of the most common blade materials available.
High-Carbon Steel - Carbon Steel has been used in the making of blades for many years. Carbon steel blades are tough, can be very sharp, retain their sharp edge fairly well, and sharpen with little effort. They have a tendency to be brittle and can break under stress. Carbon steel blades discolor when they come in contact with foods that are high in acid, such as tomatoes and citrus fruit. The discoloration does not affect the quality of the knife. With proper care, discoloration and rusting of the blade can be avoided and it can be treated if it does occur. Wash and dry thoroughly after use. If the blade rusts, scour to remove rust and continue to use. A light polishing with fine grit steel wool or sandpaper can also be used to remove the stains and rust from the blade.
| Tip: When storing knives with carbon steel blades, lightly coat the blades with flavor free vegetable oil to help prevent discoloration and rust. |
High-Carbon Stainless Steel - A combination of the best attributes of carbon steel and stainless steel blades. They contain enough carbon to give them the toughness and ability to hold an edge, although not quite as well as high-carbons steel, and they contain enough chromium to make them stain and rust resistant, although they can discolor or rust under extreme conditions. High-carbon stainless steel blades are slightly harder to sharpen than high-carbon steel but they have become the most popular blade material used for high quality kitchen knives.
Stainless Steel - Unlike high-carbon steel, stainless steel blades are highly resistant to discoloring or rusting, but if not cared for properly, they can stain. If over exposed to salt water, hard water, or acidic material such as, lemon juice or vinegar, it may discolor or rust. Dry thoroughly after washing to prevent discoloring and if the knife does discolor or rust, clean with a stainless steel cleaner or a light abrasive powder. Although the stainless steel blades have the ability to hold a sharp edge slightly longer, the stainless steel is so hard that it cannot be produced with as sharp an edge as high-carbon steel. When they dull, they are much harder to sharpen than the high-carbon steel.
Titanium - Titanium blades are made from a mold of titanium and carbides. The carbides allow the blade to be heat treated, which produces a very strong and durable blade. When compared to steel, titanium is lighter, more wear resistant, corrosion resistant, holds its edge longer, and is fairly easy to sharpen. The titanium blade is more flexible than steel, making them a good choice for tasks such as boning and filleting. Beware that titanium coated or edged knife blades will not have the same qualities as knives that have blades made totally of titanium. The titanium coating on the cutting edge of the blade will be lost after sharpening several times.
Ceramic - Ceramic blades are made of zirconium oxide and aluminum oxide. Zirconium oxide is the second hardest material available next to diamonds. It is very hard but is also brittle and can chip or break. The edge of a ceramic blade is much thinner than steel, which makes cutting through items much easier. Because the ceramic blades are brittle they must be used with caution. They should be used for slicing rather than chopping. Although they are much more brittle than steel knives, they tend to hold their edge up to 10 times longer. Once the blades have dulled, they must be sharpened by a professional with a diamond sharpener.
Plastic - Plastic blades are used with the primary goal of preventing vegetables and such from becoming discolored from the blade of a knife. Plastic blades generally serrated and are not very sharp, requiring some force when cutting.
|
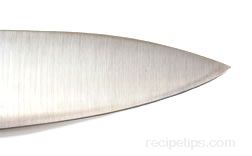
Hollow Ground
|
Knife blades with a concave beveled edge created by starting midway or lower from the top of the blade and grinding or tapering each side of the blade thinner toward the bottom or cutting edge by grinding an inward curvature. As the blade is ground the slight curve (concave) grind creates the "hollow" area referenced in the name of the blade edge. Produced with either a fluted pattern or a beveled pattern, a hollow grind provides a very thin and exceptionally sharp edge that can be easily sharpened when necessary. It is a type of blade that is excellent for slicing due to the sharp edge, but not for chopping activities since the higher impact of the chopping action dulls or may chip the thinner blade. |
|
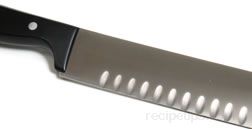
Hollow Edge
|
A term used to describe a knife blade that most often contains evenly spaced vertical indentations or "hollows" that have been ground out of the thickness of the steel blade. Often confused with the term "hollow ground blade," which references more of a tapered grind with a thinner cutting edge running the entire length of the blade, the hollow-edged blade is quite different with its evenly spaced indentations running the length of the blade. The hollow edge blade is also known as a Granton blade. A Santoku knife is an example of one type of utensil that is commonly produced with a hollow edge or Granton edge by many knife manufacturers. The purpose of the hollow edge or Granton-style blade is to assist with keeping particles from sticking to the knife edge as it chops small bits of food. It is also a friction reducer to provide less drag when chopping, which enables easier and faster motion. |
|
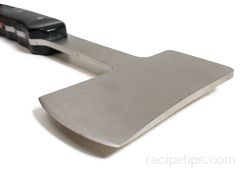
Convex Ground Blade
|
The opposite of a hollow-ground blade, this type of knife blade rounds outward instead of inward such as a hollow grind. Commonly used for larger blades such as cleavers and axes, the Convex Grind provides a rounded cutting surface on the bottom cutting edge of the blade rather than a straight edge or a flat grind. It is similar to the flat ground "V" cut except rounded rather than straight or flat ground. Durable in structure, the Convex Ground Blade can be used for chopping and cutting activities required for thicker textured items such as meats, bones, and fibrous foods. |
|
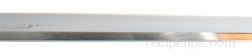
Taper Ground
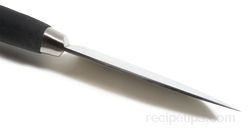
Thicker at Spin Edge
Tapers to a Thinner Cutting Edge
|
The blade of a knife that decreases in size from the handle to the tip and from the spine to the cutting edge. The blade is manufactured from a single sheet of metal and has been ground on one side or two sides of the surface so that it tapers smoothly from the spine to the cutting edge without creating a bevel. Often referred to as a fully tapered blade when ground from top to bottom, the taper grind can also be produced as a partially tapered grind. The partially tapered grind starts midway down the blade and extends to the cutting edge, becoming more like a flat grind or flat ground blade. Unlike the hollow ground blade that has a either a beveled or fluted edge, the taper ground blade is a more stable knife blade due to the rigid structure of a finely tapered, sheet of metal. Thus, the taper ground blade is made to withstand more cutting action as it cuts cleanly through a variety of foods and food textures when slicing or chopping. |
|
Flat Ground
|
The type of blade with a straight "V" cut ground into the steel edge. Varying in depth, the flat ground blade can be made with only a very slight "V" cut or a longer cut that tapers slightly from higher up on the blade and extends downward toward the cutting edge. Knives with a flat grind can be used for cutting as well as chopping activities since the blade is generally very stable. |
|
Chisel Ground
Angle Ground Side
Flat Surface Side - Not Ground
|
This type of blade has a grind that is made on only one side of the blade, which creates an edge that looks like the blade of a chisel and thus the origin of its name. While one side of the blade remains flat surfaced, the other side of the chisel ground blade is cut at an angle. When the blade is viewed from the tip back, it looks like half of a "V" ground blade. Most often used for making blades of chisels, axes, and swords, this grind is also used on some knives but it is not as common as the flat grind or "V" grind. |
|
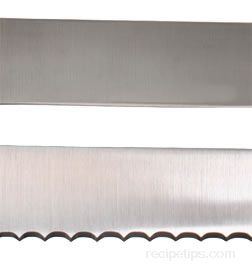
Straight Edge
|
A knife blade that is straight along the cutting edge or straight and slightly curved. In contrast, blades that contain serrations such as serrated blades or indentations such as hollow edge blades are not considered to be straight-edged blades. Blade edges, such as hollow ground, taper ground, flat ground, convex ground, and chisel ground blades are all considered straight edge blades. Blades with a straight edge are best for cutting foods that are either soft or firm, such as fruits, vegetables and meats. |
|
Serrated Edge

Pointed Serrated Edge
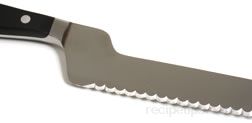
Rounded Serrated Edge
|
A sharp-edged blade with saw-like notches or teeth formed on the cutting edge of the blade that enable it to slice cleanly through foods without damaging delicate or soft textures, such as bread or pie crusts. Serrated edge knives can be found with pointed teeth or rounded teeth on the cutting edge. The rounded serrated edge knife is sometimes referred to as scalloped or wavy. The rounded serrated edge is a little less abrasive than the serrated edge with pointed teeth, but may not work as well when cutting through the top crust of certain breads. It may have a tendency to slip when first cutting through the crust. The serrated cutting edge works well for slicing bread, soft fruits (peaches), soft vegetables (tomatoes), and food dishes such as pies, quiches, sandwiches, and pizza. Some knives made for specific functions will have serrations on both edges of the blade such as double-sided serrated blades formed into grapefruit knives that are used to section fruits and vegetables.
Serrated blades require less maintenance for sharpening than straight-edged blades however, they do become dull after long periods of use. The serrated edges are harder to sharpen typically need to be sharpened by a professional. Therefore, to lengthen the life of the blade, wash serrated knives by hand so that dishwater detergent, which is harmful to the sharp edge of the blade, does not affect the quality of the cutting edge. |
|
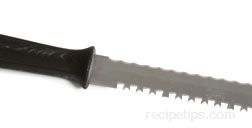
Saw and Raker
|
Blades built to handle hardened objects such as frozen foods. They are formed with an alternating blade construction containing sets of double-toothed blade extensions separated by curved and serrated blade surfaces. Made from a rigid steel, a saw and raker blade can withstand very cold temperatures and the heavier than normal cutting pressure required to cut through ice hard substances, such as frozen foods. The forward and backward motion required for cutting hardened objects will cause flexible blades to bend or quiver which is eliminated by using a rigid, saw and raker type blade, since the raker helps to keep the blade in the track created by the cutting edge. |
Knife Handle Materials
Knife handles are generally made of wood, plastic, metal or a combination of wood and plastic. Some pros and cons of different types of handle materials are shown below.
|
Wood Handle
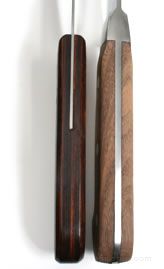
Hardwoods with tight grains are best for making wood handles. Rosewood, Brazilian Ironwood, and Ebony are woods that work well for making knife handles. Wood handles provide an excellent grip, but requires more maintenance than a plastic or stainless steel handle. It is thought that wood handled knives absorb microorganisms and are not as sanitary as knives with handles made of other materials.
| Tip: Never allow wood handled knives to soak in water and rub the wood occasionally with mineral oil. | |
|
Wood Handles Infused with Plastic
A combination of the best attributes of wood handles and molded plastic handles. They have an excellent grip but do not require the maintenance all wood handles require. They are also not as porous as wood handled knives, preventing the absorption of microorganisms. |
|
Molded Plastic or Composition
Molded plastic handles are much easier to care for than wooden handles. They will not absorb debris and microorganisms and are easily cleaned. It is argued that handles made with molded plastics become brittle over time, causing them to break and that they can become slippery if hands are wet, making them harder to handle. |
|
Stainless Steel
Metal handled knives last longer and add weight to the knife. There are arguments made that stainless steel handles are slippery if hands become damp, making them harder to handle. As with the plastic handles, stainless steel will not absorb debris and microorganisms and are easily cleaned. |
Knife Varieties
The following descriptions and images of different varieties of knives are general examples only. Although the basics of each knife style is the same, different manufacturers have different design variations for each type of knife.
Bird's Beak Knife | Boning Knife | Butter Knife | Ceramic Knife
Cheese Knife | Chef's Knife | Chestnut Knife | Clam Knife | Cleaver Knife | Deli Knife
Devein Knife | Filet Knife | Frozen Food Knife | Grapefruit Knife | Mincing Knife
Oyster Knife | Paring Knife | Sandwich Knife | Santoku Knife | Sashimi Knife
Serrated Knife | Slicing/Carving Knife | Steak Knife | Tomato Knife | Utility Knife
|
Bird's Beak Knife (Tourne Knife)
Considered to be a type of utility knife that is used for many of the same tasks as the traditional paring knife. The bird's beak knife, which is also known as a "tournée" knife, has a shorter blade than a paring knife with a blade that is typically 2 to 3 inch long. It is designed to curve upward on both the cutting edge and the top edge. The bird's beak knife is commonly used to make a type of cut referred to as the tournée cut in vegetables such as carrots, potatoes or squash. This cut is performed for purposes of food presentation. This cut is also known as a tourne or tourné cut.
Bird's beak knives may also be used to slice soft fruits such as nectarines, plums or peaches and for peeling skins or blemishes from a variety of fruits and vegetables. It is a knife that is also used for cutting decorative garnishes such as rosettes in radishes or fluted mushrooms. |
|
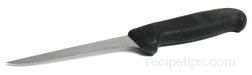
Boning Knife
|
A knife with a thin short blade, typically 5 or 6 inches long, used to remove the main bone within a cut of meat, such as a ham or a beef roast. A boning knife will typically have a long narrow blade for ease of manipulation around bones. The blade is rigid and proportioned to the size of the bones being removed. Bigger cuts of meat require a larger more rigid blade that is not too flexible to prevent injury from the blade bending too easily. Smaller meat cuts can be trimmed and boned using a smaller less rigid blade. |
|
Butter Knife
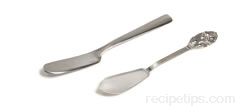 |
A small knife with a blunt edge blade that is used to apply spreads, such as butter, peanut butter, and cream cheese, on bread or dinner rolls. Butter knives will generally be the same pattern as the flatware set they come with but there are also many individual butter knives available with patterns that range from very plain to very ornate. |
|
Ceramic Knife
A knife with a blade made from zirconium oxide, also referred to as ceramic zirconia, a very durable and hard substance that is only slightly softer than the hardness of diamonds. With a blade harder than steel, knives made from industrial ceramic do not easily dull and will maintain an exceptionally sharp edge before being required to be sharpened. Industrial ceramic, which is made by heating the base materials to exceptionally high temperatures, results in a substance that has a high degree of purity. This eliminates most of the impurities that make ceramic materials brittle.
Ceramic knives are excellent for slicing through a variety of foods, making thin slices an easy task, however, use on harder materials, such as bones and hard textured foods may result in chipped or broken blades. This is due to the hard and rigid blade materials of the ceramic blades that are not as flexible as more common metals. Also, if the blade hits or is dropped accidentally on a hard tile floor, it may chip part of the blade but will not shatter it. Factory repair of the blade is an option if the blade becomes damaged. Ceramic knives will not need sharpening as often as other metal knives, but will require that the person doing the sharpening be qualified to sharpen ceramic materials. |
|
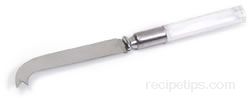
Cheese Knife
|
A kitchen utensil that is thinly shaped to cut easily through soft or hard textured cheese. Bladed cheese knives are typically manufactured with narrow-blades or short wide blades. Quite often, the narrow-bladed version will have a forked tip that is used as a lifter for pieces of cheese as they are cut. This knife may also be referred to as a forked-tip utility knife, which is used as a bar knife for cutting through citrus fruits or spearing garnishes, such as pickles, onions or maraschino cherries, for drinks as may be required.
Wider or heavier bladed knives are generally produced to accompany a cheese plate containing uncut cheese. Since cheese begins to harden as it is exposed to air, cheese is often kept whole when placed on plates or trays requiring the cheese to be cut as it is served. Shorter knives work well for this purpose, enabling the person cutting to slice through soft to firm textured cheeses. |
|
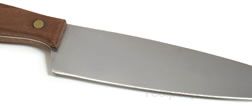
Chef's Knife
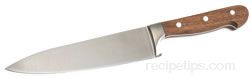
Traditional Chef's Knife |
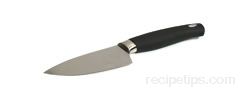
Mini Chef's Knife |
Also called a cook's knife, this knife is an all purpose kitchen knife that is used for most types of chopping, dicing, mincing, and slicing.
Chef's knives come in various lengths of 6, 8, 10, and 12 inches. The smaller sized knives are typically referred to as mini chef's knives while the longer lengths are known as traditional chef's knives. The heft, weight and balance of this knife allow it to be used for heavy duty work with thicker cuts of vegetables, fruits and meats. The length of the knife you purchase is significant. The longer the knife, the heavier and more difficult it will be to handle. Small handed cooks should choose shorter blades while large handed cooks will prefer longer blades. |
|
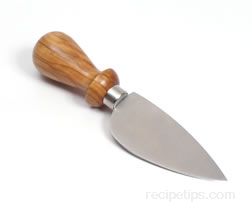
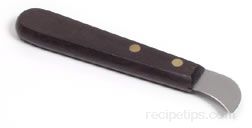
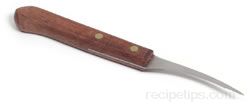
Chestnut Knife
|
A kitchen utensil that is used to score the chestnut prior to roasting. By carving a line, a cross or an "X" into the shell of the unroasted nut, it allows it to breathe during roasting and to resist exploding as the steam builds up. The chestnut knife is short shafted in order to keep the cut confined to the shell without going too deeply to pierce the inner skin.
After the chestnuts are done roasting, the knife can then be used to open the shell to remove the meat. To remove the nut, make a single score/cut fully around the middle of the shell. The nut may stick to the skin, but should be adequately separated to remove the nut easily. |
|
Clam Knife
 |
A kitchen utensil that is used to pry open the hard shell of a clam or an oyster in order to remove the meat. Typically, the knife will have a beveled edged blade that can be inserted into the tightly closed shell, twisting the blade to pry the shell apart. The sharp edge of the knife is used to cut the clam muscles from the shell. Some knives will have a notch in the blade, which is used to keep the shell open to remove the meat. |
|
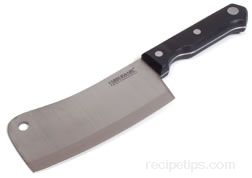
Cleaver
|
A knife with a wide rigid blade that is approximately 6 inches in length and tapers to a sharp cutting edge. This tool is used to chop, shred, pound, or crush food ingredients and materials. The blade of the cleaver is thick, somewhat heavy and well balanced with a beveled cutting edge. The beveled blade allows for ease of chopping through vegetables or hard materials, such as bones. The flat blunt side of the blade can be used to pulverize meat. If the handle is flat on the end it may be used to crush seeds, garlic or other similar ingredients. A hole is typically provided on the top end of the blade to allow for ease of hanging this tool when storing. |
|
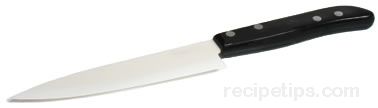
Deli Knife
Designed for thick sandwiches, this knife is made to cut easily and quickly through a variety of sandwich ingredients. The deli knife is manufactured with a carbon steel, offset blade allowing for ease of slicing and handling. The offset blade keeps the hand holding the knife, up and away from cutting boards or counters as the blade is pushed downward through thicker than average sandwiches. The offset makes the knife handling easier to control and better positioned as the full length of the blade can be positioned so it is horizontally parallel with the cutting surface.
Deli knives are available in several different lengths, the most common being 8 inches. Since the blade contains rounded serration, it easily releases resistance as it cuts through foods, resulting in less food being pulled out and away from the thicker, deli-style sandwiches.
|
|
Devein Knife
|
A kitchen utensil that is used to remove the large vein that runs down the length of a shrimp. A fork can be inserted in the back of the shrimp to pull out the vein or a deveining knife can be used to cut a slit down the length of the shrimp. This tool is inserted at one end of the shrimp and then pushed up through the entire body to remove the vein and the shell at the same time. |
|
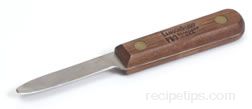
Filet Knife
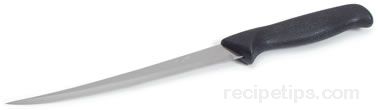
A knife consisting of a thin flexible blade, typically 6 to 11 inches long, used for filleting fish. The narrow blade enables the knife to cleanly move along the backbones of the fish, in and around areas adjacent to bones, and to evenly slice along the skin, removing it easily from the flesh. |
|
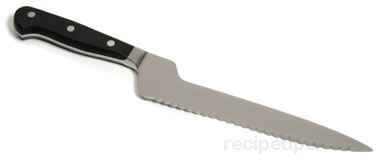
Frozen Food
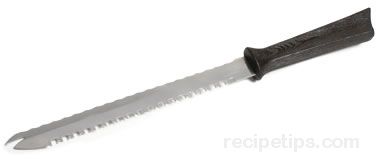
Built to cut through hard to semi-hard substances, this utensil is manufactured for specialty tasks. A common cutting blade used for this type of knife is the saw-and-racker tooth which may be called a saw- toothed blade or a coarse saw tooth blade. A saw-toothed blade has tiny but coarse teeth that are closely aligned and formed to cut through materials such as metal surfaces.
Typically, the Frozen Food Knife blade is made of a rigid steel that can withstand very cold temperatures and the heavier than normal cutting pressure required to cut through ice hard substances, such as frozen foods. Simple tasks such as cutting apart a small carton of frozen peas can be easily accomplished with this knife or harder tasks of cutting larger blocks of frozen vegetables and breads can be undertaken with a knife built to cut frozen foods. |
|
Grapefruit Knife
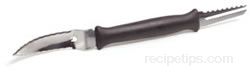
A kitchen utensil that is made for ease of cutting the meat of the fruit away from the grapefruit skin when preparing a half grapefruit for serving. There are several varieties of this tool available, either single or double bladed, each containing at least one serrated blade. The dual bladed knives have serrated blades on each end of the handle. The curved blade on one end is used for cutting the meat away from the outer skin.
The second blade may consist of two closely aligned parallel blades or one blade with a slit in the center, each used to cut between the linings that separate the inner meat into sections. The grapefruit knife effectively separates the meat sections of grapefruits better than the average kitchen knife. |
Lettuce Knife
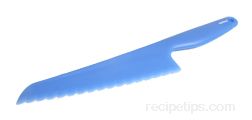 |
A plastic serrated edge knife that is designed to slice lettuce without causing the edges of the lettuce to turn brown. When cutting lettuce with a metal knife, the edges of the lettuce will turn a light rusty brown after it is stored for a short time. The plastic lettuce knife is efficient at slicing the lettuce and eliminates the edges from turning brown. |
|
Mincing Knife
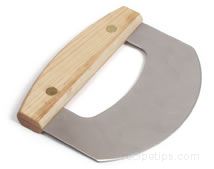
Single Bladed Mincing Knife
|
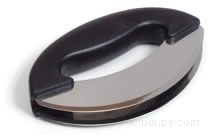
Double Bladed Mincing Knife |
A knife that can be used to mince or cut food into smaller bits for seasoning sauces, soups, salads, and other dishes. Mincing knives can be either single or double bladed to cut a variety of foods into very small pieces. A mincing knife is also referred to as a Mezzaluna, Mezzaluna chopper or Mezzaluna knife. Another version of a mincing tool is the rolling mincer or rotary mincer. This utensil consists of numerous circular blades, close together mounted on a handle, enabling the user to roll the tool back and forth over the herb as the blades do the mincing. |
|
Oyster Knife
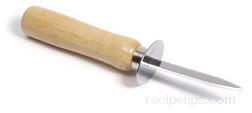
|
A kitchen utensil that is used to pry open the hard shell of an oyster or clam in order to remove the meat. Typically, the knife will have a short, very strong, sharp, beveled blade that is inserted into the tightly closed shell and twisted to pry the shell apart. The blade is then used to cut through the muscle and oyster membrane. A round shield is built into the handle in order to protect the hand from the sharp edges of the shell if the hand would slip while trying t pry open the shell. It also serves as a spot to place the thumb for a firmer grip when holding both the oyster and the knife. |
|
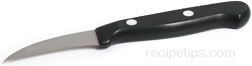
Paring Knife
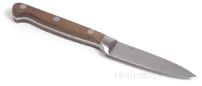
|
Traditionally, this utensil is a small knife with a straight, sharp blade that is generally three to five inches long. Its thin, narrow blade is tapers to a point at the tip. It is easy to handle and works well for peeling and coring foods or mincing and cutting small items. Working with small bits of food or small ingredients, such as shallots, garlic or fresh herbs, can easily be accomplished with this knife. |
|
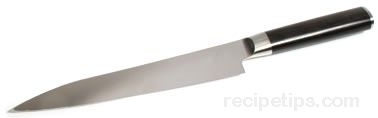
Roast Beef Knife
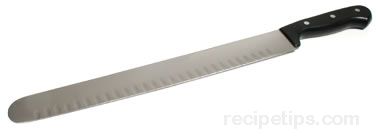
A knife with a long slender blade that is used for cutting thin slices of meat from roast beef, roast pork and ham. The knife has a long blade so it can easily cut across a large roast. The roast beef knife is available in different lengths, such as 10", 12" and 14" blades. They are also available with different blade edges. They can be found with a straight edge, wavy edge, or hollow edge. They are designed so that the meat will cut smoothly and not be torn as it is being sliced. |
|
Sandwich Knife
A sharp-bladed kitchen utensil used to slice through a medium amount of food ingredients "sandwiched" between two slices of bread. Similar in use to a deli knife, the sandwich knife is shorter in length with a shorter blade depth in order to easily cut through smaller to medium-sized sandwiches. Sandwich knives will typically be made from stainless steel with a serrated blade that works best for slicing bread, soft fruits, soft vegetables, and food dishes such as pies, quiches, and sandwiches. Available in sizes from 6 to 12 inches, the sandwich knife is designed to handle small to medium-sized sandwiches with the small to medium blade sizes and larger sandwiches with the larger blade sizes. |
|
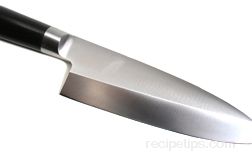
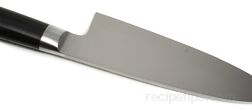
Santoku Knife
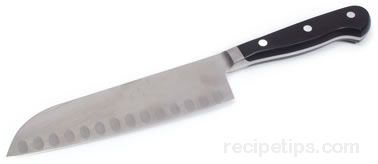
A type of knife commonly used to prepare ingredients for Asian food dishes. This knife is very similar to a chef's knife with a wide blade that has a long straight edge curving up slightly at the end. The main difference is that the santoku knife has a wider blade that is thinner in thickness, shorter in length, and curves up very gradually at the end providing a straighter cutting edge. Constructed of high-carbon stainless steel, stainless steel, ceramic, or titanium, this knife will typically be expensive to purchase, since it is precision made to be well balanced and well formed for ease of handling and greater control. With a thinner blade than a chef's knife, the santoku can cut smoothly and more precisely through dense vegetables, which may have a tendency to provide more resistance when using thicker width blades.
Versions of this knife are manufactured with either a standard-edged blade or a hollow ground edge, also known as a granton edge. The purpose of the granton style blade is to assist with keeping particles from sticking to the knife edge as it chops small bits of food as well as a friction reducer to provide less drag when chopping, which enables easier and faster motion. Santoku knives are used for chopping, dicing, and slicing foods into narrow or fine pieces so they can be added as ingredients to enhance the look or flavors of the various foods being prepared. This knife also works well for butterflying boneless chicken breasts, providing a manageability and ease of handling for the cutting required to butterfly poultry. |
|
Sashimi Knife
A traditional Japanese knife used for preparing a variety of foods quickly and with ease. Exceptionally sharp-edged, the Sashimi knife typically has a hollow-ground blade that is 16 to 18 inches in length. The sharp cutting edge on the Sashimi knife is very thin, providing a blade that can be easily sharpened. Excellent for slicing but not for chopping, the blade of the Sashimi knife is generally not made for the higher impact of the chopping action that dulls or may chip the blade on this type of knife. Slicing or dicing vegetables, fruits, meats and fish are common tasks handled well with this type of knife. |
|
Serrated Knife
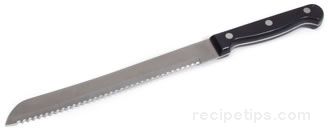
A knife with a sharp edge that has saw-like notches or teeth. The blade of a serrated knife is 5 to 10 inches long. Serrated knives are difficult to sharpen; therefore many chefs spend less on a serrated knife and buy new more often.
A serrated knife with a long blade is used to slice through food that is hard on the outside and soft on the inside, such as slicing through the hard crusts of bread. A serrated knife with a short, thin blade is intended for slicing fruits and vegetables. |
|
Slicing / Carving Knife
A knife used to cut slices of cooked or smoked meat, poultry and fish. There are many varieties of slicing knives, which vary in blade width, blade length, flexibility, pointed to rounded tips, and type of cutting edge. The construction of the knife depends on its use. Frequently the terms slicing knife and carving knife are used interchangeably, but the carving knife is actually a variety of slicing knife. Some common slicing knives are shown below.
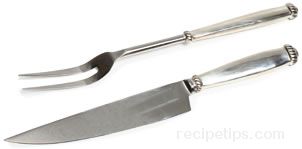
Carving Knife - Generally made of a fairly thin blade that is at least 8 inches long and has little flexibility. The blade has a pointed tip designed to aid in cutting meat away from the bone. The carving knife works well to slice hot meats such as roast beef and roast pork. Often the carving knife comes with a carving fork that is used to anchor the meat while carving.
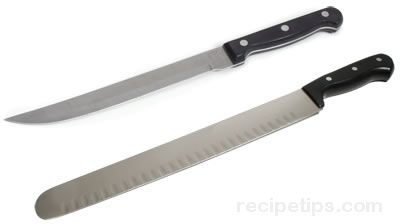
Meat and Fish Slicers - Knives designed for slicing meat, such as poultry, ham, and fish. They have a long narrow blade that is more flexible than a carving knife and generally at least 10 inches long so it will reach across a large ham or roast. They will range in flexibility depending on the type of meat being cut. A slicer used for ham and fish would have a more flexible blade than a knife used for slicing poultry. The slicer can have a pointed tip, used to cut in around a bone or it can have a rounded tip for slicing boneless meat or fish.
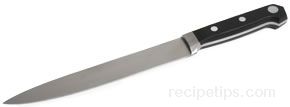
General Purpose Slicer - Includes various types and sizes of slicers. They range from 6 to 9 inches in length and their size makes them easy to handle for cutting and slicing smaller cuts of meat. A general purpose slicer can also be used to slice some fruits and vegetables.
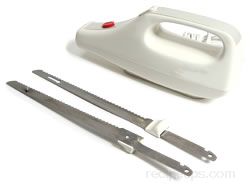
Electric Knife - There are also electric knives available, which are used for slicing, carving and cutting. The electric knife consists of two very sharp, thin blades that move independently in a back and forth motion to slice or carve through many different types of food. |
|
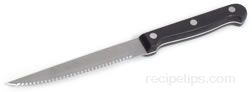
Steak Knife
|
A knife used for cutting main courses such as steak and chicken. The knife usually has a blade that is 4 to 6 inches long and varies in thickness. Depending on the manufacturer, the blade may or may not be serrated. Since serrated knives cannot be sharpened, they require less sharpening maintenance than the straight-edged blade, but eventually the serrated edge becomes dull and requires replacement. To lengthen the life of the serrated blade, do not wash the in the dishwasher. The dishwasher detergent will dull the blade. |
|
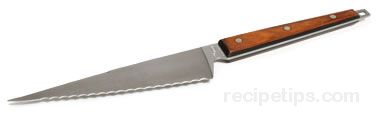
Tomato Knife
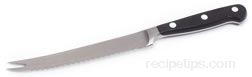 |
A serrated edged knife used to slice food that has a tough exterior and a softer middle, such as tomatoes or salami. This knife is similar to a bread knife only smaller. It is used for tasks that a bread knife would be too large and awkward to use. |
|
Utility Knife
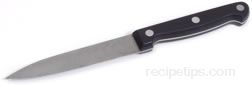
A small lightweight knife used for miscellaneous light cutting. It has a blade that is 4 to 7 inches long, which is slightly larger than a paring knife. This utensil can cut food items that are too large for a paring knife but too small for a chef's knife, such as cucumbers, larger apples, smaller squash, and other mid-sized items. Similar to the paring knife, this knife works well for herbs, shallots, fruits, vegetables, and larger pieces of garlic.
Utility knives are available with a straight-edge blade or a serrated blade. Serrated blades will typically require fewer sharpenings than straight-edged blades. However, they do become dull over time, so it is best to hand wash the blade to eliminate harsh dishwasher detergents from dulling the blade. |
Choosing the Right Knife
There are several things to consider when you are going to purchase knives, such as price, functionality, maintenance, and comfort. When purchasing knives, always purchase the best quality you can afford. Good quality knives will make the task of using them more efficient and they will last much longer than less expensive knives. When choosing knives, consider the tips below to ensure that you purchase the right knife for you.
Tips for Choosing the Right Knife:
- Purchase individual knives rather than selecting a set. If you do select a set, consider what types of knives are included because many times sets will include some knives that you will not use often. It may be hard to find a set where all the knives have the right fit for you. You may be better off purchasing fewer knives and selecting those of better quality that will fit your needs better.
- Your first set of knives should include the four following items: chef's knife, pairing knife, utility knife and a serrated/bread knife. These knives should take care of most of the basic cutting task. Add more specialized knives as your budget allows.
- Before purchasing a knife, be sure to understand its features to ensure it will perform the tasks desired.
- Be sure to pick up the knife and see how it feels in your hand. It should be comfortable to grasp and it should feel balanced. Be sure it is well weighted. A heavy knife will require less effort when slicing and chopping.
- Consider the type of blade and blade edge the knife has and the care and maintenance involved. Some blades will need sharpening more often than others and some will need professional sharpening because of the type of blade edge they have. See Knife Blades and Blade Cutting Edges.
Maintaining and Storing Knives
- To extend the lifetime of your knives, wash them by hand. Knives that are washed in the dishwasher are exposed to harsh detergents, which will dull the cutting edge and they are exposed to intense and varied temperatures that can affect the temper of the steel. Damage is also likely to occur to the sharp edge of a knife if allowed to be knocked around by other items in a dishwasher.
- Wipe knives clean immediately after use to prevent the discoloration of the blade. This practice will also help to prevent foods from hardening onto the blade, allowing for easier cleaning.
- When washing in a sink of warm soapy water, do not place the knife in the sink with other items. This will avoid injury to the person washing the knife and it will avoid damage to the blade from the other items. Do not allow the knife to soak in the water. This will prevent damage to the blade and handle. Wash and dry immediately.
| Tip: Safely clean knives by laying the blade on a flat surface and wipe one side with a wet cloth, then turn and wipe the other side. Always use hot, soapy water to clean a knife that has been used to cut poultry, meat, or fish. |
- If available, store knives in a wooden or polyethylene knife block. If one is not available, store knives in a sheath or, at a minimum, store the knives away from other utensils to prevent damage to the sharp edges.
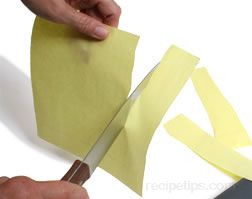
- Make sure knives are kept sharp. A dull knife requires more effort when using and the more effort that is used, the more chance the blade can slip and cause injury. To test the sharpness of a blade, pull the blade lightly over a tomato. The blade should make a clean cut through the skin with little effort. Another method of testing the sharpness of a blade is to take a sheet of paper and try to cut strips from it by slicing with the knife. The knife should cut smoothly through the paper without resistance.
- Use a wood or polyethylene cutting board. Wood and polyethylene cutting boards create less resistance to the knife edge than ceramic, metal, or plastic cutting boards.
| Tip: To prevent contamination, wash cutting boards with hot soapy water immediately after use. Periodically, cutting boards should be sanitized by spraying the surface with a solution of bleach and water, letting it stand for a short time, then wiping it with a clean cloth. |
Sharpening Knives
Tools for Sharpening Knives
|
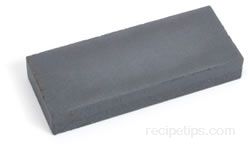
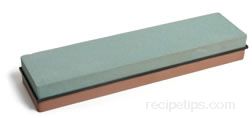
Sharpening Stone
|
A finishing tool that is used to sharpen steel blades of knives and cutting utensils. Most often rectangular in shape, the sharpening stone may be 1/2 to several inches in thickness. There are several different varieties available that are made of a variety of natural and man-made materials. They are available in coarse, medium and fine grit. The coarser the grit the more steel is removed when sharpening. Some stones are available that are double-sided with a coarse grit on one side and a finer grit on the other side. This allows only having to have one stone for sharpening knives. Most stones are used with oil or water to aid in sharpening. The lubricant helps remove the swarf (metal dust), which is created when sharpening the blade edge, from the pores of the stone. Most stones can also be used without the lubricant if desired. |
|
Sharpening Steel
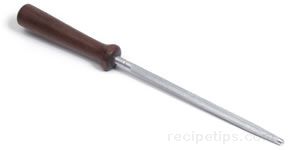
A tool generally made of steel, which is used to realign the knife's edge in-between sharpenings. Often the knife's edge will bend or roll slightly from normal use. Running it across the steel will straighten the edge and the knife will be sharp again. It is also used after a knife is sharpened on a stone to remove the debris and any irregularities that may be left on the blade edge. The tool can also be glass, ceramic, or diamond-impregnated metal. |
|
V-Shaped Knife Sharpener
|

Single Stage Sharpener
|
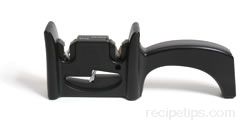
Two Stage Sharpener |
A convenient tool that can be used to sharpen a knife when a person is not comfortable with using a sharpening stone or steel. The tool's casing holds two steel rods coated with diamond abrasive or rods made from tungsten carbide that are positioned to form a V-shape that is at a 20° angle for sharpening. There are many different varieties available, which vary in how they are used. Some varieties contain two stages of sharpening. One stage is coarser and is used for the first stage of sharpening. The second stage has a finer grind for finishing the sharpening process. The knife's edge is pulled across the rods when sharpening. Four to six draws of the blade is usually sufficient to keep the blade well honed. A guard is commonly attached to the sharpener so hands are kept safely away from the knife blades. |
|
Electric Knife Sharpener

|
Electric knife sharpening units contain sharpening wheels or stones that offer a quick alternative for sharpening knives. They have a guide that holds the knife at the perfect angle for sharpening. The sharpening wheels or stones are generally made out of sapphirite, ceramic, or are diamond plated. The blade is drawn through the guided slots a couple of times and the blade is sharpened. Some models have 2 or 3 stages of sharpening. The first stage is the coarser grind and then it is finished through a finer grind and honing.
Be aware that using an electric sharpener on a knife that has a bolster will not allow you to sharpen the heel of the blade. You will not be able to run the entire blade through the sharpener without damaging the heel of the knife. If it does not have a bolster it should run through without any problems. When using an electric sharpener, be sure to pay close attention to what you are doing because the sharpener will have a tendency to grind more of the blade away than desired. |
Knife Sharpening
Most knives will need sharpening after three to five months of normal usage. In-between sharpening times the knife may need to be steeled to maintain the sharp edge on the blade. There are several methods and techniques that can be used for sharpening knives. Shown below is one method using a sharpening stone and steel.
|
Using the Sharpening Stone
To prepare the stone, a light weight lubricating oil or water is applied to assist in the sharpening of the blade. Apply to a medium grit stone or the coarser side of the stone if it is a two sided stone. The stone can also be used dry if preferred.
|
|
 |
|
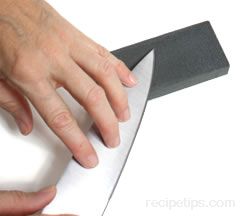
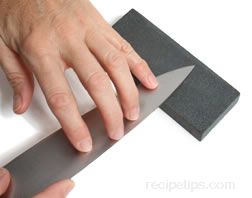
Hold the knife firmly by placing the handle in your hand with your index finger on top of the blade and your thumb on the spine. The blade should be facing away from you. Place the fingers of your other hand along the length of the blade. |
|
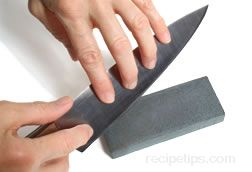 |
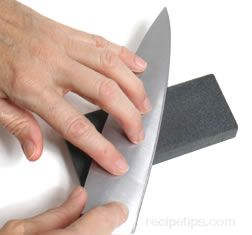
| Place the edge of the knife on the stone so it is angled at the same bevel as the edge of the knife, which should be approximately a 20° angle. The sharp edge should be facing away from you. Start at the tip and grind in a counterclockwise motion as if you are cutting a fine sliver off the surface of the stone. |
|
|
|
Continue to lightly rotate in this circular motion on the stone while gradually moving the length of the blade across the stone, keeping pressure consistent as you go. |
|
|
|
Grind until you have gone along the entire length of the blade edge. As the knife edge is being sharpened, a slight ridge will form along the edge on the side that is not being sharpened. This ridge is an indication that the blade is ready to have the other side sharpened. |
|
|
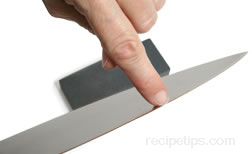
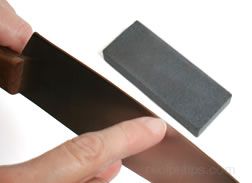
To detect the ridge, run your fingernail off the edge of the side of the blade that has not been sharpened yet and if your fingernail catches at the edge, the blade is ready to have the other side sharpened. Be sure to check for the ridge in several locations along the length of the blade to be sure the entire edge has been sharpened properly. If there is a spot that does not have the ridge, go back and sharpen that area again. |
|
|
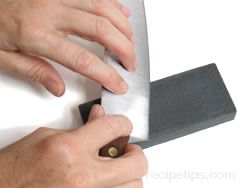
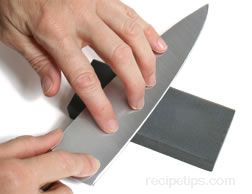
| Once the first side has been sharpened properly, turn the knife over so the blade edge is facing towards you. Hold the knife in the same manner as when sharpening the first side. Now the hand holding the handle will have the forefinger on the spine and the thumb will be on the blade. |
|
|
| Begin grinding at the tip in a counterclockwise direction in the same manner as before. Carefully apply consistent pressure as you work across the blade. |
|

|
| When you have finished grinding the second side, check again for the ridge to have been formed. If the ridge has not been formed in sections of the blade edge, continue to grind in those areas until the ridge has formed. |
|
|
| Using a fine grit stone, grind the blade edge using the same basic method used with the coarser grit stone. Make 4 or 5 counterclockwise strokes across the stone and then turn the blade over and make 4 or 5 strokes on the other side of the blade edge. Continue to alternate back and forth in this manner until the blade edge is polished and razor sharp. |
|
|
|
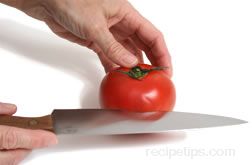
To test for sharpness, never run your finger along the edge of the blade. Instead try a couple of other test that will verify sharpness. One is to pull the blade lightly over a tomato and if the blade is sharp it should slice through the skin with little effort. |
|
|
| Another test is to hold the end of a piece of paper in one hand and try cutting strips from the other end using the newly sharpened knife. You should be able to easily cut strips from the piece of paper without snagging or tearing the paper as the knife cuts through. |
|
 |
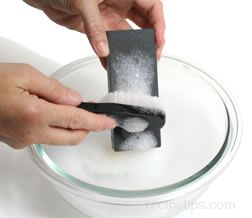
| When you are done sharpening the blade, be sure to wash the stone with hot soapy water and a brush to remove all debris from grinding. Allow the stone to dry completely before storing. |
|
|
|
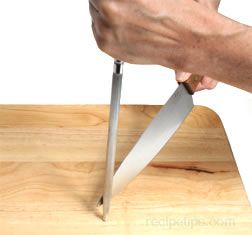
Using the Sharpening Steel
The steel is used to remove the debris left on the blade edge after sharpening. It is also used in-between sharpenings to straighten the edge of the blade, which will restore its sharpness.
|
|
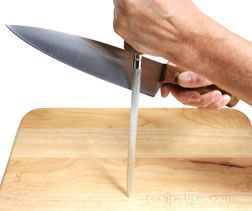
Begin by holding the steel vertically and placing its end on a cutting board, which will help protect the work area. Holding the handle of the steel firmly in one hand and the handle of the knife in the other hand, place the blade edge at an angle equal to the bevel of the sharpened edge. This should place the blade at approximately a 20° angle away from the steel.
Start with the heel of the blade at the top of the steel with the tip pointed slightly upward. |
|
|
|
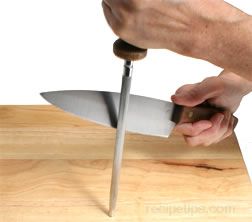
Maintaining the correct angle, use light pressure to pull the blade down the steel. As the blade moves down the steel, pull the blade back towards you so the middle of the blade is drawn over the middle of the steel. |
|
|
|
Continue to pull back and down the steel holding the blade at the proper angle with consistent pressure. The full swipe of the blade should end with the tip of the knife at the bottom of the steel. |
|
|
|
Repeat the same process on the other side of the blade. Alternating from one side to the other, make about 4 swipes on each side of the blade. This should be enough to remove any debris left from sharpening or straighten damaged edges. Clean the blade before using. |
|
 |
Remember that keeping your knives sharpened will make using them easier and more efficient. It is also safer to have a sharp knife than to have it dull when trying to use it. A dull knife often results in the blade slipping off items you are trying to cut, presenting more of a chance of causing an accidental cut. |


