


Oven Baking | Hearth Baking | Using a Bread Machine | Using a Slow Cooker
Oven Baking
|
Before the indoor electric or gas oven became a common household appliance, most bread was baked in large wood fired masonry ovens, communal ovens, or over and open fire. The large masonry ovens yielded excellent results; however, other methods, such as open fire baking, resulted in bread loaves that were inconsistent in texture, flavor, and doneness. |
Preheating the OvenIt is important to set and preheat the oven to the proper temperature as called for in the bread recipe. Most breads require a specific baking temperature that must remain constant to achieve the proper results. Many basic breads, containing only flour, water, and yeast, are baked at high temperatures, usually 400ºF and above, while breads containing enrichments, such as eggs, milk, or butter, are baked at lower temperatures. Some bread recipes call for the dough to be placed in a very hot oven for a short time and then the temperature is lowered for the remainder of the baking time. This technique simulates the cooking temperatures of old fashioned wood-fired masonry ovens in which the bread dough received an initial blast of very hot air followed by a gradual cooling after removal of the embers. | |
Baking ProcessThe heat of the oven transforms the moisture in the bread dough into steam causing the bread to rise rapidly. The yeast in the dough continues to produce carbon dioxide gas, contributing to the rising action of the baking bread. Usually within the first 10 minutes of baking, the temperature of the dough has increased to a level that kills the active yeast cells, ending the rising action. The final shape and size of the bread is set and the crust begins to form. The oven door should not be opened before this stage is completed. Further baking allows the natural sugars in the dough to caramelize, which results in the golden brown color that is characteristic of many varieties of bread. Chemical leavening agents used in quick breads cause carbon dioxide gas to form when the liquid ingredients are blended with the chemical leavening agent and other the dry ingredients. The chemical leavening agents become even more active when exposed to the heat of the oven, causing rapid rising. It is important to mix the ingredients only until just blended and place the batter or dough in the oven immediately. Over mixing and/or a delay in baking the batter or dough will allow too much carbon dioxide gas to escape, resulting in a collapsed loaf. | |
Adding Moisture While BakingThe level of moisture in the oven is an important factor in achieving proper results when baking bread. Moisture, in the form of steam, allows the bread to form a thin, golden crust while allowing the interior to remain soft and moist. It is often beneficial to add moisture to the oven either before the bread is placed in the oven or during the baking process. There are a number of methods for adding moisture to the oven.
|
Bread Baking TimesThe baking time for different breads is determined by the instructions in the recipe. This should be followed closely, but variables such as the quality of the oven, the temperature calibration, the humidity level, and altitude may affect the suggested baking time. A convection oven will reduce the baking time, but some experimentation may be required before the proper baking time can be determined when using this feature. Although there are exceptions, baking times for the majority of breads usually fall within the following ranges: | |
| Hearth breads, large country-style rounds, and breads baked on flat surfaces | 35 to 50 minutes |
| Basic breads baked in loaf pans and other containers | 45 to 60 minutes |
| Thin flat breads | 5 to 15 minutes |
| Thicker flat breads | 15 to 25 minutes |
| Quick breads | 45 to 75 minutes |
| Rolls and Buns | 15 to 20 minutes |
Checking DonenessThere are no scientific methods for determining whether or not bread has been baked to the optimum doneness. Unlike some food items, such as meat, in which a meat thermometer can be used to determine proper doneness, the doneness of bread is usually determined by the senses alone. An experienced baker can readily determine doneness even when the baking time may differ from day to day due to temperature and humidity factors. A loaf requiring 30 minutes baking time on a particular day may require 35 minutes on another day, so it is never wise to strictly adhere to the baking time suggested in the recipe, which is provided only as a guideline. |
| Using the baking time in the recipe as a guide, begin to check for doneness a few minutes before the suggested baking time has elapsed, especially if the crust is becoming too dark. The crust on most basic breads should be golden brown. | 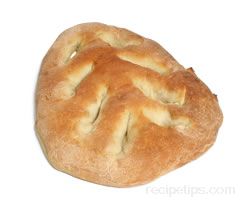 |
| The bread should feel firm, but not too hard, which would indicate that the bread is probably overdone. If the bread is too spongy, it usually indicates that it is undercooked, which is a common problem encountered by the inexperienced home bread maker. | |
|
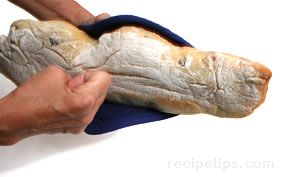
One of the best indicators of proper doneness is to tap the underside of the bread with your knuckles and listen to the sound. A hollow sound indicates that the bread is done, while a dull sound indicates an underdone loaf. |
 |
Cooling, Slicing, and ServingFreshly baked bread does not have to be cooled before it can be served, but if it is to be served at a later time, proper cooling after baking is essential. |
| Bread should be removed from the baking sheet or loaf pan and allowed to cool on a raised wire rack. The wire rack ensures even cooling around the bread. It allows internal steam to exit through the crust, causing it to soften a bit. It also prevents the underside of the bread from becoming damp as would be the case if the bread were cooled in the pan or on a flat surface, which traps the condensing steam. |  |
| Although bread does not have to be cooled completely before it can be served, it should be noted that bread sliced immediately after removal from a hot oven is often not as easy to slice as bread that has been cooled. A clean, flat surface is necessary for slicing bread. A wooden bread board is a good surface for bread slicing and it is best when the board is used specifically for slicing bread to prevent the possibility of contamination from other foods, such as meat and vegetables. | 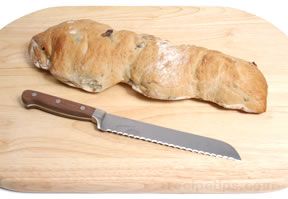 |
| Use a large, sharp, serrated knife for slicing and use a sawing motion without applying excessive downward force so as not to crush the loaf. The thickness of the slices is usually based on personal preference, however a general rule is that the denser the crumb, the thinner the bread can be sliced without the slice falling apart. | 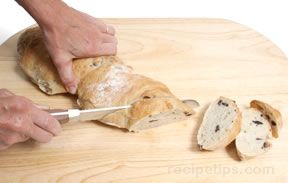 |
| Some breads are torn rather than sliced. Although almost any type of bread can be torn into pieces rather than sliced, this is especially true with flatbreads, which are often passed around the table, with each person tearing off the desired quantity. | 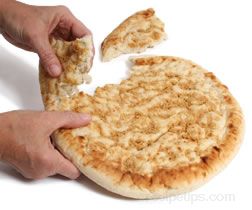 |
Hearth Baking
|
Before the modern oven became commonplace, bread was usually baked over the fireplace in many homes. Large wood-fired ovens built of stone, clay, or brick were built specifically for bread baking, but most people could not afford to have an oven built in their homes and there was also a high risk of fire from indoor wood-fired ovens. Many of these ovens were stand-alone communal ovens. In early versions of these ovens, a wood fire was lit directly on the floor of the oven compartment. When the stone, clay, or brick floor and walls of the oven became hot, the embers and ash were pulled from the oven and the bread dough was inserted onto the oven floor. The heated surfaces inside the oven remained hot long enough to bake several batches of bread. Breads that required shorter baking times with high heat were baked first, followed by breads that benefited from a longer baking time with a gradually cooling temperature. Later versions of these ovens were constructed of metal and were built over large fireplaces within the kitchens of wealthy households. Today, the old-fashioned methods of bread baking are again becoming popular in many regions. Wood burning ovens are being restored and traditional breads are being baked. |
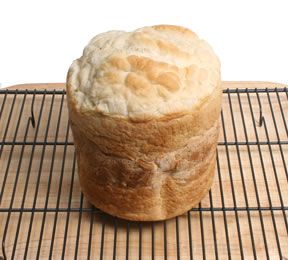
Using a Bread Machine
|
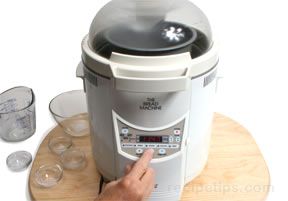
There are many different makes and models of bread machines available. Some offer a variety of features that allow a wider range of breads to be made with the machine. Common features include a range of temperature settings for baking, a rapid baking cycle, settings for controlling the darkness of the crust, timers to allow the bread to be made at a later time, and a feature in which the bread machine does the mixing, kneading, and rising, but not the baking. This is a handy feature when bread shapes other than the loaf shape provided by the canister of the bread machine are desired. All makes and models have differences, but the following simple steps are representative of the steps required for making bread in most machines. |
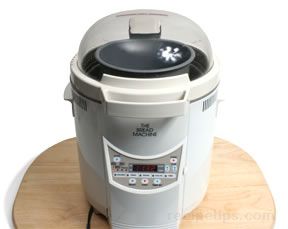 A bread machine is a useful tool that eliminates most of the work involved in bread making, allowing even the busiest people to make homemade bread on a regular basis. Bread machines are designed to be as simple to use as possible. Most models require only a few simple steps: measure the ingredients called for in the bread recipe, add the ingredients to the machine, select the proper settings for the type of bread being made, and press the start button. The machine does the rest of the work: it mixes the ingredients, kneads the dough, allows the dough to rise, and bakes the bread.
| It is often easiest to measure all the ingredients first, before adding them to the machine. Use the type of yeast specified in the manual, which will often call for yeast that is specifically marketed for bread machines and is readily available in most food stores. It is often possible to use active dry yeast or quick-rising active dry yeast. |
|
| Add the ingredients to the canister. Since models vary, it is best to consult the instruction manual to determine the proper order for adding the ingredients, which can be important for achieving optimum results. | 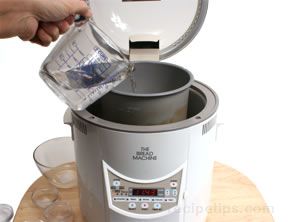 |
| Set the controls for the specific requirements of the type of bread being prepared. | 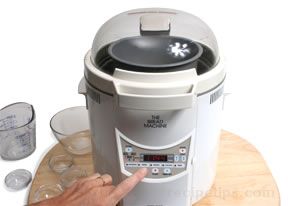 |
|
Press the start button. The machine will begin mixing the ingredients and kneading the dough. Specific times are programmed into the machine for mixing, kneading, and rising, secondary kneading and rising, and final rising, based on the type of bread being prepared. If any flavoring ingredients, such as dried fruit and nuts, are part of the recipe, they should be added near the end of the kneading cycle so that the pieces will remain intact. Some models will beep, indicating the correct time to add the extra ingredients. |
 |
| When the baking process is complete, some models draw air into the baking chamber to cool the bread. The machine will beep, indicating the proper time to remove the bread. Other models may not have this feature, so oven mitts or pot holders should be used to remove the canister from the bread machine. | 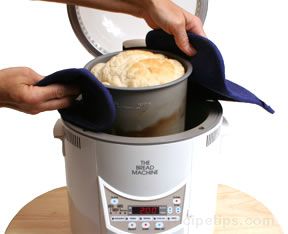 |
| Slide the bread from the canister. | 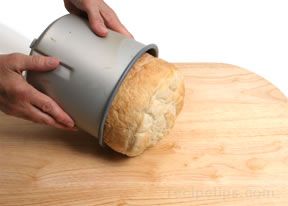 |
| Remove the dough blade from the bottom of the bread. | 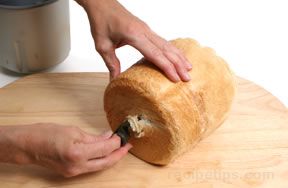 |
| A wire rack should be used for further cooling. |
 |

Using a Slow Cooker
|
Believe it or not, a slow cooker can be used to bake bread. It actually works quite well for certain types of bread, especially quick breads. Although the following step-by-step procedures are a demonstration on how to prepare banana bread, you can make almost any type of great tasting quick bread in the slow cooker using the same basic techniques. Slow Cooker Banana Bread(using a 6-quart slow cooker)
|
|
|
| Grease and flour a loaf pan, and set it aside. | 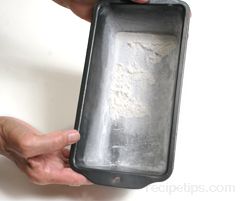 |
| Peel the bananas and mash them with a fork. Set the mashed bananas aside until needed. | 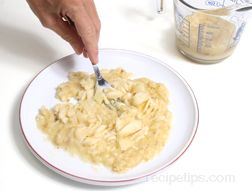 |
| In a mixing bowl, cream together the shortening, sugar, and eggs until fluffy. Add the dry ingredients to the creamed mixture and beat until well blended. | 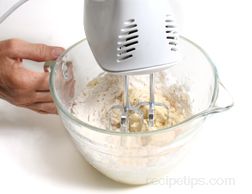 |
| Stir the mashed bananas into the batter using a spatula. Blend the ingredients until the mashed bananas are well distributed. | 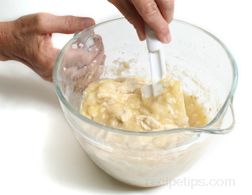 |
| After stirring in the bananas, pour the batter into the greased and floured loaf pan. | 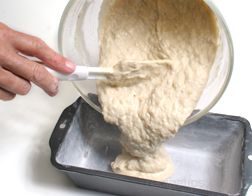 |
| Tent the loaf pan with foil, leaving some space between the bread batter and the foil. This will provide the necessary space for the bread to rise. Seal the foil around the edges of the pan. The foil will help to keep the bread moist as it is cooking. | 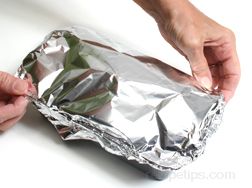 |
| Place a rack or trivet on the bottom of a 6-quart slow cooker so that the loaf pan does not sit on the bottom. If you do not have a rack or trivet that fits properly, crumple some aluminum foil and place it on the bottom of the slow cooker. | 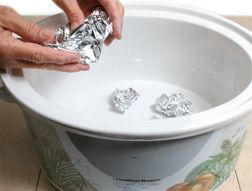 |
| Place the loaf pan in the slow cooker. The foil or rack in the bottom of the slow cooker will allow the heat to circulate around the loaf pan for more even cooking. | 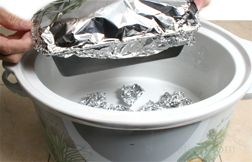 |
| Place the lid onto slow cooker and turn the temperature dial to high. Cook the bread for 2 to 3 hours. Do not remove the cover or check for doneness before 2 hours has elapsed. After 2 hours, check for doneness by inserting a toothpick into the center of the loaf. If the toothpick is clean when it is pulled out of the loaf, the bread is done. | 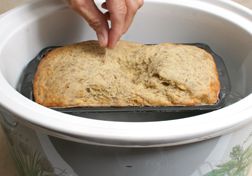 |
| If the bread is not done, remove the foil from the loaf pan, cover the crock with a paper towel, and place the cover back onto the slow cooker. | 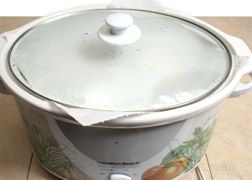 |
| Cook the bread for another 30 minutes; then check it again for doneness. When the bread is done, allow it to cool for 10 minutes; then remove it from the loaf pan and place it on a wire rack for further cooling (if necessary). | 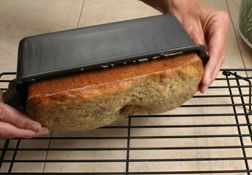 |
| The bread can be sliced and served warm or it can be cooled completely before serving. Quick breads baked in a slow cooker are moist and delicious. | 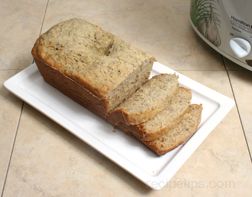 |


