
|
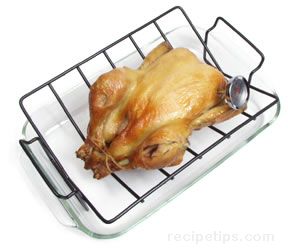
Roasting | Baking | Frying | Grilling and Broiling | Steaming | Poaching There are many methods that can be used to cook chicken, with each providing its own distinctive flavor and texture. Each method has many different recipes that can be used. In addition to preparing chicken using these methods, chicken can be used as an ingredient in many dishes. Each method has many different techniques that can be used, which may be determined by the recipe being used or by the personal preference of the person doing the cooking. Shown below are some of the most common methods used and basic instructions for each. Keep in mind that there are many good techniques for accomplishing these cooking methods. When choosing a chicken for roasting, it is best to select a bird that is labeled a "roaster." Roasters are generally older birds with more muscle, flavor and fat. The fat is favorable for roasting because it adds flavor and moisture to the meat as it is cooking and will eventually melt off through the cooking process. Roasting is accomplished by cooking the chicken uncovered in a hot oven. The chicken is cleaned, seasoned, stuffed (optional), and then placed on a rack in a shallow roasting pan. The rack is not necessary, but it will improve the quality by holding the bird out of the juices and allowing the heat to reach evenly around the entire bird, providing a chicken that is golden brown on all sides. It will also allow the juices to evaporate more easily, developing a caramelized layer, which will produce a very flavorful base for making a sauce or gravy. The chicken should be cooked in at a higher heat, for a short period of time, to crisp the skin and seal in the juices to provide moist, tender meat. Generally roasting at about 450°F for 15 to 20 minutes is adequate.. The heat should then be reduced to 375°F for the rest of the cooking time. Basting the bird throughout the cooking time is not necessary, unless the chicken is smaller, generally under three pounds. The smaller birds do not have the fat necessary to flavor the meat and keep it moist. Cooking temperatures and times will vary according to the size of the chicken and varying recipes. The length of time a chicken will have to cook depends on whether it is stuffed and/or trussed and on the quantity of other ingredients, such as potatoes and vegetables, added to the pan. The best way to determine if it has cooked long enough is to check for doneness. You do not want to overcook the chicken but if undercooked, it will not be full flavored and will not have the desired texture. It also needs to be cooked to the proper doneness to make it safe to eat. Shown below are some common methods used to determine doneness.
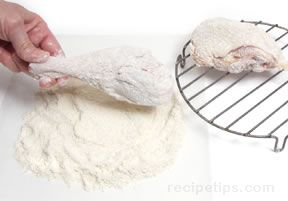
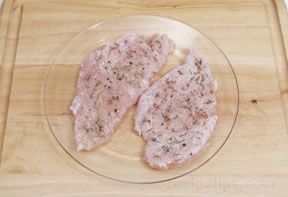
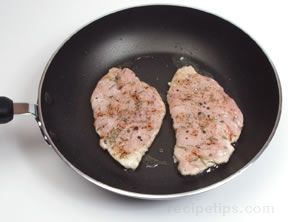
When the chicken is done, it should be allowed to rest (a waiting period before carving) for 10 to 15 minutes. This allows the juices to be distributed through the meat before it is carved. Baking is similar to roasting in that the chicken is cooked in a preheated oven. Roasting involves the cooking of a whole chicken where as baking generally involves the cooking of chicken pieces. The pieces can be skinless, skin-on, boneless or bone-in. Generally baked chicken has a coating applied to it before baking. There are many different coatings used, such as a mixture of herbs, breadcrumbs and sauces. The chicken can also have other ingredients baked with it, such as potatoes and vegetables. The chicken is baked in a shallow pan, which should be large enough so that the pieces do not touch, allowing the chicken to cook and brown evenly. It is common for the chicken to be turned once through the cooking time but this may depend on the recipe. The chicken should be baked until the juices run clear when pierced. The amount of time the chicken needs to bake will depend on the amount of chicken and other ingredients being cooked at the time. If some pieces finish cooking before others, they can be removed from the oven and kept warm by placing aluminum foil loosely over them. Frying chicken is a quick and simple way of cooking chicken where the cooking can be accomplished by the use of two different methods, pan-frying and deep-fat frying. Both methods work on the principle of using hot oil to cook the chicken, producing chicken with a crispy brown outside and juicy, flavorful meat inside. The chicken is generally coated with a thin layer of flour, crumbs or batter. Chicken pieces are generally used for frying, rather than a whole chicken. Pan-Frying: When pan-frying, a heavy skillet with deep sides is generally used. The chicken pieces are coated with flour that has been seasoned with salt, pepper and at times, paprika. It can also be seasoned with other spices, such as chili or curry powder, marjoram, oregano, basil, thyme, and rosemary to create a desired flavor.
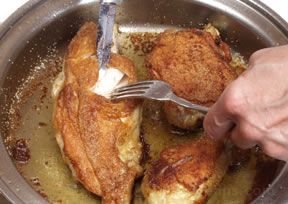
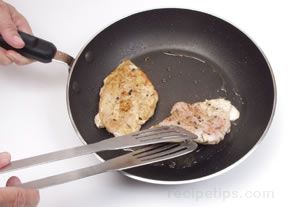
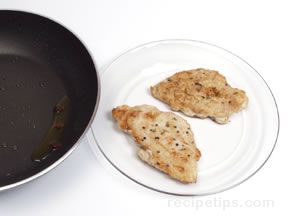
As the pieces finish cooking, they should be removed from the pan and placed on a paper towel to allow grease to drain. The chicken can be checked for proper doneness using one of three methods. The best way to check for doneness is to use a meat thermometer. Chicken breast must reach 170°F and other pieces should be 180°F. If a meat thermometer is not available, a visual test can be performed by piercing the pieces with a fork. If thoroughly cooked, the juices should run clear. Doneness can also be checked by cutting into the thickest part of the chicken and making sure the meat is opaque all the way through.
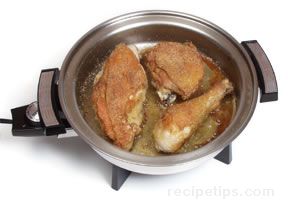
To fry, fill a deep pan approximately half full of oil and heat to between 350°F and 375°F. To test the temperature, drop in a cube of bread, it should brown in 50 seconds if the oil is about 365°F. Using tongs or a metal spatula, place three to four pieces of chicken in the hot oil, being careful that they are not overcrowded. Cook until golden brown, approximately 6 to 10 minutes. As the pieces of chicken get done, remove them from the oil and place them on a paper towel to allow the grease to drain. When using either method of frying, an important part of the process is keeping the oil at the proper temperature. Once the chicken is placed in the hot oil, the temperature of the oil will drop. But, as long as the oil continues to bubble consistently, it will cook the chicken properly. If the temperature of the oil would be brought back up to between 350°F and 375°F, the outside of the chicken would burn before the inside finished cooking. To prevent this from happening, the temperature may need to be turned down a little once the chicken starts browning, but make sure the oil stays hot enough. If the oil is not hot enough, the chicken will be greasy. Controlling the temperature of the oil is an important part of producing delicious fried chicken. Shown below are some additional tips on frying chicken.
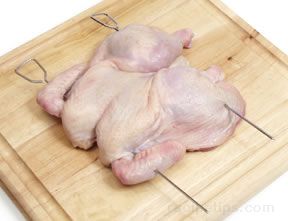
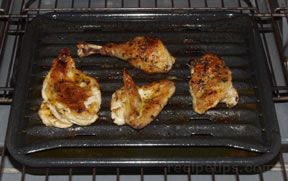
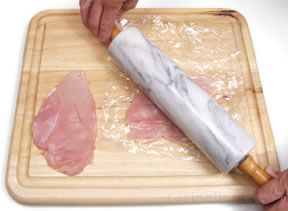
Grilling and broiling are basically the same type of method of cooking chicken. They both use a dry heat that quickly cooks the surface and then slowly moves to the middle of the meat. The main difference between the methods is that grilling applies the heat to the bottom surface of the chicken, and broiling applies the heat to the top surface. Also, grilling with charcoal infuses the chicken with a smoky flavor from the juices dripping on the coals. When broiling, this infusion of flavor does not occur. Before cooking, check the size of pieces and cut the larger pieces to smaller sizes so all pieces will cook more evenly. Flatten chicken breasts so that they are more uniform in thickness. If cooking a whole chicken, it should be butterflied for more even cooking. To butterfly, cut along each side of the backbone and then remove it. Turn chicken breast side up and use the heel of your hand to press down on the breast to break the breastbone, flattening the chicken. Use skewers to help the bird lay flat by threading one skewer through a wing, through the breast, and out the other wing. Thread a second skewer into a thigh, through the bottom part of the breast, and out the other thigh.
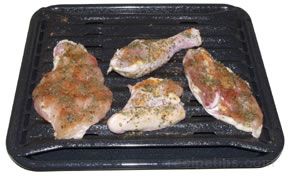
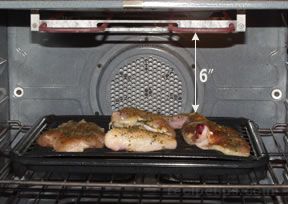
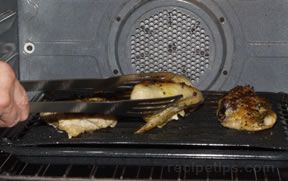
When grilling or broiling, the chicken will have a tendency to dry out so it must be watched carefully during the cooking process. Coating the chicken with a little oil or marinating it will aid in preventing it from drying out while cooking. Also, the temperature at which the chicken is cooked and the distance the chicken is from the heat source are both important to tender, juicy, properly cooked chicken. Grilling: A medium heat should be used when grilling chicken. Using too high of a heat will cause some parts to cook too quickly and dry out while other parts will not be done all the way through. To check the temperature of the grill, place the palm of your hand at the cooking level (generally 6 to 7 inches) above the heat source. If you can leave it there for 5 or 6 seconds, the grill will cook at a low to medium low heat. If your hand must be pulled away after 3 seconds, it is at a medium heat, and if it can only be left there for 2 seconds, the temperature is hot. The grate of the grill, which the chicken will be cooked on, should be brushed with oil and preheated before the chicken is placed on it. While the chicken is cooking, be sure to watch the pieces carefully and turn when necessary. Also, do not overcrowd the pieces, so if flare-ups occur from the drippings there is room to move pieces out of the way of the flames. Broiling: When broiling chicken, there is no benefit from the infusion of smoked flavoring that occurs when grilling, causing the chicken to be fairly bland in taste. This can be remedied by the use of seasoning, such as a mixture of herbs, marinades or basting sauces.
Whenever possible, it is best to leave the skin on the chicken during grilling and broiling, If you prefer skinless chicken, remove the skin before serving. Leaving the skin on will provide a juicier, more tender piece of chicken and will not increase the fat content as long as it is removed before eating. If the chicken has already had the skin removed, coat it before cooking to prevent it from drying out. The chicken can be coated with cooking oil, a liquid marinade or any type of moist marinade.. The chicken must be checked for proper doneness when using either cooking method. The best way to check doneness is to use a meat thermometer. Ground chicken and chicken breast must reach 170°F. Whole chickens and other pieces should be 180°F. If a meat thermometer is not available, a visual test can be performed by piercing the pieces with a fork. If thoroughly cooked, the juices should run clear. Doneness can also be checked by cutting into the thickest part of the chicken and making sure the meat is opaque all the way through.
Steaming is an ideal method for cooking boneless chicken breasts and small whole birds such as Cornish hens. It retains the flavor, tenderness and moisture through the use of steam. It is a healthy method of cooking because no additional fat is used. Chicken can be steamed with a traditional steamer that fits on top of a sauce pan, by using a rack that sits in the bottom of a tightly covered pan, suspending the chicken above the water, or by the use of an electric steamer. When steaming chicken with a traditional steamer, fill the steamer pot half full of water and bring it to a full boil using a high heat. For additional flavor, herbs or other flavorings can be added to the water. Place the chicken in the steamer in a single layer, leaving a little room around the pieces. This allows the steam to circulate freely, cooking the meat at a more even rate. Place the steamer in the pot over the boiling water and make sure no water is coming up through the holes in the steamer. Cover and cook for 8 to 10 minutes. If using a rack or tray in the bottom of a large pot, add at least one inch of water to the pot and bring to a boil. Place the chicken in a heatproof dish and place the dish on the rack in the pot of boiling water. Be sure water is not boiling up over the heatproof dish. Cover with a tight lid and cook for 8 to 10 minutes. Check for doneness and if thoroughly cooked, remove chicken from steamer and use the water for a broth to be eaten on its own or to make a sauce to serve with the chicken. Steaming Tips:
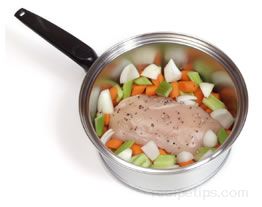
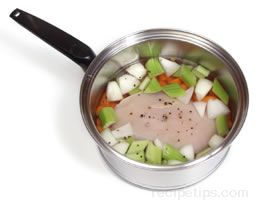
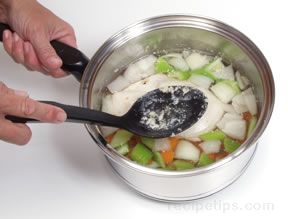
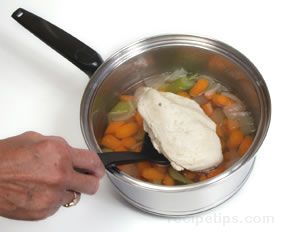
Poaching is a healthy method of cooking chicken because no fat is added. It retains the chicken's flavor, tenderness and moisture through a gentle simmering process. Poaching is an especially good method to use when cooking chicken that normally has tougher meat, such as stewing hens and chicken that has a tendency to be a little dry, such as skinless breasts. Cooking by this method provides a very flavorful chicken because it draws additional flavor from the meat and bones as it cooks. The poached chicken can be eaten as part of a main meal or used as an ingredient for salads, sandwiches, pot pies, and other dishes. The liquid, in which the chicken is poached, can also be used. It can be used as a broth or reduced to use in making a sauce to be served with the chicken.
When using the poaching method of cooking, it is important to bring the liquid to a boil and then lower the temperature so that the liquid is simmering very gently. The liquid should barely be moving with only a few bubbles breaking the surface occasionally, not bubbling as it does when boiling. Vigorous boiling will toughen the meat and make it stringy. Poaching tips:
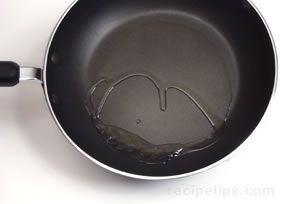
Braising and stewing are very similar methods of cooking. They both use the same process of searing to enhance color and flavor, and slow cooking in liquid to produce tender, moist meat. Once the meat is browned, it is cooked in a covered pan, either on top of the stove or in the oven. It is best to use the same pan that was used to sear the meat so you get all the benefit of the flavored pieces in the bottom of the pan when making a sauce. Select a heavy sauté or frying pan that is both suitable for the stove top and the oven. The pan should also have a fairly tight fitting lid to prevent moisture from escaping. To begin braising or stewing, be sure the chicken has been thoroughly dried off with a paper towel to ensure even browning. Heat enough oil, or an oil and butter mixture, to sufficiently cover the bottom of a heavy pan, and then place the pieces of chicken in the hot oil. To ensure even browning, do not overcrowd the pieces. Cook over a medium high heat until pieces are nicely browned on all sides. Once browned, remove pieces from the pan using tongs and then quickly sear any other desired ingredients in that same pan. Replace the chicken pieces in the pan and add the required liquid and flavorings. Heat until the liquid is boiling, then cover the pan and reduce the heat to a simmer, cooking until chicken is done. To prevent the meat from becoming dry and stringy, keep the liquid at a simmer through the remaining cooking time and do not allow it to boil. The covered pan can also be placed in a low temperature oven to finish cooking, rather than on top of the stove. The meat should be checked occasionally throughout cooking to see if liquids need replenishing. When done, the chicken and all other ingredients should be removed from the pan, so the sauce can be made. After braising, the pan drippings can be thickened with a paste mixture of butter and flour, or a mixture of cornstarch and water to make a sauce. The sauce is then served with the chicken. When stewing, thickening of the liquid may or may not be required, depending on the recipe. The liquid, chicken and other ingredients are served as one dish. Braising and stewing are almost identical methods except stewing involves the use of more liquid and the ingredients, including the meat, are cut into more bite size pieces. Sometimes the chicken is not seared before stewing, but most often it is. Sautéing is a cooking method that quickly cooks the chicken using a little oil and high heat. Olive oil, vegetable oil, corn oil, canola oil, and soy oil are commonly used oils. Sautéing and the searing process, used in browning the meat in the beginning steps of braising, are basically the same methods of cooking, except searing browns the meat and seals in its juices, but does not completely cook the meat. Sautéing browns the meat and seals in the juices but it also thoroughly cooks the meat. Seared chicken requires the use of another cooking method, such as braising, to finish the cooking process.
To sauté, preheat pan to condition it before adding oil.
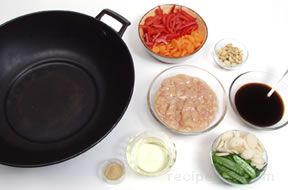
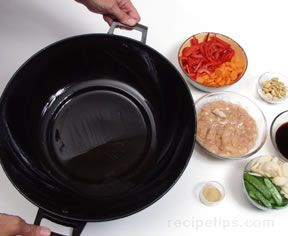
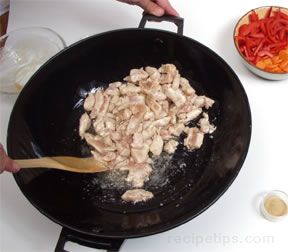
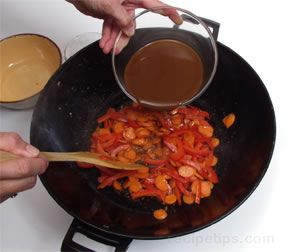
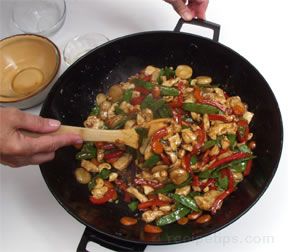
Stir-frying, like sautéing, is a cooking method that quickly cooks the chicken in a little oil, using high heat. The difference between the two methods is that sautéing cooks serving size pieces of meat and stir-frying involves cooking smaller size pieces that have been cut into strips, cubes or diced pieces all similar in size. Stir-frying generally includes meat and other food ingredients cooked at different intervals, which are added together at the end of the cooking process to make one dish. They are cooked according to how quickly each food cooks, with the quickest added last. Generally the process starts by cooking the chicken and the slowest cooking vegetables first, such as carrots, cauliflower and onions. Then vegetables such as broccoli, green beans, peppers, sugar snap peas, and snow peas are added after the first ingredients have been stir-fried for several minutes. A few minutes later vegetables, such as mushrooms, celery, peas, and scallions, are added. Any fresh herbs should be added at the very end of the cooking time. Fruits are also used in many stir-fry recipes and should be added as directed. Stir-frying is a fast paced cooking method so it is important that everything is ready before beginning to cook. Oil, chicken, vegetables, seasonings, and sauce ingredients are pre-measured and placed within easy reaching distance. The pan used for stir-frying should be a heavy skillet with deep sides to allow the ingredients to be stirred and tossed without being spilled over the edges of the pan while cooking. A wok, which has deep tapered sides that make it easy to stir and toss the ingredients as they are cooking, is a traditional pan used for stir-frying. Although a wok works well, it is not a necessity. Using a nonstick deep skillet also works very well.
Stir-fry Tips:
Microwaving is a quick and convenient method for cooking chicken but the flavor of the chicken will not be enhanced as it is with other cooking methods. When cooked properly, it will provide a tender, juicy meat. The flavor can be enhanced by the use of salt, pepper and other seasonings. This is a good method for cooking chicken that is going to be used in dishes that require cooked chicken or when just a small serving is required. When microwaving chicken, it is best to follow the manufacturer's instruction manual because different varieties of microwaves vary in cooking time. Chicken pieces cook better than whole birds in the microwave and are generally cooked at a high setting. Whole chickens should be cooked at a medium setting. Place the chicken parts in a microwave safe dish arranged so that the larger, denser pieces are placed around the outer edge, and the smaller pieces are placed in the middle. Part way through the cooking time the chicken pieces should be rearranged by turning and exchanging positions of the pieces that are cooking faster with those that are cooking more slowly. This will assist in getting most of the pieces done at approximately the same time. While cooking, the chicken should be covered with wax paper or plastic wrap, leaving one corner open for venting purposes. Checking doneness is accomplished in basically the same manner regardless of the cooking method you are using. Some methods are more accurate than others and some are more suitable in regard to the cooking method and to the cut of chicken. Shown below are the most common methods for checking doneness. Thermometer: Using a thermometer is the most accurate method for testing doneness of the chicken. A regular meat thermometer or an instant read thermometer can be used. A regular meat thermometer is inserted before placing the chicken in the oven or other heat source and remains there throughout the cooking time.
Piercing: Another method for testing doneness is to prick the chicken with a fork or the tip of a knife and check to see if the juices that escape run clear. If the juices have any pinkish coloring, the chicken is not done and should be returned to the heat source for further cooking.
Before carving, the chicken should sit for 10 to 15 minutes after it is removed from the oven. This allows the juices to be redistributed throughout the meat, resulting in a firmer, juicier and easier to carve chicken. Choose a carving knife that is long enough to cut the entire length of the breast. It is important that the knife be extremely sharp so it allows thin slices to be carved and easily cuts through the joints when necessary. Shown below are the steps to carving a chicken.
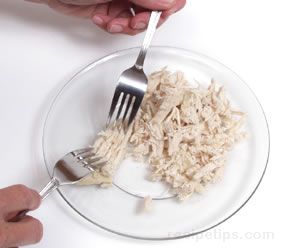
After the chicken has been cooked, it can be shredded to use for several purposes. Shredded chicken is good for making sandwiches, adding to salads, and is used as an ingredient in many different dishes.
Tenderness Tips
Light Tips
Cooking Tips
| ||||||||||||||||||||||||||||||||||||||||||||||||||||||||||||||||||||||||||||||||||||||||||||||||||||

Loading
Chicken Cooking Guide


Provided By
RecipeTips
RecipeTips


Loading
There currently aren't any reviews or comments for this article. Be the first!


Advertisement


Advertisement