Loading

Rotisserie Chicken

Provided By
Reviewed By Stardust
"As a guide to how to rotisserie a chicken I rate this article as one of the ... read full review"
Share this!
Facebook

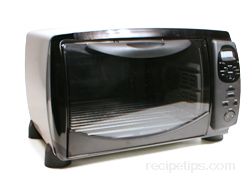
Rotisserie Cooking Units | Rotisserie Chicken Preparation
Rotisserie Cooking the Chicken | Carving Rotisserie Chicken

Rotisserie cooking is a great method to use for preparing chicken. The chicken will have a reduced fat content because the fat drains off and it will not be sitting in the fat as it cooks. The fat will flavor and moisten the meat as it cooks and drips from the chicken. The result of rotisserie cooking a chicken is moist flavorful meat with a nicely browned, crispy skin. The information below provides basic instructions on rotisserie cooking a chicken.


Rotisserie Cooking Units

Rotisserie cooking can be accomplished using several different rotisserie units. Charcoal and gas grills have rotisserie units as optional attachments and some grills are equipped with rotisseries as a standard feature. There are also several different types of countertop rotisserie units that are made to be used indoors. These units are available in a variety of sizes and types. There are countertop convection ovens also available that have the option to use rotisserie units in them. The basic method for rotisserie cooking is the same for any type of rotisserie cooking unit. The heat source is just provided in a slightly different manner in each one. The rotisserie information below shows the chicken being cooked in a countertop convection oven. For more information on rotisserie cooking using other types of units, see Turkey Rotisserie Grilling, Rotisserie Grilling Turkey, or Rotisserie Grilling. For whatever type of rotisserie unit you are going to use, be sure to read the instructions provided by the manufacturer so the rotisserie is used properly and safely.

Countertop Convection Oven with Rotisserie Unit
 

This convection oven consists of temperature controls, a timer, drip pan, and rotisserie unit. The heat source is at the top of the oven and the chicken rotates below while cooking. Other types of countertop units may have the heat source in the back of the unit. No matter where the heat source is located, the chicken rotates as it cooks to provide even cooking. Keep in mind that the countertop units are limited to the size and number of chickens they can cook at one time depending on the unit's size.


Rotisserie Chicken Preparation

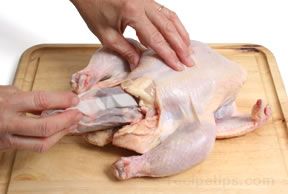
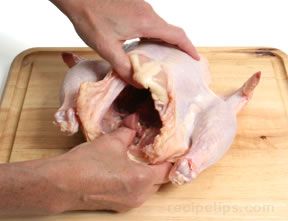
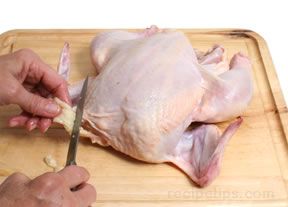
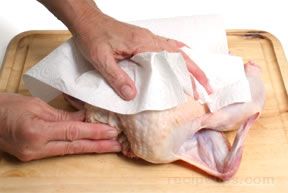
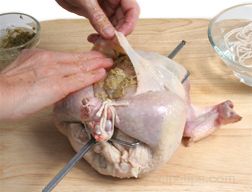
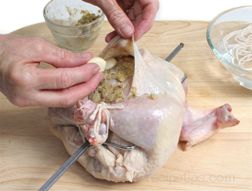
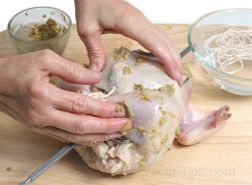
Cleaning | Flavoring | Place on Spit

Preparing a chicken for the rotisserie is not much different than preparing it for roasting. Be sure to select a chicken that will be an appropriate size for the rotisserie unit you are using. If a frozen chicken is purchase, be sure it is completely thawed before you start to cook it. Follow the simple instructions below on preparing the chicken.

Cleaning the Rotisserie Chicken


Generally, a whole chicken will contain a giblet package that needs to be removed from its cavity, unless it was previously removed during thawing.


Check the cavity of the chicken at the tail end to see if the kidneys have been removed. The kidneys are the dark reddish colored objects located on the back side of the cavity near the tail. If they have not been removed, use your thumbs or fingers to force them out.

The chicken should then be rinsed thoroughly inside and out with cold water.


Check neck and tail area for excess fat. Trim the excess away and discard.


Pat the chicken dry using a paper towel. It is now ready to be seasoned or prepared in the desired manner for rotisserie cooking.

When finished, be sure all utensils and work areas are cleaned and sanitized properly.


Flavoring the Rotisserie Chicken

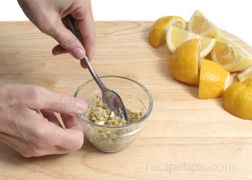
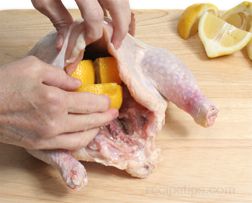
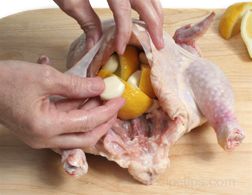
The rotisserie chicken can be cooked without any extra flavoring added if desired and you will still have a delicious chicken after it has been basted by its own fats and juices. But, adding different flavorings will enhance the flavor of the chicken to your desired taste. The chicken can be flavored with the use of marinades and rubs or by basting it while it is being cooked on the rotisserie. There are an endless number of recipes for marinades, rubs, and bastes that will provide great flavor and juiciness to your chicken. Don't be afraid to try a mixture of your own favorite flavorings. There are many choices of flavorings that can be used, such as fruits, vegetables, herbs, and spices. Butter and olive oil can also be used to flavor and moisten the chicken as it cooks.

Provided below is just one example of a number of flavorings that can be used to enhance the flavor of the rotisserie chicken.

Garlic Lemon-Pepper Rotisserie Chicken

Ingredients:

  • 1 whole chicken (3 1/2 to 4 lbs.)
  • 1 or 2 lemons
  • 3 tsp. salt, divided
  • 1 tsp. pepper
 
  • 2 tbsp. butter, softened (not melted)
  • 10 cloves of garlic

Grate the zest from 1 lemon and mix it with 2 tsp. of salt and the pepper.

Add the lemon zest mixture to the butter and stir with a fork until the all the ingredients are evenly mixed. Set aside.


Salt the cavity of the chicken with the remaining 1 tsp. of salt.

Cut the lemons into quarters and place them in the cavity of the chicken. The number of lemon quarters that are added will depend on the size of the chicken. Add enough to fill the cavity but do not over stuff. When the legs are tied together they need to be able to hold the stuffed ingredients in the cavity.


Peel the cloves of garlic and place 5 of them in the cavity of the chicken along with the lemons.

Place the chicken on the rotisserie spit as shown below.


Once the chicken has been placed on the rotisserie spit and has been secured, be sure the legs are tied tightly together so that the ingredients inside will not drop out when the chicken is rotating on the rotisserie.  
Apply the lemon and butter mixture to the chicken. Rub approximately 1/2 of the butter under the skin of the chicken, spreading it out evenly.  
After rubbing the butter under the skin, place the remaining 5 garlic cloves sporadically under the skin.  
If the outside of the chicken is moist, dry it off with a paper towel and then rub the remaining lemon butter mixture on the chicken.  

Now finish tying the chicken around the fatty parts of the legs and tying the wings to the body. See below.

The chicken is then ready to start the rotisserie cooking.


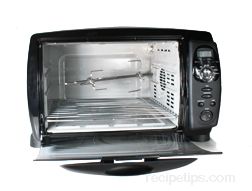
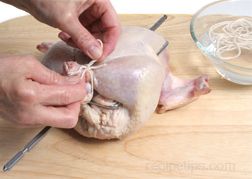
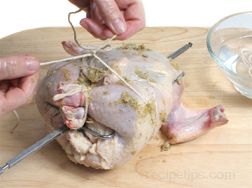
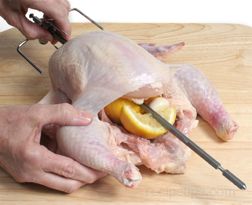
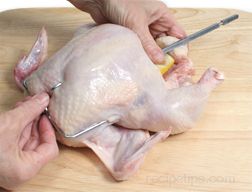
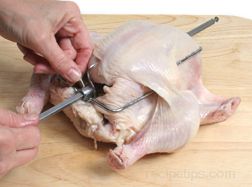
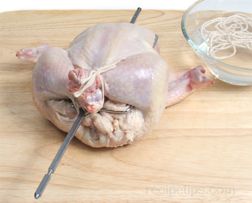
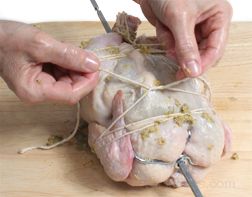
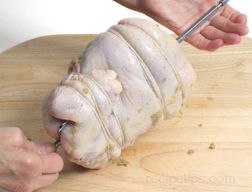
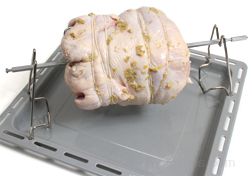
Place Chicken on Rotisserie Spit

The chicken needs to be placed on the spit so that it is centered and evenly balanced. It must also be held in place so it does not move around as it is cooking. If the chicken was loose on the spit rod and unbalanced, the heaviest side would always drop to the bottom and the chicken would not turn evenly as it is cooking on the rotisserie. See the instructions below on how to place the chicken on the rotisserie spit.


Slide the spit rod in through the neck opening of the chicken and out the bottom end. Place the chicken so it is in the center of the rod.


Keep the rod running thru the center of the chicken and attach the rotisserie spit forks into the breast end. Once in place, secure the forks on the spit rod by tightening the wing nut.


Then attach the spit forks at the tail end in the same manner. When the forks are attached the rod should be centered through the chicken so that it is evenly balanced. It is important for the chicken to be balanced so that it rotates smoothly on the rotisserie unit.

Make sure the forks are pushed in so they are holding the chicken securely and that the wing nut on both forks has been tightened.


Cut several lengths of kitchen twine and soak in water. This will help prevent the twine from burning.

First loop a piece of twine around the tail, securing it to the rod, unless the tail was secured by one of the tongs of the spit fork. Then cross the legs and wrap the twine up around the legs several times.


  Tie the twine securely, making sure the opening to the cavity is closed tightly so that the ingredients inside will not drop out as the chicken rotates on the rotisserie.


Finish adding rubs or other flavorings to the chicken as shown above and then finish securing the chicken on the rotisserie spit.

Wrap another piece of twine around the fatty part of the legs a couple of times and tie securely.


  Use another piece of twine to wrap around the breast area to hold the wings in close to the body of the chicken.

  Check to see if the chicken is centered and if it feels balanced by rolling the rod of the spit in the palm of your hand. It should feel like it rolls evenly across it. If not, adjust the forks to even out the weight on the rod.

  The chicken is now ready to start the rotisserie cooking.


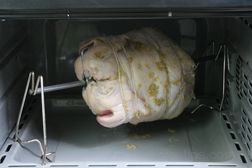
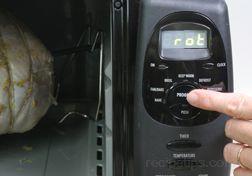
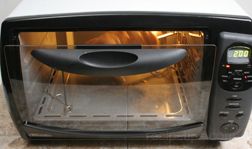
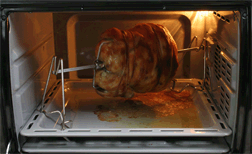
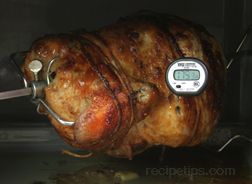
Rotisserie Cooking the Chicken

The heat source for cooking the chicken should generally be preheated before placing the spit in the rotisserie unit for cooking. Follow the instructions for assembling the rotisserie spit provided in the user's manual for the type of rotisserie unit you are using. For this convection oven, it may be desirable to wait to start the oven until the rotisserie unit is properly secured because it takes some maneuvering to get the spit rod into the spit mount hole. Because the spit mount hole is in the back corner of the oven, it will be easier to insert the rod if you do not have to worry about a hot oven. The convection oven above has a rotisserie heating function that it is set on for rotisserie cooking. The start button is pressed and the oven turns on and begins to heat up.


For the convection oven shown above, the rotisserie spit is placed on spit supports that are attached to the drip pan.
 
The drip pan is then slid into the oven, making sure the pointed end of the rod is inserted into the rotisserie spit mount hole in the back of the oven.  

Set the rotisserie function on the oven as instructed by the user's manual. The display will read "rot" when it is on the proper setting.

See the manufacturer's user manual for the unit you are using to find the suggested cooking time. The user manual for this oven suggests 120 minutes for a 4 to 5 lb. chicken. Set the timer for the estimated cooking time and press start.


The door of the oven is then closed but should be left slightly ajar during the rotisserie cooking time.  

The chicken will rotate as it cooks. This will provide an evenly browned chicken that is very moist.

Approximately 15 to 30 minutes before the end of the suggested cooking time start checking for doneness.

 
Use an instant read thermometer to check doneness. The internal temperature of the thickest part of the thigh should be 175°F. If checked in the breast of the chicken it should be 170°F. If the chicken has not reached this temperature, continue to cook and check in 15 minute intervals until it is at the proper temperature.  
When the chicken is done, remove from the heat source and place on a heat proof surface, such as a cutting board. Remove the forks from both ends of the chicken and take it off the spit.  
Place it on a platter or a baking sheet with sides. Remove the string from the legs and carefully remove the lemons and garlic from the cavity.  
After removing the items in the cavity, tent the chicken with foil and allow it to rest for 15 to 20 minutes before carving.  


Carving Rotisserie Chicken

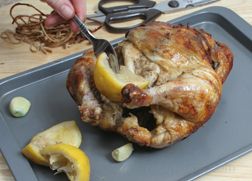
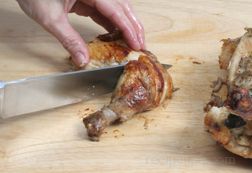
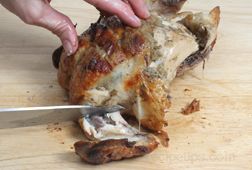
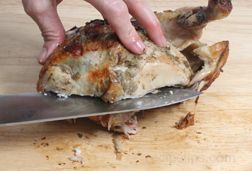
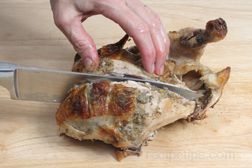
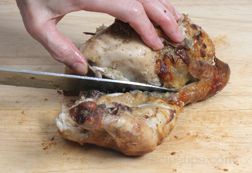
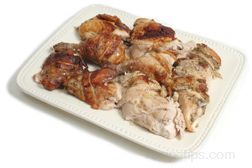
A whole rotisserie chicken is carved in the same manner as other whole cooked chickens. Allowing the chicken to rest as stated above will allow the juices to be redistributed throughout the meat, resulting in a firmer, juicier and easier to carve chicken. Choose a carving knife that is long enough to cut the entire length of the breast. It is important that the knife be extremely sharp so it allows thin slices to be carved and easily cuts through the joints when necessary. Shown below are the steps to carving a chicken.

Remove any strings remaining on the chicken that were tied on it to hold it together during the rotisserie cooking process.


Place the chicken on the cutting board breast side up and begin carving by cutting through the skin and meat between the thigh and breast.


Using a carving knife, pry the thigh away from the body and locate the joint connecting the leg to the body. Cut through the leg joint, detaching it from the body.


  On smaller birds, the thigh and leg can be served as one piece or it can be cut into separate pieces. Separate the two by cutting at the joint.

  Remove the wing by cutting through the joint that attaches the wing to the body, keeping the cut as close to the body as possible. Remove the wing tip, if desired, before serving.
Begin to carve the breast meat by running the knife horizontally under the breast, cutting the entire length of the bird. Make sure to cut all the way in to the bone.  
Cut the breast vertically starting at the top along the side of the breast bone. Cut by following vertically down along the breast bone until you reach the bottom where the horizontal cut was made.
 
Remove the breast from that side of the chicken and place it on the cutting board to slice. Using a fork to hold the breast in place, slice across the breast, cutting across the grain of the meat to make the slices the desired thickness. Cutting across the grain shortens the fibers and provides a more tender piece of meat.
 
Repeat the carving process on the opposite side in the same manner.  

Place all of the pieces on a platter and serve while warm.

 
Loading

Rotisserie Chicken Reviews

rotisserie chicken

:
Average of 5.00 out of 5 stars
Rating of 5 out of 5.0 stars
Ratings (4)
Comments (0)
Stardust
Rating of 5 out of 5.0 stars
Reviewed By
"As a guide to how to rotisserie a chicken I rate this article as one of the best. I used this article to prepare the chicken, and I used the Rotisserie Chicken with Herbs Recipe to complete my preparation. Absolutely top notch!"
Judy Leong
Rating of 5 out of 5.0 stars
Reviewed By
"I have previously attempted to roast a rotisserie chicken using my newly bought rotisserie roaster oven. However, it wasn't as well roasted as some parts were not properly cooked. After reading through your processes and simple steps, I will have more confidence and will try out roasting a rotisserie chicken again. I think the steps and instructions are fantastic and I am confident that I will get a perfect roast this time. I will post a picture of it with my comments once I get it. Hurray for the instructions and step by step pictures shown."
Artscet User
Rating of 5 out of 5.0 stars
Reviewed By
"Great information. Delicious recipe too. It was my first attempt at rotisserie grilling so it was really nice to be able to see the step-by-step instructions. I used the "Rotisserie Grilling" link at the top to see what temperature to use for grilling because I was doing it on our grill. I grilled on high for about 15 minutes and then turned down to just a little under medium. Turned out great."
jwc User
Rating of 5 out of 5.0 stars
Reviewed By
"I made this chicken in my convection oven - 375 for 1 hr 10 minutes. I didn't have a lemon, so I used an orange instead. It was delicious!"
E-mail: 
Advertisement
Reproduction in whole or in part without written permission is strictly prohibited.
© Copyright 2024 Tecstra Systems, All Rights Reserved, RecipeTips.com