


|
Additional Canning Information: Canning Supplies | Ingredients | Food Preparation | Jar and Lid Preparation
| ||||||||||||||||||||||||||||||||||||||||||||||||||||||||||||||||||||||||||||||||||||||||||||||||||||||||||||||||||||||||||||||||||||||||||||||||||||||||||||||||||||||||||||||
| Quantity of Fresh Tomatoes per Quart | |
| Vegetables | Quantity per Quart |
| Tomatoes (whole, stewed, or chopped) | 2 1/2 to 3 1/2 lbs. |
| Tomatoes (for juice) | 3 to 3 1/2 lbs. |
For information on other ingredients that may be needed when canning tomatoes, see Canning Vegetables and Fruit - Canning Ingredients.
Canning Tomatoes - Preparation
When preparing tomatoes for canning, the first thing that is necessary is to clean them. Clean the tomatoes in the same manner you would if you were going to prepare them to eat right away. The main concern is to remove any gritty dirt and to remove any blemishes. Discard overripe or spoiled tomatoes. Once they are clean, they can be prepared as instructed by the recipe. The tomatoes are prepared for canning in much the same manner as they are when prepared for other uses. Shown below are some preparation methods commonly used when canning tomatoes.
|
Tomatoes | ||
|
|
 | |
|
Tomatoes Canned Whole or Halved, Stewed or Made into Sauce
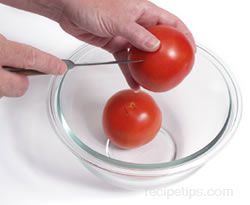
Slice an "X" on the bottom of each tomato with a small utility knife. |
 | |
|
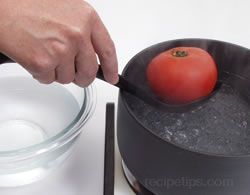
Fill a large saucepan with water up to approximately 1 1/2 inch from the top and bring water to a rolling boil. Have a large bowl with cold water set aside and ready to use. With a large spoon, place tomatoes in the boiling water for 30 to 60 seconds to loosen skin. |
 | |
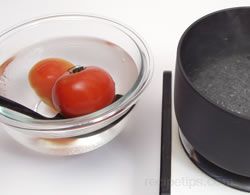
| Remove tomatoes from the boiling water and place directly into cold water to stop the cooking process. |
 | |
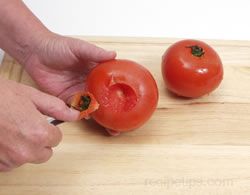
| Core the tomatoes by removing the stem with a paring knife and then remove any blemishes the tomato may have. |  | |
|
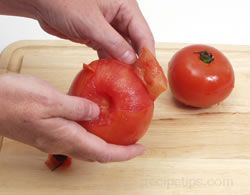
Peel away the skin, being careful not to injure the flesh of the tomatoes. |
 | |
|
| ||
Packing the Jars
Tomatoes can be packed in the jars using one of two methods, hot packing or raw packing (also referred to as cold packing).
Hot Packing: When using the hot packing method, the tomatoes are cleaned, prepared as instructed by the recipe, and placed in a pan to be cooked. They are then heated to a boil and simmered for 2 to 5 minutes. The hot tomatoes are immediately packed or poured if making juice, in a canning jar. They are then covered with hot water that has been heated to a boil, allowing the appropriate headspace when filling jars. When making juice, it is brought to a boil and poured in the jars, leaving the appropriate headspace.
Raw Packing (or Cold Packing): Raw packing, also referred to as cold packing, is used more for both high-acid foods and low-acid foods. When using the raw packing method to pack tomatoes in the canning jars, they are cleaned, prepared as instructed by the recipe, and then placed raw in canning jars. The food is packed firmly in the jars, allowing for the proper headspace. The tomatoes are then covered with water that has been heated to a boil, allowing the appropriate headspace when filling jars.
If uncertain as to which method to use when canning, hot packing will be the safest choice.
When you are canning tomatoes, either hot packing or raw packing can be used. It will depend on whether you are canning whole tomatoes, tomato halves, crushed tomatoes or tomato juice. See the charts below for suggested methods of packing for the different types of tomatoes using different canning methods.
| Boiling-Water-Bath Canning Method | ||||||||||
| Headspace:
Leave 1/2 inch headspace. At higher elevations, the steam in the headspace will expand more than at elevations below 1000 feet. To allow for this expansion, it is suggested that you increase the headspace by 1/8 inch for each 1000 feet above sea level, not to exceed 1 inch on pint jars and 1 3/4 inches on quart jars. | ||||||||||
| Food Type | Pack Method | Process Time - Minutes | ||||||||
| Pint Jars | Quart Jars | |||||||||
| Tomatoes - Juice (with acid added) | Hot | 35 | 40 | |||||||
| Tomatoes - Whole or halved - No Liquid Added (with acid added) | Raw | 85 | 85 | |||||||
| Tomatoes - Crushed (Quartered) - No Liquid Added (with acid added) | Hot | 35 | 45 | |||||||
|
High Altitude: The processing times above are for canning at sea level. Adjust as shown below:
| ||||||||||
| Dial Gauge Pressure Canning Method | |||||||||||||||
|
Headspace: Leave 1/2 inch headspace. At higher elevations, the steam in the headspace will expand more than at elevations below 1000 feet. To allow for this expansion, it is suggested that you increase the headspace by 1/8 inch for each 1000 feet above sea level, not to exceed 1 inch on pint jars and 1 3/4 inches on quart jars. | |||||||||||||||
| Dial Gauge Pressure Canning Method | |||||||||||||||
| Food Type | Pack Method |
Process Time (minutes) |
PSI (pounds per square inch of pressure) | ||||||||||||
| Pint Jars | Quart Jars | Under 2000 ft. |
2001 to 4000 ft. | 4001 to 6000 ft. | 6001 to 8000 ft. | ||||||||||
| Tomatoes - Juice (with acid added) | Hot | 20 | 15 | 6 lb. | 7 lb. | 8 lb. | 9 lb. | ||||||||
| Hot | 20 | 15 | 11 lb. | 12 lb. | 13 lb. | 14 lb. | |||||||||
| Tomatoes - Whole or halved - No Liquid Added (with acid added) | Raw | 40 |
40 | 6 lb. | 7 lb. | 8 lb. | 9 lb. | ||||||||
| Raw | 25 | 25 | 11 lb. | 12 lb. | 13 lb. | 14 lb. | |||||||||
| Tomatoes - Crushed (Quartered) - No Liquid Added (with acid added) | Hot | 20 | 20 | 6 lb. | 7 lb. | 8 lb. | 9 lb. | ||||||||
| Hot | 15 | 15 | 11 lb. | 12 lb. | 13 lb. | 14 lb. | |||||||||
|
Weighted-Gauge Pressure Canning: When using a weighted-gauge pressure canner, use the chart above for pack methods and processing time. Weighted-gauge pressure canners cannot have the PSI increased by 1 lb. increments, so adjust the PSI as shown below:
| |||||||||||||||
Filling the Canning Jars
It is very important that the jars are filled properly when canning tomatoes to assist in producing a safe product when the processing is complete. Follow the instructions given below. If you have a recipe with special instructions, be sure to follow them closely.
-
Decide on whether you will be using the raw pack or hot pack method for packing the jars. To decide on which method to use, see the information above on the raw and hot pack methods or use the method indicated on the recipe.
-
Prepare jars and lids properly. If the jars are sterilized, leave them in the warm water until ready to use. For more information on preparing jars and lids, see Canning Vegetables and Fruit - Jar and Lid Preparation.
-
Clean and prepare the tomatoes for canning as indicated by the recipe.
-
Fill jars according to the pack method being used or as indicated on recipe.
-
Be sure to allow for the appropriate headspace when filling jars with the tomatoes. The headspace is important to allow for expansion of the tomatoes from the heat during processing and to allow a vacuum to form to seal the jars properly.
-
After the jars are properly filled, wipe the top rim and the screw threads on the neck of the jars with a damp cloth or paper towel to remove anything that may have gotten on them while filling the jars. Any liquid or pieces of tomato left on them may prevent the jar from sealing properly.
-
Place the prepared lid squarely on the rim and hold in place while placing the screw ring on the jar. Tighten the screw ring securely but do not over tighten.
-
Once all of the jars are filled and sealed, finish the canning process using the method called for in the recipe.
For more information on filling the canning jar, see Canning Vegetables and Fruit - Packing the Canning Jars.
Processing Temperature and Time
Using the proper processing temperature and time is very important when canning tomatoes and other foods to ensure that the processed food will be safe to eat. If not processed properly the food will spoil. There are several factors that will affect the amount of processing time required: shape and size of the jar, whether the tomatoes will be raw packed or hot packed, canning method being used, and the altitude in your area.
All of these factors determine the canning method, processing time and PSI (pounds per square inch) of pressure to be used. Be sure to follow all canning instructions very carefully. It is also important to adjust the processing times when you are at a higher elevation. The charts above contain processing information for canning tomatoes and the adjustments that need to be made in processing time for higher elevations. If you are unsure of what the elevation is in your area, you can call your local county extension office to request this information.
When using a pressure canner to process high acid foods, your processing time is much shorter than when processing with the boiling-water-bath. When processing at higher elevations the processing time can remain the same as what is used at sea level but the PSI (pounds per square inch) needs to be increased to make up for the lower internal temperature of the canner. For more details on processing temperatures and processing times, see Canning Vegetables and Fruit - Processing Temperature and Time.
Canning Tomato Juice
Boiling-Water-Bath - Preparation
-
Wash the tomatoes and remove stems and any bruises or blemishes. Skins do not need to be removed during preparation because they will be removed when they are strained.
-
Cut 2 or 3 tomatoes into quarters and place directly in a large saucepan. Start heating the tomatoes to bring then to a boil, crushing them while they are heating to produce juices for the tomatoes to cook in. Stir to prevent burning.
-
Bring tomatoes to a boil and finish cutting the remaining tomatoes into quarters, adding them to the boiling tomatoes as they get quartered. Keep the tomatoes boiling strongly as you add quartered tomatoes so that they are constantly boiling.
-
After all the tomatoes have been quartered and add in the boiling tomatoes, allow all the tomatoes to simmer for 5 minutes.
-
After simmering for 5 minutes, remove skins and seeds by pressing the cooked tomatoes through a chinois strainer with pestle. A regular sieve or food mill could also be used.
-
Have jars and lids properly prepared (for detailed instructions, see Canning Vegetables and Fruit - Jar and Lid Preparation). To ensure proper acidity, add two tablespoons of bottled lemon juice to each quart jar (one tablespoon per pint) or 1/2 teaspoon of citric acid (1/4 teaspoon per pint). Add 2/3 teaspoon of salt and 1 1/3 teaspoons of sugar to each quart jar.
-
After removing skins and seeds put the tomato juice back in the saucepan and heat just until juice comes to a boil.
-
Pour the hot tomato juice into the prepared jars using a ladle. Fill the jars, leaving 1/2 inch headspace. For more information on packing jars properly, see Canning Vegetables and Fruit - Packing Jars.
-
Clean any spillage from the rim of the jar and then place the lid on the jar. Screw the ring onto the jar just until it is tight. Do not over tighten. The tomato juice is now ready to be processed.
Boiling-Water-Bath Canning - Tomato Juice
-
Fill the boiling-water-bath canner half full of clean water; heat water to 180°F for hot packed jars. This heating process could be done while packing the jars.
-
Place the empty rack into the heated water and then using the jar lifter, carefully lift the jars and place them in the rack. Be sure that the jar lifter is secure around the neck of the jar, just below the screw ring. Be careful not to tip the jars as they are being lifted into the canner. If jars are tilted too much, liquid can spill into the sealing area of the lid and may prevent the jar from sealing properly.
-
Another method of placing the jars in the canner is to pack the jars in the rack before placing it in the canner. Pack all the jars into the rack and then use the handles on the rack to lift it and the jars into the heated water. Be careful not to tip the jars as they are being placed into the rack and when lifted into the canner. The rack will be heavy so you may need help lifting it into the canner if using this method.
-
Check the water level after the jars are all placed in the canner. It should be at least one inch over the top of the jars. For longer processing times, have the water level 2 inches above the top of the jars. If level is not high enough, add boiling water to increase it to the proper level.
-
Using high heat, bring the water to a full boil. After the water has come to a rapid boil, place the cover on the canner and reduce the heat enough to keep the water at a gentle continuous boil. Set timer for proper processing time. Don't forget to adjust time for altitude if necessary.
-
Check water level occasionally through processing time to be sure it is remaining at the proper level. Add more boiling water if necessary.
-
After boiling for the full processing time, turn off the heat and remove the cover.
-
Have a folded towel ready for placing the jars on when processing is complete. Using the jar lifter, carefully remove the jars from the canner and place them on the towel. If desired, a cooling rack can be used to place the processed jars on for cooling. Leave at least 1 inch between the jars to allow for air circulation while cooling. Do not try to re-tighten the screw band after processing because that may disturb the sealing process that has already started to form. Allow jars to cool for 12 to 24 hours before handling.
After the jars have cooled for 12 to 24 hours, they need to be check for a proper seal before they can be stored. First remove the screw bands and then use one of the following methods to check for a proper seal.
- Press down in the center of the lid with a finger or thumb. If the lid does not move up or down it is sealed properly.
- Another method to use for checking the seal is to pick up the jar and look at the lid at eye level. If the lid is curved down slightly in the center, the jar has sealed properly.
- Lift the jar by the lid. If the lid holds the jar without loosening, the jar is sealed properly. Hold a hand under the jar to catch the jar if it should loosen from the lid or hold over a sink lined with a towel for padding when testing the seal.
If there are jars that are not properly sealed, they can be reprocessed to try to get them to seal. If reprocessing, remove the lid and check the rim of the jar for nicks. If the jar has a nick, pour the contents into a good jar and prepare a new lid to place on it. Reprocess as originally processed. Reprocessing will produce a product that does not have as good of quality as the originally processed product.
If you do not want to go through the entire processing for one or two jars, the unsealed jars can be refrigerated and use within 2 or 3 days.
For more information on testing processed jars for a proper seal, see Canning Vegetables and Fruit - Testing Jars for Proper Seal.
Storage and Safety
Storage
After checking for a proper seal, wipe off any residue on the jars and lids. Label the jars with the content and date of when they were processed. Store the jars in a cool, dry and dark place. If the food is exposed to a lot of light or warm temperatures, it will have an effect on its color and flavor. The jars should be stored at temperatures between 50°F and 70°F. If stored under the proper conditions the canned food should be able to be stored for about a year before the quality is affected.
Safety
Proper Processing Time
It is extremely important that the tomatoes to be processed for the proper time to ensure that all bacteria have been destroyed properly. If in a high altitude area, be sure to adjust processing times accordingly. See the charts above for proper processing.
Check for Spoilage
It is extremely important that the canned products are checked carefully for spoilage before using them. The clostridium botulinum bacterium that can contaminate the spoiled canned food causes botulism, which can be deadly. It is a good idea to periodically check your stored canned goods for signs of spoilage but be sure to check them before using. If there is any signs of spoilage the product should be disposed of properly. If you are unsure as to whether the product is contaminated, DO NOT TASTE IT TO DETERMINE SPOILAGE, throw it out to be safe. Shown below is a list of signs of spoilage that should be check for before using the canned goods.
- Check the jar to see if the lid has a good seal. If the center of the lid is concave, the jar has a good vacuum seal.
- Look for fresh leakage or streaks of food that have dried on the jar that are coming from the top.
- Rising air bubbles in the liquid indicates the jar is not sealed properly.
- Look for bad coloring. If the content is very dark in color, it is an indication of spoilage. If the food has some light discoloration it may be the result of minerals in the water and then the contents would still be safe.
- There is spoilage if the contents are slimy, shriveled and have a cloudy appearance.
- If while opening the jar, contents spurt out, it should be discarded.
- After opening the jar, look for any signs of mold, which could be white, blue, green, or black in color. Be sure to check the bottom side of the lid for signs of mold as well as the content of the jar.
- Smell the contents, if it has an unnatural odor it should be discarded.
- DO NOT TASTE THE FOOD TO DETERMINE IF IT IS SPOILED.
| Note: Spoilage of Low-acid foods and tomatoes is not always as evident as in other foods or spoilage may appear in a different manner. If there is any suspicion that there may be spoilage, dispose of the food properly. |
For more information on storing canned vegetables and canning supplies, and canning safety, see Canning Vegetables and Fruit - Storage and Safety.
Canning Tips
- For the best color and flavor in canned tomatoes, be sure to use quality tomatoes that have few blemishes and that they are at their prime maturity level and are not diseased.
- To keep canned tomatoes fresh year to year, only can the quantity that you will use up within a year.
- Do not use commercial jars, such as mayonnaise jars, for canning. They are not strong enough and will crack or break more frequently during processing.
- If processing time will be longer than 10 minutes, washing the jars in the dishwasher will be sufficient without having to sterilize them before using. They will be sterilized during processing.
- If located in a higher altitude, be sure to increase processing time according to the charts above. Water boils at a lower temperature at the higher altitudes, requiring a longer processing time.
- After processing, do not tighten screw bands. This may disturb the sealing process that has already started to form.


