


|
See More Information on Canning Vegetables and Fruits: Canning Food Preparation | Canning Jar and Lid Preparation | Packing the Jars There is much preparation that goes into canning vegetables and fruits. Different foods require different preparation, the jars and lids require proper preparation, and the jars must be packed correctly to ensure safe canning of the vegetables and fruits. The information below will provide you with the instructions on preparing the food and equipment so that you will have a safe product when you are finished with the canning process.
| ||||||||||||||||||||||||||||||||||||||||||||||||||||||||||||||||||||||||||||||||||||
|
Tomatoes | ||
|
|
 | |
|
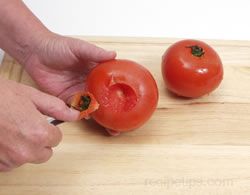
Tomatoes Canned Whole or Halved, Stewed or Made into Sauce.
Slice an "X" on the bottom of each tomato with a small utility knife. |
 | |
|
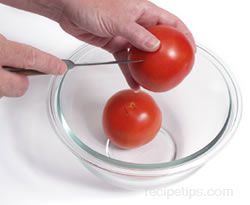
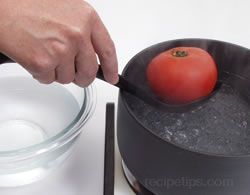
Fill a large saucepan with water up to approximately 1 1/2 inch from the top and bring water to a rolling boil. Have a large bowl with cold water set aside and ready to use. With a large spoon, place tomatoes in the boiling water for 30 to 60 seconds to loosen skin. |
 | |
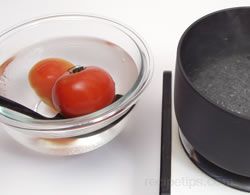
| Remove tomatoes from the boiling water and place directly into cold water to stop the cooking process. |
 | |
| Core the tomatoes by removing the stem with a paring knife and then remove any blemishes the tomato may have. |  | |
|
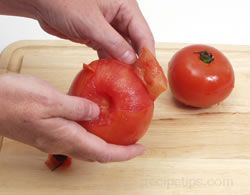
Peel away the skin, being careful not to injure the flesh of the tomatoes. |
 | |
|
| ||
| Peaches | ||
|
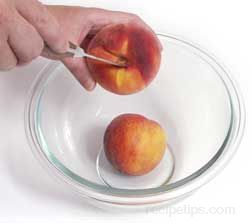
Handle peaches with care so they do not bruise. Cut a small slit in the upper portion of the peach skin. |
 | |
|
Fill a large saucepan with water and bring water to a rolling boil. Have a large bowl with cold water set aside and ready to use. Place peaches in a heat safe bowl. Pour boiling water over peaches to cover. Leave peaches in boiling water for 30 to 60 seconds. |
 | |
|
Remove peaches from the boiling water and place directly into cold water to stop the cooking process. Remove from cold water and pull off skins. |
 | |
|
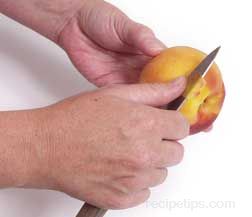
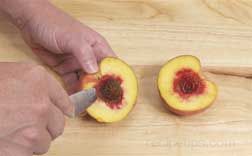
Remove the pit from the peach by cutting around the entire perimeter (follow the natural indentation) down to the pit using a small knife. Twist the peach halves in opposite direction until they separated from each other. |
 | |
|
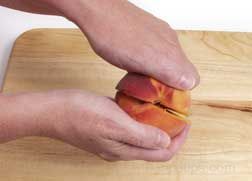
The pit will remain in one half of the peach when they are separated. Remove the pit using a knife or your fingers to pry it loose from the center of the peach. |
 | |
| Leave the peaches in halves or cut into quarters or slices as indicated by the recipe. |  | |
|
To prevent the fruit from darkening, place it in one of the following solutions until you are ready to pack it in the canning jars:
When ready to pack the fruit into the jars, drain the solution off and rinse the fruit before packing. | ||
| Green Beans | ||
| Check green beans for rusty spots, blemishes, and beans that are over mature or diseased. Discard any bad beans that are found. Wash beans under cold water until free of dirt. Snap off the ends of the beans. The ends can also be cut with a knife. | 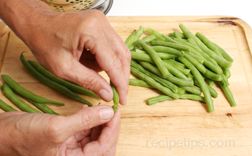 | |
|
Once the beans have ends snapped or are cut into desired length, they are ready to pack into the jars for canning. | ||
| Cucumbers for Pickling | ||
|
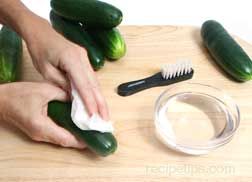
Note: When harvesting cucumbers, do not pick immediately after a heavy rain. Wait a couple of days to give them a chance to dry out. Cucumbers can become waterlogged after a rainfall. It is best to harvest them on a sunny day. Wash the cucumbers thoroughly to rid them of any dirt and prickly spines found on some varieties. Scrub with a soft brush if necessary. Handle with care to avoid bruising. |
 | |
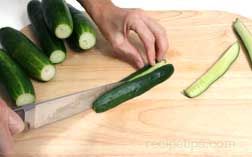
| After thoroughly cleaning, trim off the blossom end of the cucumbers. The blossom end contains enzymes that can cause the pickles to be soft. The stem end does not need to be trimmed. | 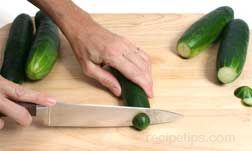 | |
|
When blossom ends are trimmed, cut cucumbers as instructed by the recipe. Some recipes may call for leaving smaller cucumbers whole but larger cucumbers are generally cut into spears or slices. To cut into spears, cut the cucumbers in half lengthwise. Then cut each half lengthwise again to form quartered spears. |
| |
| If called for in the recipe, cut cucumbers into slices. Cut them crosswise approximately 1/8 inch thick. | 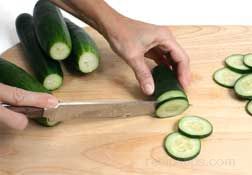 | |
|
Note: There is also a product available called pickle crisp that can be added to each jar to help produce crisp pickles. There is no soaking and rinsing process necessary with this product. | ||
Canning Jar and Lid Preparation
Working in a clean sterile environment is very important when preserving fruits and vegetables. Working with clean and sterile equipment is a must in the process. Shown below are methods for preparing the jars and lids to ensure safe usage.
Canning Jar Preparation
If the food is going to be processed in a pressure canner or in a boiling-water-bath for 10 minutes or longer, the jars do not have to be sterilized before filling and processing. If the food will be processed for less than 10 minutes in a boiling-water-bath canner, the jars must be sterilized before filling them with food and processing. If you question whether you need to sterilize the jars or not, it is always best to go ahead and sterilize them.
-
The first thing that should be done when the jars are taken out for use is to check them for chips and cracks. Visually check the jars for cracks and chips. Then carefully run your finger lightly along the top edge of the rim to check for small chips. Any defective jars should be discarded. Even the smallest crack or chip weakens the jar and may cause the jar to not seal properly or it may cause it to break during processing.
-
After checking the jars carefully, wash them in the dishwasher or by hand in hot soapy water. Be sure they are rinsed thoroughly even if they were washed in the dishwasher. It is important to get rid of any soap residue. Any soap residue left on the jars may affect the flavor or color of the food.
-
After washing and rinsing the jars properly, fill each with hot water and set them in the canning rack inside a canner that is at least half full of water.
-
When all the jars are in the water, they should be covered with at least 1 inch of water. If not, add water until there is an inch of water covering the jars.
-
Bring water to a boil and allow the jars to boil for 10 minutes. For higher elevations, increase the boiling time by 1 minute for each 1000 ft. above sea level.
-
Turn off the heat and leave jars in the hot water until ready to be filled.
Canning Lid Preparation
| Check lids and rings to be sure they are of good quality. The lids should not be bent and the sealing compound should not have any defects in it.
Wash the lids and rings in hot soapy water and rinse well. Wipe rings dry and set aside. | ||
|
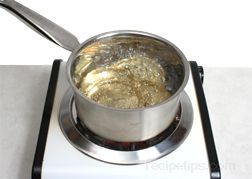
Place the lids in a saucepan and cover with water. Bring water to a simmer (180°F) over medium-high heat. |
 | |
|
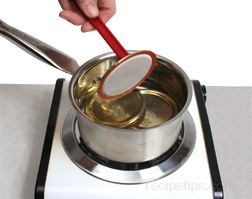
Once lids have come to a simmer, turn heat off but leave saucepan with lids on the burner and allow lids to remain in the hot water until ready to use. |
 | |
Canning - Packing the Jars
Hot Pack versus Raw Pack
The food to be canned is packed in the jars using one of two methods, hot packing or raw packing (also referred to as cold packing).
Hot Packing: When hot packing food in the canning jars, the fresh food is cleaned, prepared as instructed by the recipe, placed in a pan and covered with water. It is then heated to a boil and simmered for 2 to 5 minutes. The hot fruit or vegetables are immediately placed loosely in a canning jar. They are then covered with hot water, juice or syrup that has been heated to a boil, allowing for the appropriate headspace when filling jars. The lid is then placed on the jar and secured with the screw ring.
Raw Packing (or Cold Packing):Raw packing, also referred to as cold packing, is used more for both high-acid foods and low-acid foods. When raw packing food in the canning jars, the fresh food is cleaned, prepared as instructed by the recipe, and then placed raw in canning jars. The food is packed firmly in the jars, allowing for the proper headspace. The fruit or vegetables are then covered with hot water, juice or syrup that has been heated to a boil, allowing for the appropriate headspace when filling jars. The lid is then placed on the jar and secured with the screw ring. The filled jars are placed in the canner, which should contain warm water. Be sure the water is not boiling when the jars are placed in the canner or the jars may crack.
Although it may seem easier to use the raw pack method when preparing the fruits or vegetables, there are advantages to hot packing that make it worth the extra time. Some of the advantages to consider are listed below:
- Fresh fruits and vegetables are made up of 10 percent to 30 percent or more of air. When raw packed, this air makes the food float to the top and it is harder to rid the jar of air before sealing. When hot packed, most of the air in the food is removed when the food is boiled before adding it to the jars.
- The hot packed fruits and vegetables are softer and have shrunk in size so more product can be packed into the jars, requiring fewer jars to be needed.
- Any excess air in the processed jars will begin to affect the quality and color of the food. The difference will not be noticeable after first processing but after 2 or 3 months, the raw packed food will begin to discolor in the top 1 to 2 inches of the jar.
If uncertain as to which method to use when canning, hot packing will be the safest choice.
Filling the Canning Jars
It is very important that the jars are filled properly to assist in producing a safe product when the processing is complete. Follow the instructions given below. If you have a recipe with special instructions be sure to follow them closely.
-
Decide on whether you will be using the raw pack or hot pack method for packing the jars. To decide on which method to use, see the information above on the raw and hot pack methods, check the suggested packing method in the charts in Canning Temperatures and Processing Times for the type of food and canning method being used, or use the method indicated on the recipe.
-
Prepare jars and lids as shown above under Jar and Lid Preparation. If the jars are sterilized, leave them in the warm water until ready to use.
-
Clean and prepare food as indicated by the recipe. If using the hot pack method, place the food in a pan and cover with water. Heat to a boil and simmer for 2 to 5 minutes.
-
Fill jars according to the pack method being used or as indicated on recipe. Fill jars allowing for the proper headspace. Using a canning funnel and a ladlel can be very helpful when filling the jars with small pieces or more liquid type foods.
Hot Pack Method: The hot fruit or vegetables are immediately placed loosely in a canning jar.
Raw Pack Method: The raw food is packed firmly in the jars. -
The fruit or vegetables are then covered with hot water, juice or syrup that has been heated to a boil. Again, being careful to allow for the appropriate headspace when filling jars. See the top of the charts in Canning Temperatures and Processing Times for the proper headspace to use for high-acid and low-acid foods or allow the headspace as indicated on the recipe. The headspace is important to allow for expansion of the food from the heat during processing and to allow a vacuum to form to seal the jars properly.
-
After filling the jars, remove the excess air bubbles by placing a non-metallic utensil, such as a rubber spatula, in the jar between the side of the jar and the food. Gently press against the food to force the excess air bubbles out. Repeat this process on all sides of the jar.
-
Once the air bubbles have been removed, the headspace may have increased. Check for proper headspace and add more liquid to bring the headspace back up to the proper level if necessary.
-
After the jars are properly filled, wipe the top rim and the screw threads on the neck of the jars with a damp cloth or paper towel to remove anything that may have gotten on them while filling the jars. Any liquid or food left on them may prevent the jar from sealing properly.
-
Place the prepared lid squarely on the rim and hold in place while placing the screw ring on the jar. Tighten the screw ring securely but do not over tighten.
-
Once all of the jars are filled and sealed, place them in the canner at the same time so they are all processed evenly.


