Loading

Turkey Gravy

Useful Gravy Making Tools | Traditional Methods for Making Gravy
Quick Method for Making Gravy | Adjusting the Consistency | Gravy Making Tips

There are many recipes available for making turkey gravy, but you will find that most of them call for the use of the turkey drippings and the browned bits from the bottom of the roasting pan (formed as a result of oven roasting the turkey) combined with a small amount of fat, to produce gravy with the best flavor and color. The guidelines described below will help you create smooth, flavorful turkey gravy.

Useful Gravy Making Tools

There are several tools available that can be used to provide assistance with gravy making. Although these tools are not essential to success in making turkey gravy, they help to make the process easier.

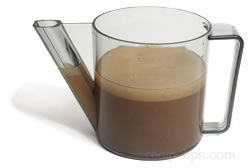
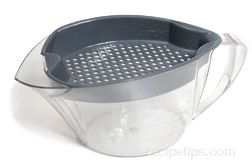
Gravy Separator

A gravy separator is a kitchen utensil that is used to separate the fat from the flavorful juices that have collected in the roasting pan while the turkey was cooked. When the hot turkey juice (or any hot meat stock containing fat) is poured into the separator, the fat rises to the top while the meat juices remain on the bottom. The spout extends to the bottom of the device where the meat juice is located, allowing it to be poured out while the fat remains on the top of the separator above the level of the spout opening. This design makes it easy to separate the meat juice from the fat. Besides having the ability to separate the juices and fat, some gravy separator models have a strainer that fits on the top, which filters unwanted particles.


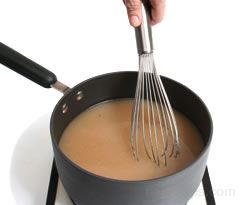
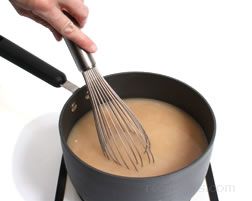
Whisk

A wire whisk works well when combining the fat and flour that forms the thickening agent for the gravy. The whisk is also the best tool for preventing lumps when the cooking liquid is added to the thickener.


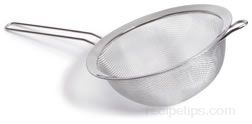
Strainer

The strainer is a good tool for eliminating unwanted particles in broth, pan drippings, and the finished turkey gravy. When the liquid is poured through the mesh of the strainer, the particles are trapped by the strainer because they are too large to flow through the openings in the fine mesh.

Traditional Methods for Making Gravy

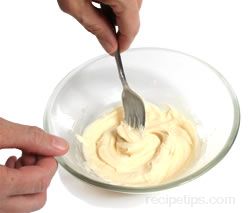
There are two traditional methods for making turkey gravy (or any other type of gravy) that involve the same initial steps. The primary difference between the two gravy making methods is in the procedure for thickening the gravy. One method uses a roux and the other method uses a beurre manié for thickening. Both are a mixture of flour and fat, but they are prepared differently and are added at different points in the gravy making process.

The initial steps for both gravy making methods are: preparing the stock, separating the fat from the meat juices that have collected in the roasting pan while the turkey was cooking, deglazing the roasting pan, and determining the gravy quantity.

Preparing the Stock | Separating the Fat from the Meat Juices
Deglazing the Roasting Pan | Determining the Gravy Quantity
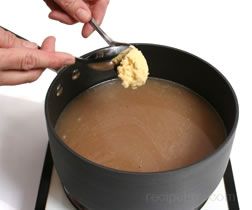
Thickening the Gravy: Roux | Thickening the Gravy: Beurre Manié

Preparing the Stock

Most types of gravy require additional cooking liquid to reach the proper consistency and to ensure that the quantity will be adequate. Homemade stock adds so much flavor to gravy, but it is a step that is not absolutely necessary when preparing gravy. Commercially prepared canned stock can be substituted. Potato water is also a good choice, or plain water may be used if nothing else is available.

Homemade stock can be prepared a day ahead and refrigerated until it is needed. When refrigerated, any fat in the stock will rise and harden on the surface, which makes it easy to remove.


The steps described below can be used to prepare
homemade turkey stock for use in gravy, sauces, soups, or stews.

Place the neck, heart, and gizzard in a saucepan and cover with water. Do not use the turkey liver because it will impart a bitter taste to the stock. Add a 1/2 teaspoon of table salt or 1 teaspoon of kosher salt to the saucepan. Cook over high heat until boiling.

Note: Vegetables, such as onions, carrots, and celery, can also be used to provide additional flavor.

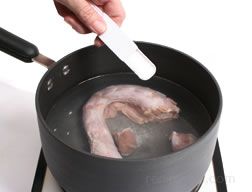
As the stock cooks, foam and impurities will collect on the surface of the liquid. Skim off as much of the foam and impurities as possible and discard.
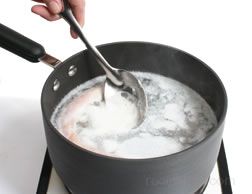
Once the stock begins to boil, cover the saucepan and turn down the heat to low. Allow the stock to simmer for 45 minutes to an hour.

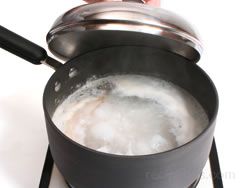
Remove the giblets from the saucepan and pour the liquid into a bowl. If the stock contains unwanted bits and pieces that have been released from the giblets, you may want to pour the stock through a strainer. Allow the stock to cool slightly and then refrigerate it until it is ready to use.

Note: Commercially prepared stock or broth can be used instead of the homemade turkey stock.


Separating the Fat from the Meat Juices

The fat and the meat juices should be separated before the gravy is prepared. Both the fat and the meat juices are used in different stages of the gravy making process.

After removing the turkey from the roasting pan, pour the drippings (the juices produced while the turkey was roasting) into a gravy separator. If you do not have a gravy separator, pour the drippings into a glass measuring cup or bowl.
Allow the drippings to set in the gravy separator for 4 to 5 minutes. The fat will rise to the surface and the meat juices will settle at the bottom.
If using a gravy separator, pour the meat juices into a 2-quart measuring cup until only the fat remains in the separator. After the juices are removed, pour the fat into another bowl and set it aside for later use.
If not using a gravy separator, remove the surface fat by skimming it off with a spoon. Reserve the fat in a small measuring cup or bowl. The fat will be used later in the gravy making process.
Any remaining fat can be removed by skimming a paper towel gently over the surface. A piece of bread also works well for soaking up additional fat. Set the juices and fat aside until it is time to use them in the gravy making process.


Deglazing the Roasting Pan

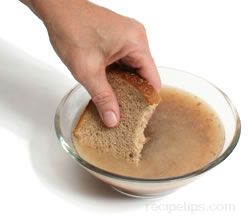
Deglazing the roasting pan releases the browned bits from the pan that have collected during the roasting process. These tasty morsels add so much flavor and color to the gravy. If, however, there are few browned bits in the pan after roasting the turkey, an easy remedy is to add a few pieces of skin and some of the meat from the neck or the bottom of the turkey and brown them in the roasting pan prior to deglazing the pan.

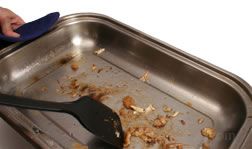
Begin the deglazing process by placing the roasting pan on the stovetop over medium heat. Add 2 cups of stock to the roasting pan.
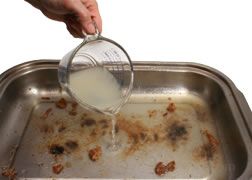
As the contents of the roasting pan are heated, stir the stock and scrape the flavorful bits from the sides and bottom of the pan.
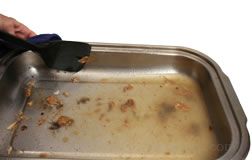
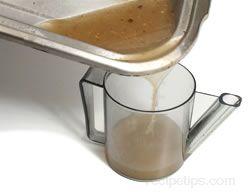
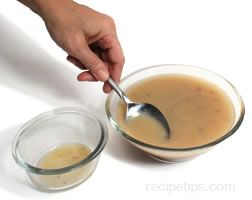
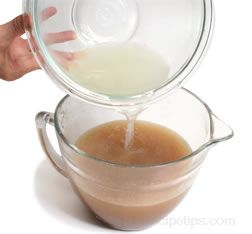
Pour the deglazed liquid into a gravy separator to separate the fat and juices, or pour the contents into a bowl and skim the fat off the top after the juices have set for several minutes.
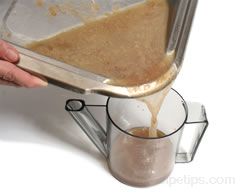
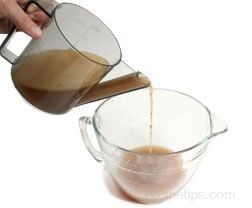
Pour the meat juices through a strainer and into the 2-quart measuring cup containing the other defatted meat juices that were collected earlier (immediately following the roasting process).
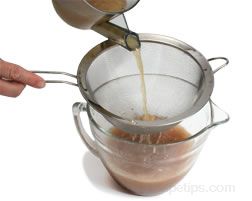

Determining the Gravy Quantity

When preparing gravy, it is often difficult to gauge how much fat (or butter, when not using the fat from the pan drippings) and flour to use for thickening the gravy. Begin by determining the amount of cooking liquid you have for making the gravy. The cooking liquids include the stock (homemade or commercially prepared) and the juices from the drippings created during the roasting period.

Pour the remaining stock (the portion of the stock not used during the deglazing process) into the 2-quart measuring cup containing the other meat juices. Determine whether the amount of juices in the measuring cup will be adequate for the number of servings of gravy required, basing an estimate on 1/3 cup per serving. If there is not enough liquid to make the desired quantity of gravy, add commercially prepared broth or stock, or use water to make up the difference for the amount required. If potato water available, use it instead of plain water (if broth or stock is not available).

The next step is to determine the amount of thickener needed for the amount of juices in the measuring cup. A one-to-one ratio of flour to fat (1 tablespoon flour to 1 tablespoon fat) is often a good starting point, although many cooks prefer a three-to-two ratio of flour to fat.


The chart below can be used as a quick reference for determining the quantity of thickener to use based on the quantity of liquid available for preparing the gravy. The ratio of flour to fat is one-to-one (tablespoons). Additional thickening or stock can always be added to adjust the gravy to the desired thickness.


No. of Servings Cooking Liquid Flour Fat (or butter)
6 2 cups 2 Tbsp. 2 Tbsp.
8 2-2/3 cups 2-2/3 Tbsp. 2-2/3 Tbsp.
10 3-1/3 cups 3-1/3 Tbsp. 3-1/3 Tbsp.
12 4 cups 4 Tbsp. 4 Tbsp.
14 4-2/3 cups 4-2/3 Tbsp. 4-2/3 Tbsp.
16 5-1/3 cups 5-1/3 Tbsp. 5-1/3 Tbsp.
18 6 cups 6 Tbsp. 6 Tbsp.
20 6-2/3 cups 6-2/3 Tbsp. 6-2/3 Tbsp.


Thickening the Gravy: Making Gravy with Roux

Roux is a flour and fat mixture that is cooked prior to its use as a thickener for sauces and gravies. It is often used for preparing turkey gravy. Follow the easy steps described below to ensure success when preparing gravy with this type of thickening agent.

Using the one-to-one ratio of fat to flour per cup of cooking liquid, add the required quantity of reserved fat to a saucepan (the roasting pan can also be used if desired). Place the pan over medium heat.

Note: If you are making 4 cups of gravy, use 4 tablespoons of fat and 4 tablespoons of flour; for 6 cups of gravy, use 6 tablespoons of fat and 6 tablespoons of flour; and so on.

Add the flour to the fat in the saucepan and whisk until smooth. Continue to cook for 3 to 4 minutes over medium heat, but do not allow the flour to brown. It is important to keep the ingredients moving in the pan to prevent the flour from scorching. Continue to whisk the flour and fat as it cooks, to form a smooth, well blended mixture.
After the roux has cooked for the required time, the reserved meat juices can be added. Add the liquid slowly to the roux while whisking.
Whisk the mixture as it continues to cook over medium heat. As the mixture cooks it will begin to thicken. Bring the gravy to a boil, then turn the heat to low and simmer for approximately 5 minutes. Season the gravy with salt and pepper to taste and keep it warm until it is ready to serve.
To serve, pour the gravy into a gravy boat or serving bowl with ladle.


Thickening the Gravy: Making Gravy with Beurre Manié

A beurre manié is a paste prepared with equal quantities of flour and butter that are kneaded together. It is used as a thickener for gravies, sauces, or soups. Unlike a roux in which the flour and butter are cooked prior to adding the liquid, beurre manié is not cooked first. It is added to the liquid at the end of the cooking time in order to adjust the thickness. To achieve the desired consistency, the beurre manié is added in small increments so that it can be well incorporated into the gravy or sauce before more is added.

In a small bowl, add equal amounts of flour and butter. When determining the quantity of flour and butter to use, figure the amount based on 1 tablespoon of flour and 1 tablespoon of butter for each cup of liquid that requires thickening. The flour/fat chart is helpful in determining the proper quantity of each to use according to the quantity of liquid that is available. You may want to make extra beurre manié to ensure that you have enough on hand when thickening the gravy.
Using a small spatula, spoon, or fork, stir the flour and butter together until well blended. You can also use your fingers to knead the flour and butter into a smooth paste. Any leftover beurre manié can be stored for later use. It can also be made a head of time and stored in the refrigerator until you are ready to use it.
Pour the desired amount of cooking liquids (the reserved meat juices created from the initial gravy making steps) into a saucepan. Heat the liquid over medium heat. When the liquid is hot, begin thickening by adding a teaspoon of the beurre manié at a time, whisking it into the hot liquid until well incorporated.
Continue to add the beurre manié a teaspoon at a time, whisking continuously until the gravy is the desired consistency. After the gravy has thickened, bring it to a boil; then lower the heat and allow it to simmer for an additional 4 to 5 minutes before serving.

Quick Method for Making Gravy

The quick method for gravy making requires that the pan in which the turkey was oven roasted has the versatility to be used on the stovetop as well. This allows some of the steps used for traditional gravy making to be combined. The quick method of gravy making uses a roux for thickening. The fat and flour for the roux are cooked in the roasting pan after the meat juices and fat have been poured off and reserved.

To begin the quick method, pour off the meat juices and fat from the roasting pan and separate them as described previously in "Separating the Fat from the Meat Juices." The pan can be deglazed if desired, but this is not necessary for this method.

Make sure the cooking liquid is handy. Cooking liquids may consist of juices from pan drippings, homemade stock, broth, potato water, or plain water.

Place the roasting pan on the stovetop over medium heat. If the roasting pan is large, it may be necessary to position it over two burners.

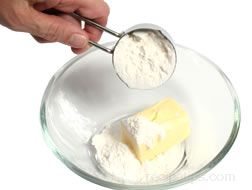
Determine amount of fat required for the quantity of gravy being prepared. Use the fat that was separated from the meat juices and pour the required amount into the roasting pan. Refer to the "Determining the Gravy Quantity" chart for calculating the quantity of fat, flour, and cooking liquid required.
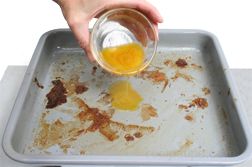
Sprinkle the required amount of flour into the roasting pan and stir it into the fat. Cook the fat and flour mixture (roux) for approximately 2 minutes, stirring constantly.

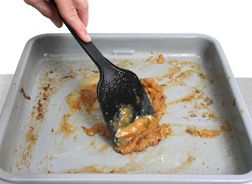
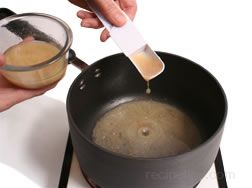
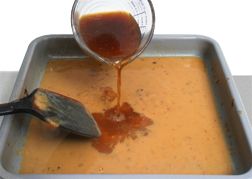
Pour gradually a 1/2 cup of the cooking liquid into the roasting pan while stirring constantly. Stir quickly to prevent lumps and to combine the flour and fat evenly with the liquid. The mixture will thicken quickly.

As the gravy thickens, add more cooking liquid. Pour in approximately a 1/2 cup at a time and stir until it is thoroughly blended into the gravy. Continue to add the cooking liquid in this manner until the all of the required liquid (for the number of desired servings) has been used and the gravy has a smooth consistency.

Simmer the gravy for 5 to 10 minutes. After simmering, taste the gravy and adjust the flavor with salt and pepper if necessary.
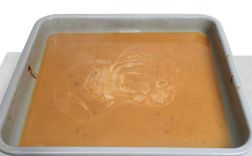
If the gravy contains unwanted particles, pour it through a mesh strainer before serving. Pour the gravy into a serving bowl or gravy boat and serve it while piping hot.

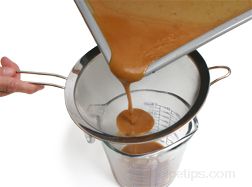
Adjusting the Consistency of the Gravy

If the consistency of the gravy is not as desired, there
are several techniques that can be used to correct it.

If the Gravy is Too Thick:

  • Add a small amount of broth and whisk it into the gravy. If the gravy is still too thick, continue to add more broth, a little at a time, whisking it into the gravy thoroughly after each addition. Continue to add broth until the gravy is at the desired consistency. Be sure to return the gravy to a boil after adding the broth.

  • If broth is not available to thin the gravy, water can be used; however, if too much is used, the flavor of the gravy will become diluted.

If the Gravy is not Thick Enough:

  • If time allows, simmer the gravy on the stovetop. This will evaporate some of the liquid in the gravy, which will help to thicken it.

  • Add 1 tablespoon of flour into 3 tablespoons of cold water and mix thoroughly until the flour is completely dissolved in the water. Add it to the gravy gradually, whisking constantly to prevent lumps from forming. If the gravy is still not thick enough, repeat the process. Be sure the gravy is heated to a boil after adding the flour and water mixture.

  • Cornstarch can also be used to thicken the gravy. Mix 1 teaspoon of cornstarch with 1 cup of cold water and blend thoroughly. Add it to the gravy in the same manner as the flour and water mixture.

Gravy Making Tips

Preparation and Troubleshooting Tips

  • When making gravy in a roasting pan or when deglazing the roasting pan, be certain that the pan is heavy enough to use on the stovetop.

  • To degrease, fatty gravy, soak up the unwanted fat with a slice of fresh bread, or drag an absorbent paper towel lightly across the surface.

  • To thicken runny gravy, whip 1-2 tablespoons of instant potato flakes into gravy.

  • A remedy for gravy that is excessively salty is to add raw, sliced potatoes to the gravy and cook until the potatoes appear translucent. The potatoes will absorb some of the salt in the gravy. Remove the potatoes from the gravy before serving.

  • A remedy for gravy that is only slightly salty is to add one or two pinches of light brown sugar to the gravy. Be mindful of how much brown sugar is added to the gravy or it may become too sweet.

  • To smooth lumpy gravy, try using a whisk or a rotary blender. If some of the lumps remain, strain the gravy through a mesh strainer.

  • To darken the color of gravy, add a 1/2 teaspoon of instant coffee.

  • Darkening the gravy can also be achieved by adding soy sauce. When a tablespoon or less of soy sauce is used per 8 cups of gravy, the flavor of the gravy will not be affected.

  • One teaspoon of peanut butter will erase the burnt taste of gravy without altering the overall flavor.

  • A circle of wax paper placed on the top of the gravy will prevent a layer of skin from forming as the gravy cools.

  • For the best pan drippings, a turkey should be roasted at a temperature range of 325°F to 350°F. Pan drippings consist of the liquid that accumulates in the bottom of the pan while the turkey is roasting. Higher roasting temperatures will decrease the amount of pan drippings available for gravy making. Do not allow the pan drippings to burn. If the drippings begin to dry up, add turkey or chicken broth to the roasting pan to prevent the drippings from burning.

Flavor Tips

  • For a distinctive twist, roast the turkey on a bed of celery and minced garlic. The flavors will be absorbed into the drippings, which will add so much flavor to the resulting gravy.

  • Add a dash of soup stock, brandy, or port to the gravy for a boost of flavor.

  • If the gravy is dull in flavor, add chicken or turkey bouillon to liven it.

  • Proper seasoning can make the difference between good gravy and great gravy. Remember to add freshly ground pepper and salt, if necessary.

Safety Tips

  • Use a meat thermometer to ensure that your gravy has reached the proper safe temperature of 165°F before serving (a rolling boil).

  • Store leftover gravy in a shallow container, separate from other foods to prevent cross contamination. When properly refrigerated, leftover gravy can be used up to 2 days. Leftover gravy must be heated to a rolling boil before serving. The temperature of the gravy must be 165ºF to ensure that it is safe for consumption.

  • As with all perishable foods, dispose of any gravy that has remained at room temperature for 2 hours.
Loading

Turkey Gravy Reviews

There currently aren't any reviews or comments for this article. Be the first!
E-mail: 
Advertisement
Reproduction in whole or in part without written permission is strictly prohibited.
© Copyright 2024 Tecstra Systems, All Rights Reserved, RecipeTips.com