


|
See More Information on Canning Vegetables and Fruits:
| |||||||||||||||||||||||||||||||
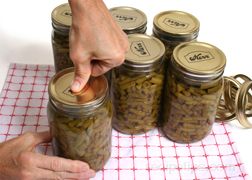
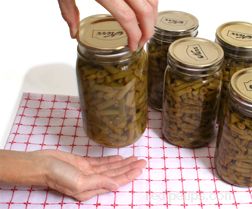
| After the jars have cooled for 12 to 24 hours, they need to be check for a proper seal before they can be stored. Remove the screw bands and use one of the following methods to check the seal. |  | |
|
Press down in the center of the lid with a finger or thumb. If the lid does not move up or down it is sealed properly. |
 | |
|
Lift the jar by the lid. If the lid holds the jar without loosening, the jar is sealed properly. Hold a hand under the jar to catch the jar if it should loosen from the lid or hold over a sink lined with a towel for padding when testing the seal. |
 | |
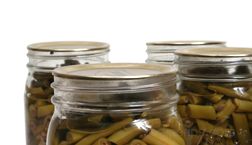
|
Another method to use for checking the seal is to pick up the jar and look at the lid at eye level. If the lid is curved down slightly in the center, the jar has sealed properly. |
 | |
| The seal can also be checked by tapping the center of the lid with the back of a teaspoon. If it makes a high pitched ringing sound, the jar is sealed properly. If it makes a dull thud sound the jar may not be sealed properly or there may be food at the top of the jar touching the lid. Pick up the jar and check the top to see if there is food touching the lid. If it is, you may want to check for a proper seal by using one of the other methods. | 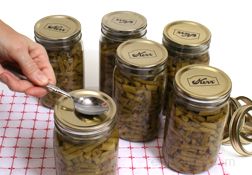 | |
|
If you do not want to go through the entire processing for one or two jars, the unsealed jars can be refrigerated and use within 2 or 3 days. | ||
Miscellaneous Canning Safety
Safe Equipment and Canning Methods
Canning is the process of placing food in jars and heating them to a temperature that will destroy micro-organisms that spoil the food. Through the canning process the jar is vacuum sealed so air cannot get in the container and cause contamination. There are two safe methods that can be used, boiling-water-bath and pressure canning. There are unsafe canning methods and equipment that have been used in the past that are no longer recommended and there are also new canning methods that should not be used because they run a higher risk of contamination. It is recommended to NOT use the methods or equipment listed below.
- Open Kettle Canning - This method of canning was once a popular choice for some types of food. When using this method you run the risk of contamination at any stage of the processing. The jars may seal but the food may not have reached a high enough temperature for a long enough period of time to create a proper vacuum or process to a safe level.
- Pressure Saucepans - Not recommended for canning because of inadequate control of the heating process.
- Conventional Ovens, Microwaves and Dishwashers - These methods will not process the food so that all risks of contamination are eliminated.
- Steam Canners - Will not process food at a high enough temperature to eliminate the dangerous bacteria that could contaminate the food.
- Jars with Glass Caps and Wire Bails, and Zinc Caps with Rubber Rings - Too often these types of jars and caps do not seal properly.
- Canning Powder Preservatives - Do not work as a preservative. Foods still need to be processed properly.
Pressure Canners - Safe Operation Check
If the pressure canner has a dial gauge it should be checked each year for accuracy before being used. The gauges can be check at most local County Cooperative Extension offices. To find your local Extension office, look in your telephone directory under "local government office." If the gauge is off by more than 1 pound at 5, 10 or 15 pounds of pressure, it should be replaced because it could cause improper processing. Before using be sure all parts, including the vent, safety valve and edges of the lid and canner, are clean.
Proper Processing Time
It is extremely important that the foods be processed for the proper time to ensure that all bacteria have been destroyed properly. If in a high altitude area be sure to adjust processing times accordingly. See Processing Temperature and Time for proper processing.
Check for Spoilage
It is extremely important that the canned products are checked carefully for spoilage before using them. The clostridium botulinum bacterium that can contaminate the spoiled canned food causes botulism, which can be deadly. It is a good idea to periodically check your stored canned goods for signs of spoilage but be sure to check them before using. If there is any signs of spoilage the product should be disposed of properly. If you are unsure as to whether the product is contaminated, DO NOT TASTE IT TO DETERMINE SPOILAGE, throw it out to be safe. Shown below is a list of signs of spoilage that should be check for before using the canned goods.
- Check the jar to see if the lid has a good seal. If the center of the lid is concave, the jar has a good vacuum seal.
- Look for fresh leakage or streaks of food that have dried on the jar that are coming form the top.
- Rising air bubbles in the liquid indicates the jar is not sealed properly.
- Look for bad coloring. If the content is very dark in color, it is an indication of spoilage. If the food has some light discoloration it may be the result of minerals in the water and then the contents would still be safe.
- There is spoilage if the contents are slimy, shriveled and have a cloudy appearance.
- If while opening the jar, contents spurt out, it should be discarded.
- After opening the jar, look for any signs of mold, which could be white, blue, green, or black in color. Be sure to check the bottom side of the lid for signs of mold as well as the content of the jar.
- Smell the contents, if it has an unnatural odor it should be discarded.
- DO NOT TASTE THE FOOD TO DETERMINE IF IT IS SPOILED.
| Note: Spoilage of Low-acid foods and tomatoes is not always as evident as in other foods or spoilage may appear in a different manner. If there is any suspicion that there may be spoilage, dispose of the food properly. |
Proper Disposal of Spoiled Food
Once it has been determined that the canned goods are spoiled or suspect to spoilage, the jars of food need to be disposed of properly. If the jar is stilled sealed, place it in a garbage bag, wrap the bag tightly around the jar and throw it in the regular trash. If the jar's seal is broken, the jar is leaking, or the jar has been opened, the food should be detoxified before disposal. Follow the steps below for detoxification.
- Empty contents of the jar into a saucepan. If contents are fairly thick, add some water so it will boil easier.
- Place the lid, jar, screw band (if it was still on the jar), and any other utensil that came in contact with the spoiled food into another pan. Lay the jar on its side if necessary to be able to cover it with water. Add water so that it covers the items with at least one inch of water.
- Bring both pans to a boil. Cook at a full boil for 30 minutes.
- After both pans are done boiling, place the contents of both pans in a heavy garbage bag and close tightly. Dispose of the bag and contents properly in the trash.
- Using hot, soapy water, wash the counter and any area exposed to the food or containers. Any sponges or rags used in the clean up should be placed in a heavy garbage bag, sealed tightly and disposed of in the trash.
- Wash hands thoroughly with hot, soapy water.
Canning Storage
|
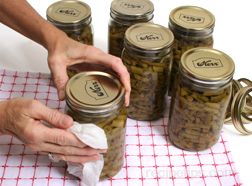
After checking for a proper seal, wipe off any residue on the jars and lids. |
 | |
|
Label the jars with the content and date of when they were processed. Apply a label to the jars to write the information on or a strip of masking tape will work to write on. A black marker could also be used to write the content and date on the top of the lid. |
 | |
|
| ||
|
Boiling-Water-Bath Canner: Wash the rack and canner inside and out. Dry thoroughly and place crumbled newspaper or paper towels in the bottom of the pot to absorb moisture during storage. Put the rack inside and place cover upside down on the canner. Store in a dry location. Pressure Canner: Wash the rack and canner inside and out. Dry thoroughly and place crumbled newspaper or paper towels in the bottom of the pot to absorb moisture during storage. Place the rack inside the canner. When washing the lid to the canner, take extra care so that it does not get dented or bent. Remove the gasket to clean it. Dry the lid and gasket thoroughly. Check the gasket for any signs of deterioration. If the gasket is worn or damaged, be sure to replace before using again. Pressure canners that have a cover with a dial gauge that is not removable, should be washed by wiping the cover off with a damp cloth because the dial gauge should not be immersed in water. Make a note to have the dial gauge checked by the local County Extension Office before using the following season. If safety valves and petcocks are removable, take them off to wash and dry thoroughly. Draw a string thru the vent or petcock to be sure it is free of any debris. To store the canner, place the lid upside down on the pot and store in a dry location. Do not seal the lid on the canner when storing. Store other canning equipment and utensils in the same area as the canner so it is easy to locate everything when the next canning season begins. | ||
Canning Tips
- For the best color and flavor in canned goods be sure to use quality food that is free of blemishes, that is at the prime maturity level, and is not diseased.
- When preparing food for canning it is important for some food to not have excessive exposure to air because it will cause the food to turn a dark color. Foods such as, apples, apricots, peaches, pears, and nectarines should be soaked in water that has some lemon juice added or in an ascorbic acid and water. Ascorbic acid is available in several forms and can be found in the canning supplies section in supermarkets. Prepare according to directions. Soak the cut up food just while doing other canning preparation.
- To keep canned goods fresh year to year, only can the quantity that you will use up within a year.
- Do not use commercial jars, such as mayonnaise jars, for canning. They are not strong enough and will crack or break more frequently during processing.
- If processing time will be longer than 10 minutes, wash the jars in the dishwasher. They will be sterilized during processing.
- If using spices for flavoring in cooking the food in preparation for canning, wrap them in cheesecloth rather than putting them directly into the food. That way they can be removed before the canning process, preventing the food from becoming to intensely flavored or discolored from the spices.
- Dried herbs are stronger than fresh so if using dried, cut back on the quantity by approximately 1/3.
- If located in a higher altitude be sure to increase processing time according to the charts in Processing Temperature and Time. Water boils at a lower temperature at the higher altitudes, requiring a longer processing time.
- After processing, do not tighten screw bands.


