|
Proper measuring of ingredients is important to successful cooking and baking. Some foods can be greatly affect by too much or too little of certain ingredients, such as salt, baking soda, baking powder and hot or spicy ingredients, such as cayenne pepper. The following information will assist in ensuring that your ingredients are measured proper.
Measuring Equipment
There are several different types of measuring utensils used for proper measuring of ingredients. The most common types of measuring equipment are listed below with a brief description for each.
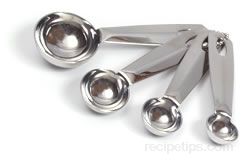
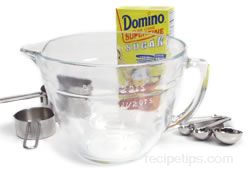
Measuring Spoons: Generally consists of at least 4 spoons, which are made of plastic or metal. Measuring spoons are used to measure small quantities of both dry and liquid ingredients. It is helpful to have two sets so that one can be used for dry ingredients and one can be used for liquid ingredients. This eliminates having to wash and dry the spoons after using for liquid ingredients and before using with the next dry ingredient.
|
|
A set of 4 will include basic measures of ¼ teaspoon, ½ teaspoon, 1 teaspoon, and 1 tablespoon. Sets are also available that include 1/8 teaspoon, ¾ teaspoon and ½ tablespoon. |
|
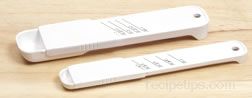
There is also an adjustable type measuring spoon produced that does not resemble the typical measuring spoons. It is an elongated slotted container that has a slide bar with a "stopper" to control the specific amount of measure desired. |
|
 |
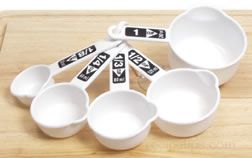
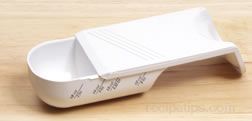
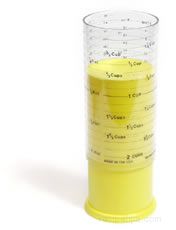
Dry Measuring Cups: Plastic or metal individual cups of various sizes used for single measures. There are also adjustable measuring cups available. The cup has a slide bar that can be adjusted so the cup can measure different amounts. Graduated and adjustable measuring cups are used to measure dry ingredients, such as flour, sugar, oats, rice and solid ingredients, such as shortening and peanut butter.
|
The single measure cups are generally found nested in a graduated set of ¼ cup, 1/3 cup, ½ cup, and 1 cup measures. You may also find some sets that will include 1/8 cup, 2/3 cup, and/or ¾ cup. They are used to measure dry ingredients, such as flour, sugar, oats, rice and solid ingredients, such as shortening and peanut butter. |
|
|
|
There are also adjustable measuring cups available. One type of adjustable cup has a slide bar that can be adjusted so the cup can measure different amounts. Adjustable measuring cups are used to measure dry and solid ingredients. |
|
|
|
The cylinder type measuring cup shown here is another adjustable cup that is handy for measuring solids, such as shortening and peanut butter. The tube is adjusted to the appropriate location for the amount desired and then filled with the ingredient. The ingredient is then extracted easily by pushing the tube to force the ingredients out of the cup. |
|
 |
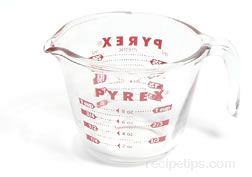
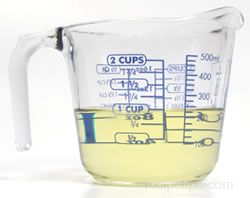
Liquid Measuring Cups: Glass or clear plastic containers with a pour spout and handle. They are generally available in 1 cup, 2 cup, 4 cup and 8 cup sizes, which have graduated measures on the side.
|
|
The full measure on the liquid measuring cup is marked down from the rim of the cup to help prevent spilling the cup's content when it is at its full measure. The spout on the cup assists in pouring the content when adding to other ingredients. |
 |
|
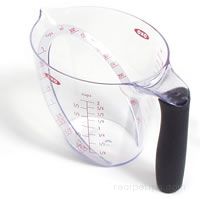
Angled measuring cups are also available, which are designed to provide easily viewable levels so that measured amounts can be readily viewed looking either down into the cup or by viewing the measured levels at the side of the cup. |
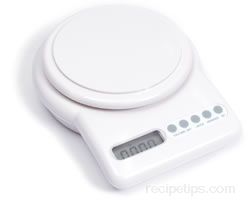
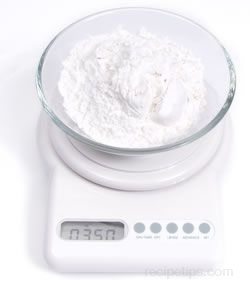
Scales: Balance or spring scales are used to measure the weight of ingredients. Balance scales will be more accurate than spring scales.
| Using a scale will result in a more accurate measurement of the ingredients than by measuring it by volume. Scales are available in manual and digital models. |
|
 |
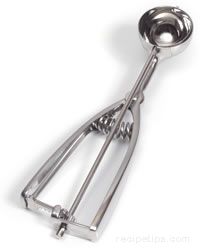
Portioning Scoops: Scoops, available in mechanical and non-mechanical types, that are used for measuring, portioning, and forming. The measuring scoops are a popular utensil used by professional chefs. They are available in several sizes, which are numbered according to their volume. The higher the number, the smaller the volume.
| Portioning Scoop Sizes Available |
 |
Scoop Size |
Tbsp. |
Fluid oz. |
| #30 |
2 |
1 |
| #24 |
2 3/4 |
1 1/2 |
| #20 |
3 |
1 3/4 |
| #16 |
4 |
2 |
| #12 |
5 |
2 1/2 |
| #10 |
6 |
3 |
| #8 |
8 |
4 |
| #6 |
10 |
5 |
The scoops are handy for measuring even portions when making foods such as cookies, muffins and meatballs. A #16 may be used for a medium size cookie where as a #30 or #24 would be used for a small cookie. A #16 may be used for making meatballs and a #6 for portioning meat for a patty. Using a scoop for measuring is not necessary, but if you have a size that works for a food that you make frequently, it can be a handy time saver.
Mixing Bowls: Plastic, glass, or metal containers of varying shapes into which ingredients can be placed, measured, and mixed.
|
There are glass and plastic measuring cups also available that are large enough to be used as mixing bowls. They range from an 8 to 12 cup capacity and are similar to liquid measuring cups in that they have a spout, handle, and measure markings down the side. They work well for large jobs and can be used for mixing and pouring batters, such as pancake or waffle batter. |
|
 |
Dry and Solid Measures
Use individual graduated dry measuring cups to measure large quantities of dry and solid ingredients and measuring spoons to measure small quantities.
Weight versus volume: If the recipe provides a volume and weight measurement, use a kitchen scale and measure the ingredient by weight for the most accurate quantity. There can be a variance in how much of a dry ingredient, such as flour, is actually in a measuring device. This is affected by the manner in which it is added to the measuring cup and by how much the ingredient is compacted. Humidity is also a factor in the weight of the dry ingredient. Using a scale to weigh the ingredient will eliminate the variance and provide a more accurate measurement. Because flour is generally a major ingredient in many recipes and different types of flour weigh do not weigh the same, it is important to be as accurate as possible with its measurement.
 |
|
Weight of Flour - Per 1 Cup
(approximate weights) |
| |
All Purpose Flour
Whole Wheat Flour
Bread Flour
Rye Flour |
4 3/8 oz or 125 g
4 1/4 oz or 120 g
4 1/2 oz or 127 g
3 5/8 oz or 102 g
|
Methods for measuring dry and solid ingredients: Ingredients are measured to the rim of the graduated measuring cup or spoon. Shown below are the methods that should be used for some of the common ingredients measured using graduated measuring cups and spoons.
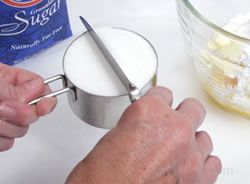
Flour, sugar, baking soda, baking powder, and cocoa
Add enough dry ingredients so that it is heaping over the top of the measuring cup by lightly spooning the ingredients into the cup. It may be beneficial to stir dry ingredients, such as flour, powdered sugar, baking soda and baking powder to aerate the ingredient and remove any lumps that have developed. Do not shake, tap, or pack the ingredient into the cup. If measuring with spoons, pour or scoop the ingredients into the spoon.
|
|
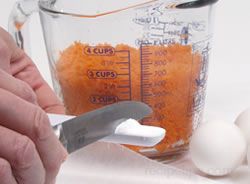 |
| Using the back edge of a knife or another straight edged object, level the ingredient by running the straight edge along the rim of the cup or spoon to push the excess ingredient off. |
Oats, cornmeal, breadcrumbs, and cereal
Add these types of dried ingredients to a measuring cup by pouring it into the cup until it is over filled and then level the ingredients using a straight edge, such as the back edge of a knife.
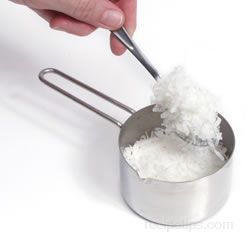
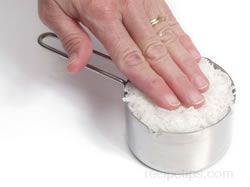
Shredded cheese, rice, coconut, chopped nuts, baking chips and other bulky dry ingredients
|
|
Bulky dry ingredients, such as shredded cheese, chopped nuts, and coconut, should be spooned into the measuring cup. |
 |
|
When the cup is full enough, pat the ingredients lightly and use your fingers to level the contents. Do not pack the ingredients down. |
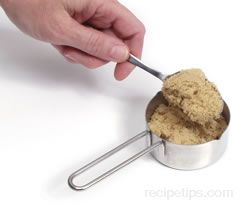
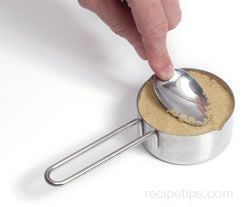
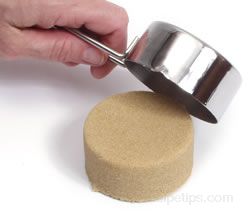
Brown sugar and shortening
Brown sugar and shortening (and other solid fats) should be spooned into the measuring device and packed firmly to eliminate any air pockets. After it is firmly packed it can be leveled with a straight edge, such as the back edge of a knife.
 |
|
|
| When removed from the measuring cup, the brown sugar will be molded into the shape of the cup if packed properly. |
|
 |
Butter or margarine in stick form
Butter and margarine in stick form have measurements marked on their wrappers, making it very convenient to measure the required amount. You simply cut off the amount needed according to the markings on the stick. They are generally marked in tablespoons. One stick equals 8 tablespoons or ½ cup. One half of a stick equals 4 tablespoons or ¼ cup and 1 tablespoon (1/8 of a stick) equals 3 teaspoons.

Liquid Measures
Use transparent plastic or glass measuring cups, with pour spouts, to measure large quantities of liquid and ingredients that are sticky and measuring spoons to measure small quantities of these ingredients.
Liquid ingredients
Pour the liquid ingredient into the measuring cup until it is at the desired measure.
| When checking to see if the ingredient is at the desired level, have the measuring cup sitting on a flat, level surface and bend down to view the measurement at eye level. Do not hold the cup up to eye level because the cup may not be level when viewing and it may result in an inaccurate reading. |
|
|
 |
|
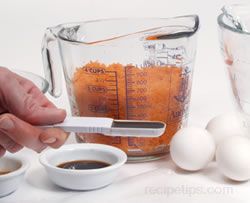
When using measuring spoons, hold the spoon flat and pour the ingredient into the spoon until it reaches the top rim of the spoon. |
Sticky ingredients
When measuring sticky ingredients, such as jelly, honey, molasses, and syrup, lightly coat the inside of the measuring cup with vegetable oil or spray with cooking oil. The oil will allow sticky ingredients to slide out easily. If the recipe calls for oil, you can measure the oil before the sticky ingredients and then use the same cup, without washing it, to measure the sticky ingredient.
Removal of sticky ingredients can also be assisted by using metal measuring cups or spoons and filling them with boiling water for a few minutes and then pouring the ingredients in them. The heated metal will allow the sticky ingredients to pour out easily.
Miscellaneous Measures
At times a recipe will call for a quantity that is not a standard measurement, such as pinch, dash, jigger, scant or heaping. Measurements of this type can be confusing as to the exact quantity to use. The descriptions below may help when these measurements are called for in a recipe.
Pinch - A measurement used on dry ingredients that is the amount you can pinch between your forefinger and thumb. It is less than a dash and equivalent to approximately 1/16 teaspoon.
Dash - A small amount of an ingredient equivalent to over 1/16 teaspoon but less than 1/8 teaspoon when measuring dry ingredients. A dash used to measure liquid ingredients equals approximately 3 drops.
Jigger - A measurement equivalent to 3 tablespoons or 1 ½ fluid ounces.
Scant - A scant measurement indicates that you should use slightly less than the actual measure.
Heaping - A term, used when measuring dry ingredients, indicating that enough ingredient should be added in the measure so that it heaps over the rim of the measuring cup or spoon.
Measuring Tips
- When measuring ingredients, never measure over the mixing bowl containing the other ingredients. You may accidentally tip the measuring device or over pour the ingredients and excess ingredients would fall into the mixture. This could ruin the whole batch, depending on the ingredient and how much was spilled. Measure over the sink, another bowl, or a sheet of wax paper to catch any excess spillage. Spillage caught on wax paper can be returned to that ingredient's container.
- If you do not have two sets of measuring cups or spoons that can be used separately for the dry and liquid ingredients, measure the dry ingredients first and then use the measuring cups and spoons for the liquid ingredients.
- Store loose dry ingredients, such as salt, in a lidded container. The ingredient can then be spooned out and leveled, rather than trying to pour it into a measuring spoon and having it spill over the edges.
- To help you keep track of which ingredients you have measured and added in the mixing bowl, place all the ingredients on one side of the mixing bowl and once you have measure and add an ingredient, move its container to the opposite side of the bowl.
- When cooking, learn to estimate the small measurements of ingredient to save time. Pour the measured amount of an ingredient into the palm of your hand. Observe the look and feel of the quantity and then try to pour that same amount into your palm without measuring first. Measure the amount you poured out to see how close you are to the actual measure. Practice doing this and soon you will be able to measure the ingredients by look and feel. This will greatly reduce your prep time when cooking. Do not use this technique when measuring ingredients for baking. When baking, it is more critical to that all ingredients are measured accurately.
- Do not mistake fluid ounces for ounces. Ounces measure weight and fluid ounces measures volume.
|


