
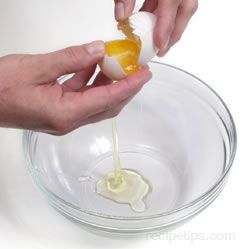
Preparation GuideIt is often necessary to separate the egg white from the yolk for many recipes. Beaten egg whites are used in many baked items and desserts such as meringues, cakes, and soufflés, providing air and volume to the dish. Yolks are required for sauces such as hollandaise and mayonnaise and for sweet items such as butter cream frosting and custards. It is important to learn proper methods for separating eggs successfully.
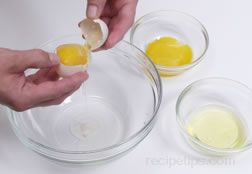
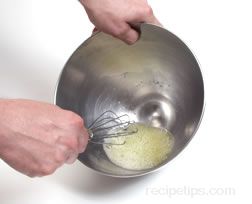
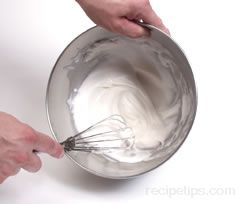
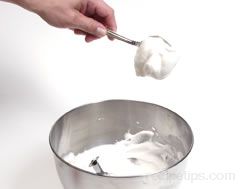
A second method that may be used for separating the white and the yolk is to insert a needle into one end of the egg, creating a hole that can be enlarged by moving the needle in a circular direction. The egg white should drain through the hole, leaving the yolk behind. The egg shell can then be cracked open to remove the unbroken yolk. There is also a slight possibility that this method may transfer germs existing on the shell to the contents of the egg. A third method of separating the white and the yolk is the funnel method. Place a small funnel over a container and crack the egg over the funnel. Be careful not to break the yolk. The egg white should slide through the funnel opening into the container, leaving the yolk behind. The yolk and the whites are transferred to other containers. Make sure that the funnel opening is small enough so that the yolk does not slide through yet large enough so that the whites can slide through easily. This method is more sanitary because the contents of the egg have very little contact with the outside of the shell. Perhaps the easiest separation method, which is also more sanitary than the traditional or needle method, is with the use of an egg separating tool. It is basically a tray which is centered in a circular frame with slots around the perimeter. When the egg is broken over the separator, the yolk slides into the center tray while the white falls through the slots in the frame into a container beneath. Egg Whites Egg whites that are correctly beaten may increase in volume by up to 8 times. They should be extremely smooth and firm, but not dry, forming stiff peaks. They can be beaten by hand or with an electric mixer. A copper bowl is often used, especially by professional chefs. The slight acidity of the copper results in a chemical reaction with the egg whites which helps to stabilize them. If copper is not available, the next best choice is stainless steel. A pinch of cream of tartar per egg white can be added as a stabilizer, replacing the acidic properties of the copper. A balloon whip or large wire whisk may be used to beat the egg whites by hand. It is extremely important that the bowl and whisk be very clean and dry and that no trace of oil is present. Egg whites will not increase to the desired volume if contaminated with any trace of oil. This is also true if any yolk is present in the egg whites. Plastic bowls and utensils should never be used because plastic tends to hold some oil even after thorough cleaning. Egg whites should be brought to room temperature to achieve the best results and the humidity should be low. Egg whites do not achieve their full volume on humid days. Eggs may be separated immediately after removing them from the refrigerator, but the whites should be allowed to reach room temperature before beating them. Don't let the whites sit unrefrigerated too long because of the possibility of bacterial contamination. The eggs should not be allowed to be away from refrigeration for more than 2 hours which includes the preparation time. Egg whites may also be warmed more quickly by placing the bowl of whites over warm water. Steps For Hand Beaten Egg whites
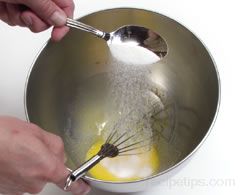
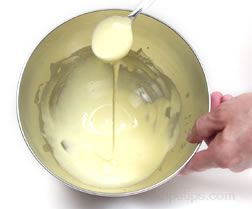
A hand held electric mixer also works well for beating egg whites, because it allows you the freedom of moving the spinning beaters all around the bowl, keeping the egg whites in motion. A stationary mixer in which the beater spins as well as rotates around the circumference of the bowl, is an excellent tool and eliminates all of the manual work. Some stationary models have beaters that do not move around the circumference of the bowl, but have bowl that slowly spins on a stand as the beaters spin. Kitchen tools such as blenders and food processors should not be used for beating egg whites. When using any electric mixer, start at a slow speed and continue for about 60 seconds. Gradually increase the speed until the egg whites reach their full volume. Operating the mixer at a high speed from the start will not allow the egg whites to reach their full volume. The entire beating process usually takes no more than 3 minutes with the better quality electric mixers. The beaten egg whites should be folded immediately into any other ingredients used in the selected recipe. It is a good idea to have the other ingredients prepared first and then beat the egg whites as the final step so that they will not have time to break down and lose volume. Egg Yolks Egg yolks that will be used for the preparation of desserts are often required to be blended with sugar and beaten until the mixture reaches the "ribbon" stage. This helps to prevent the yolks from becoming granular when heat is applied. The ribbon stage is reached when the mixture can be poured from a spoon into the bowl, containing the yolks and sugar, and a ribbon forms on the surface that slowly dissolves into the rest of the mixture.
Egg yolks may also need to be cooked and beaten for some sauces such as hollandaise, which is an egg yolk and butter sauce flavored with lemon juice and pepper. For this procedure, the yolks are whipped constantly over low heat just until the yolks are creamy and thickened. If the heat is too high, the yolks may scramble. Be ready to place the pan into cold water if there is any hint that this may occur. Once the yolks are thoroughly heated and have thickened, they are removed from the heat and softened butter is beaten into the yolks. One yolk is able to absorb nearly 3 ounces of butter, but it must be added slowly to allow the yolks to absorb it. The yolks should be whipped constantly while the butter is being added. Variations on the flavorings can be used to make other egg and butter sauces such as béarnaise sauce, which is flavored with tarragon, shallots, pepper, and wine, or choron sauce, which is flavored the same as béarnaise except that it also contains tomato paste. |

Loading
Egg Preparation Guide


Provided By
RecipeTips
RecipeTips


Loading
There currently aren't any reviews or comments for this article. Be the first!


Advertisement


Advertisement