


|
Thawing | Cleaning | Brining | Marinating | Stuffing | Preparing the Cuts There are several methods that can be used for thawing fresh frozen pork. Pork should never be thawed out on the kitchen counter because the outside of the meat will reach a temperature above 40°F while the inside is still frozen. The area that reaches a temperature above 40°F would be susceptible to bacterial growth. Use one of the thawing methods described below. | ||||||
Thawing pork in the refrigerator is the slowest but safest method you can use and will result in the least amount of moisture loss in comparison to the other methods. The temperature of the refrigerator should be maintained at 35°F to 40°F to discourage growth of harmful organisms as the meat thaws. Leave the meat wrapped and placed on a platter or a tray to catch the drippings as it thaws or unwrap and loosely cover with plastic or foil. After thawing in the refrigerator the pork can be refrigerated safely for 3 to 5 days. If you decide to not cook the meat within this time, the meat can be refrozen. Just remember that each time the meat is frozen it loses some of its quality. The meat should not be refrozen when thawed using the cold water or microwave methods. | ||||||
Thawing pork in cold water is a faster method than thawing in the refrigerator but the proper precautions must be taken. Fill the sink with enough cold tap water to cover the cut of meat, place the pork in a leak proof bag and put it into the cold water. Be sure that the meat is sealed tightly so that the meat is not exposed to the water. Meat exposed to the water will result in flavor and color loss, and will have a greater chance of bacteria growth. The water should be changed every 30 minutes. Do not use warm or hot water, even though it will thaw the pork faster because it will also encourage the growth of bacteria. Do not use the sink for other purposes during the thawing period and be sure the water does not splash onto other preparation surfaces or food. Once the meat is thawed, remove it from the sink and sanitize all utensils and surfaces affected during the thawing period. The pork should be cooked immediately after thawing and should not be stored for any period of time. Do not refreeze the meat that has been thawed using this method, unless it has been cooked first. | ||||||
Defrosting pork in a microwave is a quick thawing method but is not recommended because of the difficulty in determining the proper defrosting time. Thawing times vary according to different microwaves and the size and structure of the cut you are thawing. The meat should have the store wrapping and foam tray removed and then placed on a plate or tray and loosely wrapped with material suitable for the microwave. Generally it is best to start out by microwaving at a defrost or medium-low setting for 2 minutes and then letting stand for 2 minutes before checking progress. Turn the meat and repeat this procedure if needed, being careful that it does not start to cook. Thawing large items in the microwave does not work well and should be avoided. Pork that has been thawed in the microwave should be cooked immediately because some of the meat may have started to cook during defrosting, resulting in some areas of the meat being at a temperature of over 40°F, which would encourage growth of bacteria. Do not refreeze the meat that has been thawed using this method unless it has been cooked first. | ||||||
Meat can be cooked without thawing first. You will need to increase the cooking time when starting with frozen meat. Larger cuts, such as roasts, will require up to 1 ½ times the cooking time of an unfrozen cut. Chops and steaks should be cooked at a greater distance from the heat source and may require up to 2 times the cooking time of unfrozen chops or steaks. Frozen meat should not be cooked in a slow cooker.
Other Thawing Guidelines
- Plan ahead so that you will have adequate time to defrost the frozen meat using one of the methods above. Having the meat slowly thaw in the refrigerator will result in the best quality of meat and is the safest method for preventing foodborne disease.
- When thawing in the refrigerator, realize that food placed in the coldest area of the refrigerator will take longer to thaw than if placed in another area. Also, food placed in a refrigerator set at 35°F will take longer to thaw than a refrigerator set at 40°F.
- While thawing, be sure that drippings do not contaminate other food or preparation surfaces.
- To store meat that has been thawed in the refrigerator, remove from wrapping and pat dry with a paper towel. Place on a tray with sides to catch drippings, cover loosely and place in the refrigerator in an area where there is no danger of the juices dripping onto food that will be eaten without cooking, such as raw vegetables and salad ingredients.
- When thawing meat in the refrigerator, drain the juices that accumulate on the tray holding the meat. The juices will deteriorate and spoil faster than the meat, which will then contaminate the meat.
Fresh or thawed pork does not require rinsing before it is cooked because any bacteria on the surface of the meat will be destroyed during the cooking process. Chops and steaks sometimes benefit from being briefly rinsed in cold water to rinse away bone grindings that may occur when the chops and steaks are cut apart. Once rinsed, they should be patted dry using a paper towel.
Hands should be washed before and after handling the meat. Be sure all utensils, cutting boards and work areas are cleaned and sanitized properly after being exposed to the raw pork. The serving plate used to hold the raw meat should not be used for serving the meat once it is cooked. The same plate can be used if it is washed in hot soapy water and properly dried before using for the cooked meat.
Pork does not have to be brined but it will provide juicier and more flavorful meat. Brining (or salting) increases the ability of the meat to hold moisture. Brining solutions will vary from a simple salt and water solution to a sweet brine in which sugar is added. The more salt that is used the less brining time required, but it will also result in the outside layers of meat being very salty. Using a less salty solution and longer brining time will result in a more even seasoning through all layers to the bone. Use enough brining solution to cover the meat, which should be placed in a large pot, tub or resealable bag and then placed in the refrigerator. Be sure the brine covers the entire cut of meat. When using a brining solution made up of ¾ cup of kosher salt, ¾ cup of sugar, 1 cup boiling water, and 1 gallon of cold water, brine chops and roasts for 12 to 24 hours. A whole loin should be brined for 48 to 72 hours. When first brining, it is a good idea to start with the shorter times and then increase the time if you feel it is necessary, because the longer the meat is in the solution the more salt that soaks into the meat. If the meat becomes too salty there is no way to get rid of the saltiness.
Once the pork has soaked for the proper amount of time, take it out of the solution, rinse it off twice and refrigerate until ready to cook. The brined meat does not need salt added when cooking and it will cook faster than unbrined pork, so you need to watch it closely so that it does not overcook. The brining solutions can also contain other flavorings, such as fresh herbs, clove, cinnamon, vanilla, garlic, and hot pepper flakes.
Soaking pork in a marinade is a good method for adding flavor and tenderizing the meat. A proper marinade should contain an acidic ingredient such as vinegar or wine, an oil such as olive oil, and seasonings such as herbs and spices. Citrus fruit juices may be used in place of the vinegar or wine to provide the acidic ingredient that is necessary to soften the tissues of the meat.
There are several important points to remember when using a marinade:
- Quantity: The marinade should totally cover the meat in order for it to work effectively.
- Soaking time: Pork can be soaked in the marinade from a couple of hours to twelve hours or more. Be sure to store the meat in its marinade in the refrigerator during this period of time.
- Proper containers: Since the marinade contains an acidic ingredient, reactive containers such as metal bowls should not be used. It is best to use containers such as glass bowls, plastic bowls or plastic bags that can be sealed.
- Reuse: The marinade should not be reused for any other purpose because of the bacteria that may be present from being in contact with the raw meat. The only way the marinade can be reused is to boil it thoroughly and then use it as a basting liquid or as part of a sauce for the meat, but it is best to save some unused marinade for this purpose.
- Cooking time: When meat has been marinated for a long period of time it will shorten the cooking time. Twelve hours of marinating will reduce the cooking time by 30 to 35%.
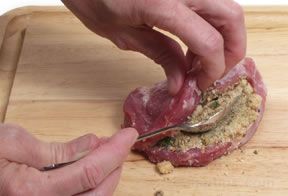
Stuffing can be used in crown roasts, extra thick chops or steaks, rolled roasts or rolled into flattened tenderloin. The stuffing can be made from a simple bread base or a wild rice mixture, with ingredients such as onions, garlic, lemon, herbs, and spices added for extra flavor. A variety of other ingredients, such as sausage, vegetables, mushrooms, pecans, and chestnuts can be added to make up a more complex recipe with a unique flavor. It is common to use eggs for binding and stock or broth to moisten the stuffing.
When stuffing a crown roast, fill the center of the roast with the stuffing and then cover the stuffing with foil. Remove the foil during the last 45 minutes to an hour of the cooking time so that the stuffing can brown. To stuff extra thick chops or steaks make a slit along the side, through the middle of the chop to form pocket to hold the stuffing.
|
|
|
 |
|

Rolled roasts and flattened tenderloins that are stuffed generally have a layer of the stuffing spread over the meat and are then rolled up and tied before cooking. If the stuffing contains egg, it must be cooked until it reaches an internal temperature of 165°F to ensure that it is safe to eat.
The following guidelines should be followed in regard to stuffing:
- If using a recipe where the stuffing or any parts of it are cooked in any manner, it must be completely cooled before inserting into the meat.
- Do not overstuff because the stuffing will expand during cooking.
- Stuffing should reach an internal temperature of 165°F when eggs are one of the ingredients.
- Always thoroughly sanitize any utensils and areas exposed to the raw meat or juices.
- For stuffed chops, be sure to purchase chops that are at least 1 ¼ to 1 ½ inches thick.
| Note: NEVER stuff meat in advance. Stuffing in advance will increase the risk of bacteria growth. Stuffing can be made in advance and refrigerated separately from the meat and then inserted just before cooking. |
Some pork cuts will require extra preparation, such as trimming and tying, depending on the cooking method that is to be used. Some of the common processes used are described below.
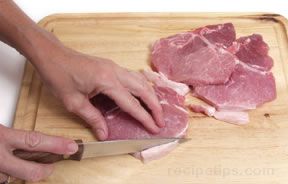
Trimming: The first thing to do before starting any kind of trimming process is to be sure that the knives to be used are sharp. This will make the process go more smoothly. Dull knives are not safe and will produce poor cuts. Shown below are some of the trimming processes that are commonly used.
|
|
Trim Off Fat - A recipe may suggest that all fat be trimmed from the surface or edges of the cut. If so, use a sharp knife and trim off the outside layer of fat. | |
|
Any cut that is going to be roasted can have up to ¼ inch layer of fat left on the surface to prevent the meat from becoming too dry. If the cut is a chop or steak that will be grilled, it is best to leave a small amount of fat on the cut and slit it at one inch intervals to prevent it from curling up while cooking.
| ||
|
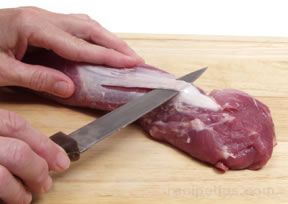
Trim Tenderloin - When preparing a pork tenderloin, trim off any excess fat that is surrounding the meat. Once the excess fat has been trimmed off, the silverskin must be removed. The silverskin is the thin shiny membrane attached to the tenderloin. | ||
|
|
| |
|
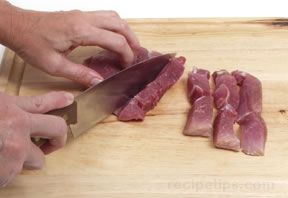
Trim Cubes and Strips - Cubes and strips can be trimmed from other cuts, such as a steak or tenderloin and used for kabobs and stir frying. | ||
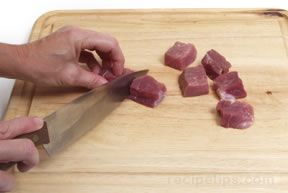 |
First trim off excess fat. Trim the meat into 1 to 1 ½ inch cubes for kabobs. | |
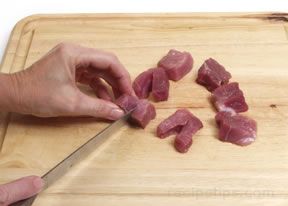 |
If cubes are to be use for kabobs and will be marinated, they can be butterflied to allow the cubes to absorb more of the flavor from the marinade. After cutting cubes for kabobs, butterfly each one by cutting through the center, leaving enough to hold the cube together. Marinate and then place on the skewer as a whole cube. | |
|
When trimming a steak or tenderloin into strips for stir frying, cut into thin slices, cutting across the grain. Tenderloins are also trimmed across the grain into thick slices forming tenderloin medallions. |
| |
|
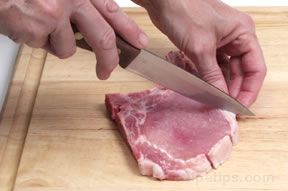
Trim Edges - Cuts such as ham steaks, Canadian bacon, and some chops have a layer of fat or rind around the outer edge that can cause the cut to curl up while cooking. To prevent the curling, slice the edges of fat or rind about every inch before starting to cook.
| ||
Tips for Trimming Meat:
- Dry meat off with a paper towel before trimming to prevent it from slipping around while cutting.
- When trying to cut thin slices, it is easier if you put the meat into the freezer for 30 minutes to an hour before slicing to help firm it up or if meat was frozen, slice before it is completely thawed.
- When trimming or cutting any meat that requires you to hold the meat in place with your fingers, be sure that your fingertips are curved in toward the palm of your hand. Holding them in this manner will prevent them from getting in the way of the blade of the knife.
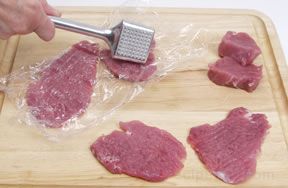
Pounding: Pounding of meat is performed for various purposes. Meat is pounded to tenderize, to even out the thickness of some cuts so that they cook more evenly, and to form cutlets. A mallet is often used to pound the meat and there are many different types of mallets available. If you do not have a mallet, use the bottom of a heavy bottle or pound with a rolling pin.
|
To make pork cutlets, place a boneless piece(s) of meat between plastic wrap and pound until the pieces have been flattened and are an even thickness throughout. The meat for the cutlets is generally taken from the tenderloin or loin cuts and should have most of the fat trimmed off before pounding. |
|
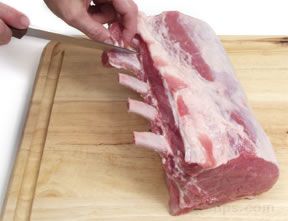
Frenching: This process is used primarily for presentation purposes. It provides an attractive piece when served. Frenching is the cutting away of the fat, gristle and meat at the end of the bone on rib chops, crown roasts and rib roasts.
|
|
The bone is scraped with a sharp knife to clean 1 to 2 inches of the tip of the bone before cooking. |
Barding: Barding is used on very lean cuts of meat that will be roasted to provide moisture while cooking. Very thin slices of pork fatback or bacon are wrapped around the outside of the roast and then are tied to secure in place. The fatback or bacon is generally discarded when the meat is done cooking.
|
|
Slices of pork fatback or bacon are also wrapped around tenderloin medallions to provide moisture during the cooking process. Cut a string approximately 10 to 12 inches in length and then tie around the bacon to secure it in place. Tie in a knot and then trim strings to 1/4 inch. |

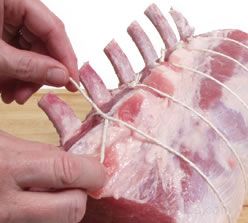
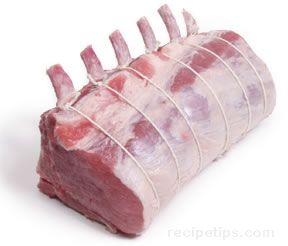
Tying Meat: The process of tying meat is used to ensure even cooking and helps hold the shape of the cut. Tying is used on several different cuts and there are several styles of tying that can be used. Some of the common cuts where tying is helpful are shown below.
- Roasts - Most often a boneless roast will be tied to reshape it once the bones have been removed. It is shaped into a roll that is the same thickness throughout. Roasts with the bones in can also be tied to provide a more appealing roast when it is cooked.
|
|
A standing rib roast, which has an outside layer of meat that has a tendency to separate from the inner rib-eye muscle is generally tied to hold the roast together during the cooking process. Cut strings approximately 18 to 20 inches in length and tie firmly, but not too tight, around the roast in between each of the bones. Tie in a knot and trim strings to 1/4 inch. |
|
The strings should be tied firmly but not too tight. If the strings are tied too tight they will force some of the juices out of the meat as it is cooked. Tying the rib roast will prevent the outside layer of meat from separating from the inner rib-eye muscle, providing a roast that is appealing in appearance when it is cooked. |
|
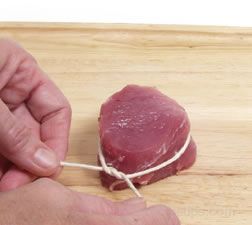
- Medallions - Tenderloin medallions or boneless steaks are commonly tied with a string around the edges and secured with a knot to provide a more appealing shape when cooked. If barded with a strip of bacon, the bacon is wrapped around the edges first and then the cut is tied.
|
|
| |
To tie a medallion, cut a string approximately 12 inches long and wrap it around the meat and tie firmly. |
Tie the string in a knot and trim the ends to 1/4 inch in length. |
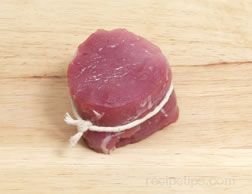
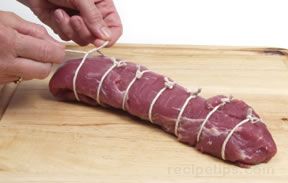
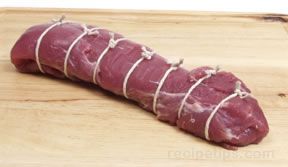
- Tenderloins - Most often the tenderloin is tied so that the more slender end of the cut can be tucked under and held in place to create a more uniform thickness for cooking. The slender end of the tenderloin is folded under and tied into place.
|
|
Fold the last 4 to 5 inches of the slender end of the tenderloin under so that the tenderloin will be closer to the same thickness throughout. Cut strings approximately 12 inches in length and tie around the tenderloin at 1 to 1 1/2 inch intervals. |
|
Tie all knots firmly and trim the ends of the string to 1/4 inch. The entire tenderloin does not have to be tied, only the folded under end must be, but it will be more appealing when cooked if tied all along the cut. |
|
The style and type of knot used to tie the cut of meat you are working with will vary depending on one's experience, the style one has been taught and personal preference. The important aspect of tying is that the string is tight enough to hold the shape of the cut but not too tight so that it will squeeze the juices from the meat while it is cooking. Use a kitchen twine that is made from an all-natural cotton or linen to ensure that it will not burn or affect the flavor of the meat. Butcher's twine works well because it is bulkier, which makes it easier to handle. Keep in mind that there are many styles of tying and knots that can be used.
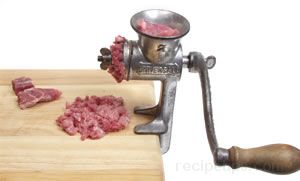
Grinding Meat: Ground pork is not as readily available as ground beef but on the occasions that you need it you can easily grind it yourself. By grinding it yourself, you can be sure of what cut of meat is used and how lean it is but be sure to trim gristle and tendons before grinding. Do not grind meat until you are ready to use it because ground meat deteriorates in quality rather quickly. Several methods used for grinding meat are shown below.
|
|
Meat Grinder - A hand grinder can be used to grind meat into a coarse or fine grind, and this method produces the most evenly ground meat. Some electric mixers also have attachments for grinding meat. | |
| Food Processor - Meat can be ground by placing cubes in a processor and using the pulsing action to grind them. The meat should be stirred between pulses to provide an even grind. Be careful of over processing, this will result in the meat having a pasty texture and it will be tough when cooked. | ||
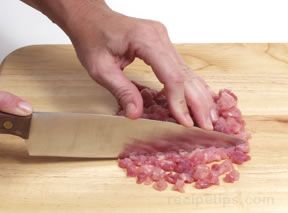 |
Hand Chopping - Cut meat into cubes and then continue to cut the cubes into smaller pieces until the meat is the consistency that you desire. Hand chopping will provide firmer ground meat than the other methods. | |
When trimming the fat from the cuts before grinding, it is best to leave a little fat with the meat to add flavor and tenderness to the ground meat. It can have additional flavor added once the meat is ground by adding flavorings such as garlic, onions, herbs, and spices.


