|
Roasting | Broiling | Grilling | Sautéing
Stewing and Braising | Lamb Doneness | Carving
There are two general methods used for cooking lamb: dry heat and moist heat. In dry heat cooking (grilling, roasting, broiling, sautéing), the meat is in direct contact with a hot surface or close to the heat source. High heat is used to quickly brown the surface and any additional cooking is at a somewhat lower temperature. This method works best for tender cuts, although tougher cuts, which have been tenderized (as with a marinade), can be cooked successfully with dry heat.
With moist heat methods (stewing, braising, poaching), the meat is cooked in contact with hot liquid, usually at a low temperature. The hot liquid tenderizes the meat and it also acts as a flavoring source. Moist heat methods are usually used on tougher cuts, such as shoulder or shank, but may also be used, with care, for tender cuts, such as cuts from the leg.
Roasting
Roasting is usually done in a shallow, uncovered pan, often with the meat raised slightly on a rack to allow heated air to circulate completely around it. Roasting is the cooking method of choice for large or irregularly shaped pieces of meat if they are tender (or have been tenderized). A smaller cut, such as a chop, would dry out if roasted. Leg, rack (including crown roast and guard of honor), and loin (including saddle) are ideal cuts for roasting. Baby, or hothouse, lamb is also roasted, but because the meat is so tender and has so little fat, special procedures should be followed. Shoulder can be roasted at lower heat, especially if it is from a young lamb that is likely to be tender.
In general, a roast should have a crisp brown surface and a juicy pink interior. This can be accomplished by searing the meat at high heat (450ºF) in the oven for a short time (usually 10 minutes) and then reducing the heat to 350ºF for the remainder of the time. Typical cooking times (after the roast is seared) are 10 minutes per pound for rare meat, 12 minutes per pound for medium-rare, 15 minutes for medium, 20 minutes for well-done. These are approximate times, for average size, bone-in roasts at room temperature. Cold meat, directly from the refrigerator, or very large pieces, or boneless roasts will take somewhat longer. The only way to be sure that the meat has reached the desired doneness is to use a good quality rapid-response thermometer, inserted into the meatiest part, but not into fat or against a bone. It is a good idea to plan where you'll insert the thermometer as you prepare the roast.
Roast lamb should be allowed to rest, loosely covered with foil, for 10 to 30 minutes (depending on the cut) after removal from the oven. Cooking will continue during the resting period (the internal temperature will rise at least 5ºF), reaching the desired level of doneness. The rest period minimizes the loss of juice and allows the meat to become firmer, making carving much easier.
|
Temperature for Roasting Lamb
Lamb may be roasted at different
temperatures, depending on the desired result: |
High Heat: 400ºF - 425ºF
(for the entire cooking time) |
Roasting at high heat maximizes the brown crusty surface. This method should not be used on large pieces because the surface will dry out and may burn before the interior is cooked to the desired doneness. |
Moderate Heat: 325ºF - 350ºF
(for the entire cooking time) |
Roasting at moderate heat maximizes juiciness and minimizes shrinkage. Leg roasts are often cooked this way. |
Varied Heat: 425ºF - 450ºF, followed by 325ºF
|
Roast at 425ºF - 450ºF for an initial 10 - 15 minutes to brown the meat, then continue cooking at 325ºF to the desired doneness (some recipes use temperatures as low as 250ºF, but this is not recommended). |
| Note: To prevent lean cuts from drying out while cooking, the meat may be rubbed with oil prior to roasting and/or basted with pan juices during roasting. |
Broiling
Broiling and grilling are essentially the same technique: the application of intense, direct heat to the meat, one side at a time. In grilling, the heat is below the meat; in broiling the heat comes from above (usually in an oven). Meat for broiling should be tender, fairly lean, and not too thick, since it needs to cook quickly. Lamb cuts that are good choices for broiling include chops, tenderloin, kebabs, and patties of ground lamb.
When broiling cuts of lamb, it is important to use the right temperature. In broiling, the temperature is adjusted by changing the distance between the meat, on its broiler pan, and the heat source. Thinner cuts of lamb can be closer to the heat source than thicker cuts, since the thicker cut will require more time to cook. If the thicker cut is too close to the heat source, the surface will char before the interior is cooked to the proper degree of doneness.
When broiling lamb, the meat is usually cooked on one side, turned once, and cooked on the other side. A tongs should be used to avoid puncturing the meat and allowing juices to escape. The meat should be watched throughout the broiling process to make sure that it does not burn.
Pan-broiling is a useful variation of oven broiling in which the surface of the hot pan becomes the heat source. It doesn't require heating up the oven and allows for easier monitoring of the cooking process. To pan-broil, heat a heavy bottomed pan (cast iron is ideal) until it's hot enough to evaporate a drop of water instantly and then sprinkle a little salt over the surface of the pan. This helps make a tasty crust on the meat and doesn't add a significant amount of salt to the food. (You can omit this step and still get good results). Put the lamb into the pan, brown well, and turn to brown the other side. If the meat needs longer cooking at this point, reduce the heat somewhat to prevent burning. Pan-broiling works especially well for chops and patties.
Grilling
The grilling process cooks foods with a high heat source, either directly, indirectly, or a combination of both. It is essentially the same technique as broiling except that when grilling, the food is cooked above the heat source and with broiling, the food is cooked below the heat source. Grilling temperatures typically reach as high as 650ºF, but any temperature above 300°F is suitable as a grilling temperature. The high heat of grilling sears the surface of lamb, sealing in the natural juices and creating tender meat with a flavorful crust. The required cooking temperature and the method of grilling (direct, indirect, or a combination) depends on the cut of lamb and the quality of the meat. As with any cooking method, lamb that is grilled should not be overcooked in order to produce the best results.
Types of Grills
There are a wide range of grills available that are suitable for grilling various cuts of lamb. Some grills are designed for indoor use and provide convenience for consumers who are unable to grill outdoors due to location or climate. Grills designed for outdoor use provide a flavor to food that is difficult to match with indoor grilling.
|
Indoor Grills |
|
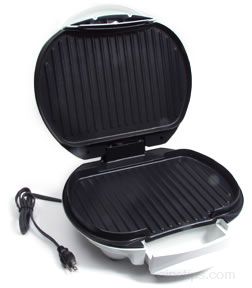
Portable Countertop Models: The most popular indoor grills are electric countertop units, which come in a range of styles and sizes and provide a grilled or broiled flavor to lamb chops or small roasts. The food is placed on a grill rack, which is positioned above an electric heating unit. A drip pan is positioned on the bottom of the unit to catch the extra fat and grease that drips from the meat as it cooks, helping to reduce the fat content of some lamb cuts. Portable indoor electric grills are convenient to use and are easy to clean and most models are inexpensively priced. |
 |
| Built-in Models: Many of the manufacturers of kitchen stoves offer models with built-in grills. Like portable indoor grills, the built-in models are convenient to use and are a good substitute when grilling cannot be performed outdoors. |
|
Outdoor Grills |
| Wood Fire Devices: Traditional methods for grilling (which are still used) involve the use of a wood fire. A small wood fire is built within a ring constructed of heavy stones or metal or in a masonry structure designed to contain the fire. Before the lamb is cooked, the fire is allowed to burn down until the flames are small and the embers are glowing. A grate, supported by the stone or metal structure, is placed above the fire and the food is cooked directly on the grate. One drawback with this grilling method is that it can be difficult to regulate the cooking temperature unless there is a method for raising and lowering the grate. |
|
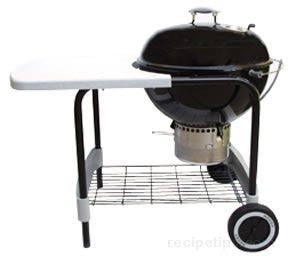 Charcoal Grills: Some lamb cuts are cooked on grills that use charcoal as the fuel source. Charcoal grills are available in a wide range of styles and sizes. Some are very basic, consisting of a small cast iron container (that may be round, square, or oblong) for holding the charcoal with a grate placed on top (hibachi). Other models are elaborate kettle grills with covers, vents on top and bottom for regulation of oxygen to change the cooking temperature, built-in ash containers, and attached carts with a work surface and storage for utensils. Charcoal Grills: Some lamb cuts are cooked on grills that use charcoal as the fuel source. Charcoal grills are available in a wide range of styles and sizes. Some are very basic, consisting of a small cast iron container (that may be round, square, or oblong) for holding the charcoal with a grate placed on top (hibachi). Other models are elaborate kettle grills with covers, vents on top and bottom for regulation of oxygen to change the cooking temperature, built-in ash containers, and attached carts with a work surface and storage for utensils.
|
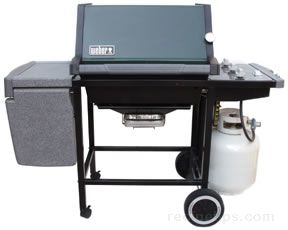 Gas Grills: Among the most popular outdoor grills are gas grills, which, like charcoal grills, are available in many styles, sizes, and price ranges. They are easy to use and most people like the convenience that gas grills provide. Most models have automatic ignition and more than one burner, which are controlled with a knob to increase or decrease the fire, just like an indoor gas range. Depending on the manufacturer and the price, some gas grills may have warming trays, special smoker boxes to add a wood smoked flavor to food, built-in thermometers to monitor the cooking temperature when the cover is closed, and attached work surfaces that may be folded down when not in use. Gas Grills: Among the most popular outdoor grills are gas grills, which, like charcoal grills, are available in many styles, sizes, and price ranges. They are easy to use and most people like the convenience that gas grills provide. Most models have automatic ignition and more than one burner, which are controlled with a knob to increase or decrease the fire, just like an indoor gas range. Depending on the manufacturer and the price, some gas grills may have warming trays, special smoker boxes to add a wood smoked flavor to food, built-in thermometers to monitor the cooking temperature when the cover is closed, and attached work surfaces that may be folded down when not in use. |
Outdoor Grill Setup
Setting up an outdoor grill is an easy process, but care must be taken to ensure safety. The following safety points should always be considered when grilling outdoors:
- Outdoor grills must be kept away from the walls of buildings and should never be used in garages or under low hanging tree branches.
- Grills should be positioned in an area that is level, such as a patio or level space in a lawn, but should never be used in similar areas that may be covered with a roof.
- If a grill is used on a wood deck, a large piece of metal or a patio/deck protector should be placed under the unit.
- A grill should never be left unattended and children and pets should always be kept away from the grilling area.
- A fire extinguisher should be kept within reach at all times.
|
Charcoal Grill Setup |
|
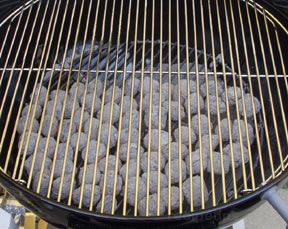
The amount of charcoal required depends on how much of the area of the grate will be used for cooking. If the entire area of the grate will be used for cooking, an even layer of coals should be spread across the entire bottom of the grill. If only a portion of the grate will be used for cooking, the coals should extend about 2 inches beyond the area where the food will be cooked. |
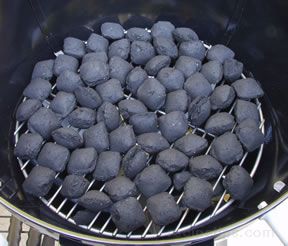 |
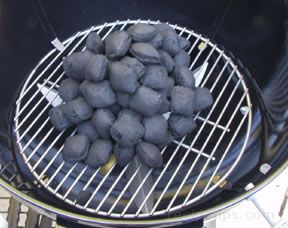
| After determining the correct quantity of charcoal to use, the briquettes can be placed in a mound in the center of the grill. |
 |
|
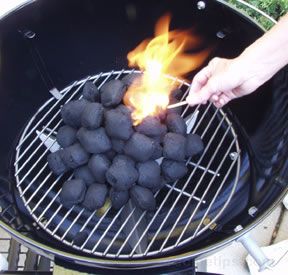
Self-lighting briquettes, containing a petroleum product for easy lighting, can be used. The coals are easily lit with a long match.
An alternative, for those who do not like using petroleum products, is to use regular briquettes, which can be lit more easily with the aid of a chimney starter. Newspaper is placed in the bottom of the chimney and the charcoal is placed on top. The newspaper is lit from the bottom and the fire is drawn up to the charcoal above. |
 |
|
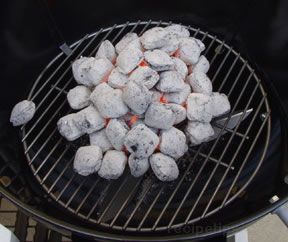
The charcoals are ready when they are glowing and are evenly coated with a layer of gray ash. This process usually requires at least 30 minutes. The coals can then be spread evenly across the bottom for direct heat grilling or they can be placed in several different configurations for indirect heat grilling. |
 |
| Many people like to add a small log or two of their favorite hardwood, such as apple or oak, to the coals in order to provide a more pronounced smoked flavor to the food. Softwoods should not be used because they burn too quickly, do not provide good flavor, and emit too much soot. |
|
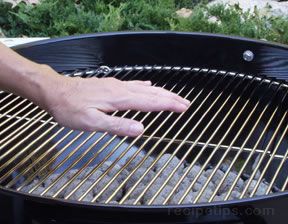
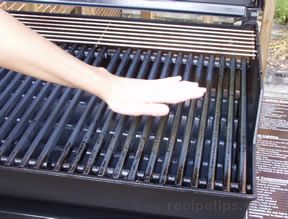
An easy method for estimating the grilling temperature is to place the palm of your hand 3 or 4 inches above the grate. The length of time you can leave your hand comfortably above the grate determines the heat intensity:
- 10 seconds = low fire
- 8 seconds = medium-low fire
- 6 seconds = medium fire
- 4 seconds = medium-high fire
- 2 seconds = high fire
|
 |
|
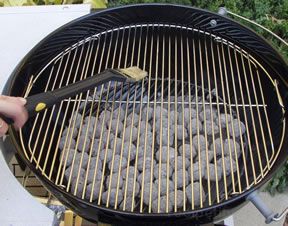
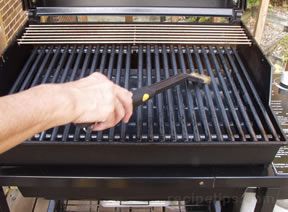
Use a long handled brush to oil the grate before grilling any food. This will help prevent food from sticking to the grate. |
 |
| A charcoal grill can be used for about an hour before the coals begin to die out and the heat is no longer sufficient to continue cooking. If a longer cooking time is required, the coals must be replenished. It is best to remove the grate, add the coals, and wait until they are properly lit before continuing with the cooking process. The fresh charcoal usually requires only half the length of time (about 15 minutes) to be ready than starting coals from scratch. |
| Gas Grill Setup |
|
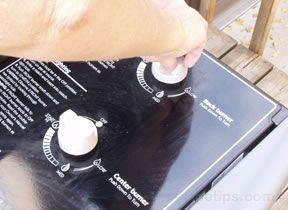
Most modern gas grills have mechanisms for automatic ignition, which makes starting the gas grill almost foolproof. One burner is usually designated as the starter burner and once it is lit, all of the other burners are lit from this source.
After turning on the gas valve, on the tank below the grill unit, the burners can be lit. The control knob (for the main burner) is turned to the "start" position, to begin the flow of gas. The ignition switch is then pushed to light the burner. |
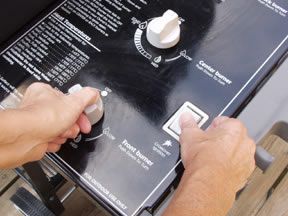 |
| Note: It is very important to open the hood of the gas grill before attempting to ignite the burners. It can be dangerous to start the burners with the hood down because gas can build up under the closed hood and may cause an explosion. Always follow the manufacturers instructions. |
| To confirm that the burner has lit, hold your hand over the grate in order to feel the heat rising from the burner. |
 |
| Once the main burner is lit, the other burners light automatically by simply turning on their respective control knobs to start the flow of gas. All the burners should be turned to "high" in order to properly preheat the grill. |
 |
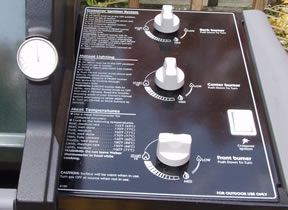
| The hood should be closed while the grill preheats. Some gas grills are equipped with thermometers built into the hoods (as shown on the right front of the hood of the grill that is pictured), which provide a reasonably accurate temperature reading when the hood is closed. |
 |
| Use a long handled brush to oil the grate before grilling any food. This will help prevent food from sticking to the grate. |
 |
Direct Heat Grilling
Cooking with direct heat is accomplished by placing cuts of lamb on a grate directly over the heat source. For outdoor grilling, the grate can be positioned over an open fire or wood burning grilling unit, a charcoal grill, or a gas grill.
|
 Charcoal Grills Charcoal Grills
When lamb is cooked with direct heat on a charcoal grill, the coals are usually spread in an even layer on the bottom of the grill. This provides a consistently hot, even temperature under the entire cooking surface.
The cooking temperature typically reaches 450ºF to 650ºF when grilling over direct heat. Thin cuts of lamb are quickly grilled over such high temperatures and should only be turned once to cook both sides. |
| |
|
Gas Grills
When grilling lamb with direct heat on a gas grill, all of the burners are lit to provide a uniform temperature under the entire cooking surface (grate).
The meat is cooked quickly over burners set to medium to high heat. Thin lamb chops or leg steaks, under ¾ inch thick, should be cooked over high heat for only 2 or 3 minutes per side and watched carefully to prevent overcooking.
Thin cuts of lamb are usually turned only once during the cooking process. A tongs or a spatula should be used to turn the meat. A fork should not be used because it pierces the meat allowing juices to escape. The hood of the grill is usually lowered during the cooking time. |
Indirect Heat Grilling
The purpose of indirect heat cooking on a grill is to allow thicker cuts of lamb to cook thoroughly while preventing the surface of the meat from burning. Indirect heat cooking is often done in conjunction with direct heat cooking. Large lamb cuts are usually seared over direct heat to seal in the juices and then the cooking process is finished using indirect heat to slowly cook the meat to the desired doneness.
|
Charcoal Grills
Several different configurations for arranging coals can be used for indirect grilling using a charcoal grill. All are effective for grilling larger cuts of lamb. |
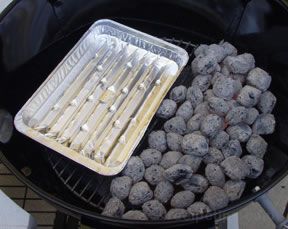
| The coals can be pushed to one side of the grill and a pan is placed on the opposite side. The pan is used to catch fat as it melts and drips from the meat as it cooks, reducing flare-ups. This is the most commonly used arrangement for the coals, which creates distinct hot and cool zones for using a combination of direct and indirect grilling. |
 |
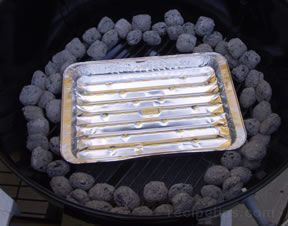
| An alternative method for arranging coals for indirect heat grilling is to place half the coals on one side of the grill and the other half on the opposite side. Some charcoal grills are equipped with side baskets, which can be used for this purpose. A drip pan is placed between the coals under the location where the meat will be cooked. |
 |
| A third method of arranging the coals is to bank them into a ring around the outer edges. Again, a drip pan is used under the meat. The grill should be covered while the lamb cooks (which is true for any of the three methods of arranging coals). |
 |
| Before actually cooking a thick cut of lamb with indirect heat, the meat is usually seared on all sides, using direct heat, in order to seal in the juices and create a flavorful crust on the surface. The meat is seared directly over the hot coals. A tongs or spatula is used to turn the meat. Utensils, such as meat forks, that will pierce the meat, should not be used. When the searing process is complete, the lamb is moved to the location on the grate that is directly over the drip pan. The grill is covered and the lamb is cooked to the appropriate doneness. |
|
Gas Grills |
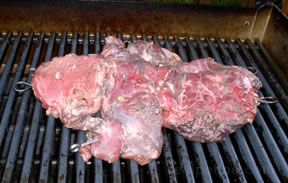
| A thick cut of lamb, such as the butterflied leg of lamb shown on the right, is seared on all sides over direct heat before it is cooked to the proper doneness using indirect heat. A tongs and/or spatula should be used to turn the meat. Do not use a meat fork because piercing the meat allows juices to escape, which can cause the meat to toughen and dry out before it is cooked to the desired doneness. Note: Legs to be grilled are often butterflied, to provide a more uniform thickness. |
 |
| All of the burners, except one, are turned off. For the grill pictured at right, the center and rear burners are turned off and the front burner remains lit (on high heat). |
 |
|
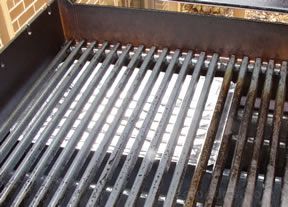
A drip pan is placed on the opposite side away from the direct heat of the front gas burner and under the location where the meat will be cooked. The seared lamb cut is placed on the area of the grate over the drip pan, away from the direct heat of the front burner. |
 |
| The heat from the one burner is sufficient to cook the lamb, indirectly, especially when the hood is closed to hold the heat within the grill. |
|
| Larger cuts of lamb, such as leg of lamb and rib racks, benefit from cooking with indirect heat because the meat remains juicy and tender and the risk of overcooking the meat is reduced. |
 |
Sautéing
Sautéing is the technique of cooking thin cuts of lamb in a small quantity of hot fat in an uncovered pan. (This is considered a 'dry heat' method because fat does not contain water). It differs from frying in that less fat is used in sautéing. It is important that the meat surface is dry when it's put into the pan so it browns rather than steams, and that the pan and cooking fat are both hot enough to brown the meat quickly. The pan should not be crowded; cook in small batches if necessary. Choose fat that doesn't burn at high temperatures. Many cooks prefer to use heart-healthy oils such as canola or olive oil. Both work well for sautéing. Butter may be used for part of the fat for the rich flavor it provides, but butter used alone will burn easily. Lamb for sautéing should be tender and not more than an inch thick. It may be seasoned or breaded before cooking. Lamb chops and liver are good choices for sautéing.
Stewing or Braising
Stewing and braising involve the slow cooking of meat in a liquid. This technique tenderizes and softens firm or tough cuts and allows for rich and subtle blending of the meat flavors with those of the liquid and seasonings. Popular choices for braising liquids include stock, water, wine, beer, and fruit juice. Seasonings may include fruits, vegetables, herbs, and spices in seemingly limitless variety.
The main differences between stewing and braising are:
- The size of the meat used: the stewing process requires that small pieces of meat be used while braising requires the use of whole, market ready cuts.
- The quantity of liquid: stewing requires the pieces of meat to be totally immersed in the liquid, while braising requires that the level of the liquid be halfway up the side of the lamb cut.
Lamb Doneness
General Guidelines
Because of growing concern that harmful bacteria may be present in the internal portions of meat, it is now recommended that whole lamb cuts be cooked to an internal temperature (after the resting period, if applicable) of not less than 145°F. Many people prefer lamb cooked rare (a final internal temperature of 140°F or less), but this decision is up to the consumer and is certainly not recommended by the USDA.
Although various tables showing recommended cooking times are useful as a general guide, there are many variables that affect the actual amount of time for a cut of lamb to reach a particular stage of doneness. Therefore, the only reliable guide for determining doneness is with the use of an accurate meat thermometer.
It is important to remember that after a cut of lamb is removed from the heat source, the internal temperature will continue to rise if the meat is allowed to rest for a few minutes. Although thin lamb cuts are usually served within a short time after removal from a grill or broiler oven, thicker cuts, such as roasts, benefit from a resting period before slicing and serving. The resting period, which may range between 10 to 30 minutes, depending on the lamb cut, allows the juices to be distributed evenly throughout the meat and allows the internal temperature to rise because of the residual heat. The internal temperature will increase 5º to 10ºF during the resting period, which allows the lamb cut to be removed from the heat source when the internal temperature is lower than the desired doneness.
Degree of Doneness
|
Doneness Chart
The temperatures listed below refer to the internal temperature of the lamb as it is removed from the heat source and the internal temperature after the recommended resting period. |
| Degree of Doneness |
Traditional Guidelines |
Updated Guidelines |
Rare
(red inside) |
Cook to 130ºF
10 - 12 minutes/pound |
Not Recommended |
Medium-Rare
(pink inside) |
Cook to 135ºF
12 - 15 minutes/pound |
Cook to 140ºF
15 - 18 minutes/pound
The temperature after the resting period should reach 145ºF. |
Medium
(barely pink inside) |
Cook to 140ºF
15 - 18 minutes/pound |
Cook to 155ºF
20 - 25 minutes/pound
The temperature after the resting period should reach 160ºF. |
Well-Done
(gray-brown throughout) |
Cook to 165ºF
25 - 30 minutes/pound |
Cook to 165ºF
25 - 30 minutes/pound
The temperature after the resting period should reach 170ºF. |
Meat Thermometers
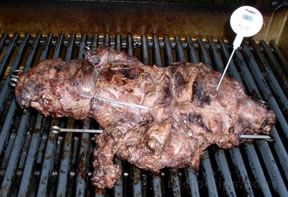
| A meat thermometer should be used to verify that a cut of lamb has reached the appropriate temperature according to the desired doneness. It should be inserted into the thickest portion of the meat. The thermometer should not be placed near a bone or in a fatty area, which will result in a temperature reading that is inaccurate in terms of proper doneness. An ovenproof thermometer can be placed into a lamb roast and remain there throughout the roasting process. Most instant read thermometers are not ovenproof, so they cannot remain in the roast during cooking. |
 |
|
Types of Meat Thermometers
Shown below are several varieties of
ovenproof and instant read thermometers that are available. |
|
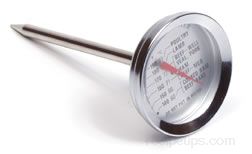
Dial Face Ovenproof
Meat Thermometer |

Digital Instant Read Thermometer
with Heatproof Sensor and Wire |
|
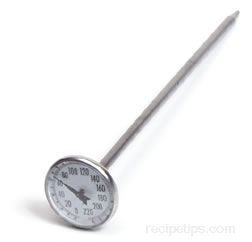
Dial Face Instant Read Meat Thermometer
(Not Ovenproof) |
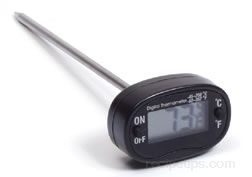
Digital Instant Read Thermometer
(Not Ovenproof) |
|

Digital Instant Read Grill Fork Thermometer |
Carving a Leg of Lamb
A leg of lamb is one of simplest roasts to carve. There are no complicated techniques involved and all that is required is a sharp knife and a meat fork to steady the roast as it is being carved. It is best to carve the leg of lamb on a cutting board although if it is possible to carve it on a large platter if it is necessary to carve it at the table.
- Place the roast on the cutting board or platter with the fat side up.
- While steadying the roast with a meat fork, slice downward, beginning at the shank end, until the knife reaches the leg bone.
- Continue cutting at half-inch intervals until reaching the rump bone (the large end of the leg).
- Run the knife under the slices using the top of the leg bone as a guide.
- Place the slices on a platter or onto individual dinner plates.
|