|
Roasting | Grilling | Broiling | Barbecuing & Smoking | Sautéing
Pan-Frying | Deep-Frying | Stir-Frying | Poaching | Braising | Stewing | Steaming
Microwaving | Unsafe Cooking Methods | Doneness | Meat Thermometers | Carving
Roasting
Roasting is a dry heat cooking process and is one of the most popular methods used for cooking turkey. The roasting process tends to evaporate and reduce the moisture content of any type of meat, shrinking the fibers and making the meat tougher, so it is important to follow the proper steps for roasting to ensure the best results.
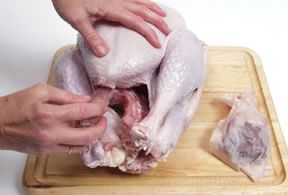
| In order to prepare the turkey for roasting, the neck and giblets, which are usually placed inside the body cavity when the turkey is processed, must be removed. |
 |
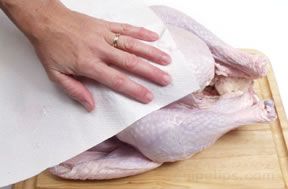
| Rinse the turkey inside and out with cold water and pat the surface dry with paper towels. |
 |
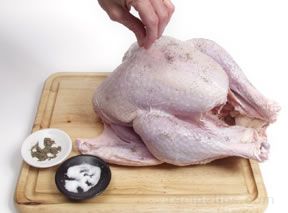
| The turkey can be seasoned with salt and pepper and with any herbs and spices that are desired, but this is optional. |
 |
| If the turkey is to be stuffed, the stuffing should be inserted into the body cavity just before the bird will be placed in the oven. It is a dangerous practice to stuff the turkey in advance with the idea that time will be saved. The stuffing may promote the rapid growth of harmful bacteria if the turkey is not cooked immediately after stuffing. Do not overstuff the turkey because the stuffing will expand as it cooks. |
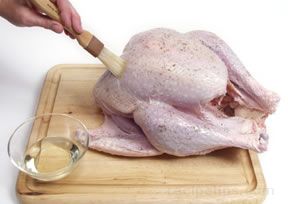
| The turkey may be coated with oil or butter to help brown the skin, but this is optional. |
 |
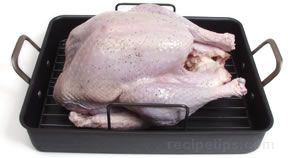
| Place the turkey breast side up on a cooking rack in a shallow roasting pan and place the pan in the center of the lowest rack of a preheated oven. |
 |
| Roast the turkey uncovered at a temperature ranging from 325°F to 350°F. Higher temperatures may cause the meat to dry out, but this is preferable to temperatures that are too low which may not allow the interior of the turkey to cook to a safe temperature. Some cooks prefer to roast the turkey at temperatures as high as 450°F to 500°F for the first 30 minutes to brown the surface and then reduce the heat to 325°F. It is important to keep the oven door closed as much as possible while the turkey is roasting to maintain a constant temperature in the oven. |
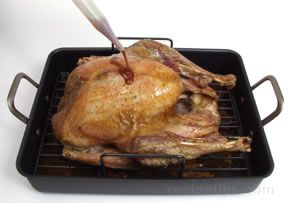
| Basting a turkey provides a crispy, golden skin, but it does not add moisture or flavor to the interior of the turkey. Basting should be kept to a minimum so that the oven door is not opened too often. The more times the oven door is opened, the longer the cooking time will be due to loss of heat. |
 |
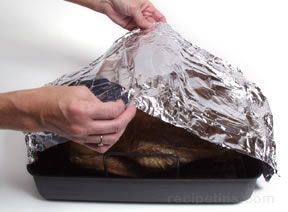
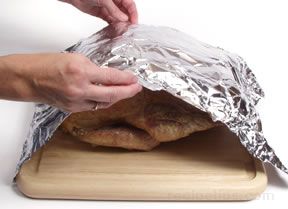
| Aluminum foil can be tented over the turkey near the end of the cooking time to keep the skin from becoming too brown. |
 |
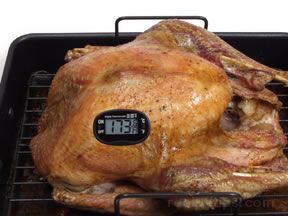
| Use a meat thermometer to determine the proper doneness, which is at least 170°F for the breast and 180°F for the thigh. After removing the turkey from the oven, the temperature of the meat will increase by about 5° as the turkey rests. It is important to not let the turkey overcook, because the breast meat may quickly dry out. |
 |
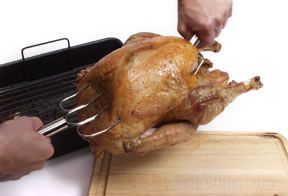
| After removing the turkey from the oven and before carving, allow the turkey to rest at least 20 minutes so that the juices settle within the meat, which will provide the meat with more flavor and tenderness and will also make carving much easier. More or less time may be allotted depending on the size of the turkey. Large lifting forks, like those shown in the picture at the right, or other types of turkey lifters should be used to remove the turkey from the roasting pan. After the turkey is placed on a large cutting board, it can be tented with aluminum foil to retain the heat while it is resting. |
 |
 |
| Note: A disposable aluminum pan is not recommended for roasting a whole turkey. The weight of the turkey may cause the pan to buckle when it is removed from the oven, creating a dangerous situation. |
Roasting times may vary greatly, depending on a number of variables that affect the cooking time such as the shape of the turkey, the proportion of meat to bone, the variations in different ovens, the altitude, and if the turkey is fresh or frozen and then thawed. Adding the confusion is that almost every source providing roasting times is different from one another. Listed below are roasting times that can be used as a general guideline, but the only true gauge for determining proper doneness is with a meat thermometer. The breast must reach an internal temperature of 170°F and the thigh must reach 180°F.
| Roasting Times for a Whole Turkey Cooked in a 325°F Conventional Oven |
| Weight |
Unstuffed |
Stuffed |
| 8 to 12 pounds |
2¾ to 3¼ hours |
3 to 3¾ hours |
| 12 to 14 pounds |
3¼ to 3¾ hours |
3¾ to 4¼ hours |
| 14 to 18 pounds |
3¾ to 4¼ hours |
4¼ to 4¾ hours |
| 18 to 20 pounds |
4¼ to 4¾hours |
4¾ to 5¼ hours |
| 20 to 24 pounds |
4¾ to 5½ hours |
5¼ to 6 hours |
| 24 to 30 pounds |
5½ to 6½ hours |
6 to 7 hours |
| Note: Using a convection oven will cut as much as 25% off the cooking times list above. |
An oven-safe bag may also be used for roasting a turkey. The preparation and roasting steps are identical to the steps used for preparing and roasting a turkey without an oven bag except for the following additional steps:
- Add a small quantity of flour to the bag and shake it to coat the inside of the bag.
- Place the turkey inside the bag and close the opening with the twist tie provided.
- A few holes should be punctured in the bag to allow some steam to escape during the roasting process.
The oven-roasting bag keeps the turkey very moist and it speeds up the roasting time. The following cooking times can be used as a guideline for an unstuffed turkey roasted in an oven bag in a 350°F conventional oven. An additional 30 minutes or more may be required for a stuffed turkey. The only true gauge for determining proper doneness is with a meat thermometer. The breast must reach an internal temperature of 170°F and the thigh must reach 180°F.
| 8 to 12 pounds |
1½ to 2 ¼ hours |
| 12 to 14 pounds |
2¼ to 2¾ hours |
| 14 to 18 pounds |
2¾ to 3½ hours |
| 18 to 20 pounds |
3½ to 4 hours |
| 20 to 24 pounds |
4 to 4¾ hours |
| 24 to 30 pounds |
4¾ to 5¾ hours |
Grilling
The grilling process cooks foods quickly and directly over high heat. Whole turkeys or turkey parts can be grilled on an outdoor gas grill or on an outdoor grill using charcoal briquettes. Turkey parts can also be grilled indoors on a portable electric countertop grill or on a stove that has a built-in grill.
Grilling temperatures typically reach 500°F or more, but any temperature above 300°F is considered a grilling temperature. The high heat of grilling sears the skin of the turkey, sealing in the natural juices of the meat and creating crisp, flavorful skin. The skin may also be removed from the whole turkey or individual pieces before grilling, but this increases the risk of the meat becoming too dry because of the absence of the skin, which provides protection against excess moisture loss. It is best to leave the skin on during grilling and it can then be removed before serving. If the skin must be removed before grilling, the surface of the meat can be brushed with some olive oil to help keep it moist.
An easy method for estimating the grilling temperature is to place the palm of your hand near the level at which the food will be positioned above the heat source. If you can leave your hand above the heat source for 5 or 6 seconds, the temperature is at a low to medium low heat. If your hand must be pulled away after 3 seconds, the temperature it is at a medium to medium-high heat, and if your hand can only be left above the heat source for 2 seconds, the temperature is hot.
When selecting a whole turkey for grilling, it is best to choose one that is not too large. A 16-pound turkey is the largest size that is safe to grill. The grilling process does not allow the internal temperature of larger turkeys to reach a sufficient temperature quickly enough to destroy harmful bacteria within a safe time period. A smaller turkey is also easier to handle when moving and turning it on the grilling surface. Allow 15 to 20 minutes cooking time per pound when using a covered grill. A meat thermometer should be used to make sure the internal temperature of the turkey reaches the proper degree of doneness.
Broiling
Broiling is much like grilling in that food is cooked directly with high heat. The difference between broiling and grilling is that food is broiled in the oven and the heat source is above the food whereas grilled food is cooked on equipment that is generally used outdoors and the heat source is below the food. (As described in "Grilling", there are also indoor portable electric models for the countertop and stoves with built-in grills). Turkey pieces may be broiled, but more often, the pieces are cut into smaller, flatter pieces so that they will cook more quickly and evenly. For example, turkey breasts may be sliced into pieces, or cutlets, and broiled, but an entire breast is not a good candidate for broiling because the outer portions may become overdone before the interior has been cooked to the proper internal temperature of 170°F.
Another difference between broiling and grilling is that when food is grilled, it is generally placed directly on the grilling rack, and when food is broiled, it is placed on a broiling pan. The broiling pan catches melting fat and juices that drip from the turkey as it cooks. This is not as critical when using an outdoor grill.
The distance the turkey is placed from the heat source is important for proper broiling, just as it is when turkey is grilled. Turkey pieces or cutlets should be placed 3 to 6 inches from the heat source, depending on the thickness of the cut. Thin cuts of turkey should be closer to the heat source than thicker cuts. Thicker cuts require more time to cook to the correct doneness than thin cuts, so placing them farther from the heat source allows the meat to cook thoroughly without burning the surface. The skin may be left on or removed, but leaving the skin on helps to keep the meat moist and tender during the broiling process. The skin can then be removed before serving the turkey.
Oven racks should be adjusted to allow for the height of the broiler pan and the thickness of the turkey. After preheating the broiler pan, the turkey can be placed on it and then placed under the broiler. Unlike some cooking processes such as roasting or braising, the meat should be watched throughout the broiling process to make sure that it does not burn. When one side of the meat is cooked, it should be turned to the other side using a tongs.
The following are additional tips to consider when grilling or broiling turkey:
- When grilling or broiling turkey pieces, use tongs to turn the pieces rather than piercing them with the fork. Piercing the meat allows juices to escape, which can toughen the meat.
- Make sure the heat is not too high so that the turkey doesn't get charred on the outside before the interior is cooked to the appropriate doneness.
- Turkey has a tendency to become dry when it is grilled or broiled so it must be watched carefully during the cooking process. The turkey can be coated with a little oil or it can be marinated to help prevent it from drying out while cooking.
- It is important that the turkey is grilled or broiled at the correct temperature and that the turkey is at the proper distance from the heat source to ensure that the meat will be tender and juicy.
- Always have a fire extinguisher handy when using an outdoor grill and make sure the grill is at least 10 feet from buildings or any other flammable items.
- In order to preserve the natural moistness, leave the skin on the turkey while it is being grilled or broiled.
- In order to cook different sized turkey pieces at a similar rate, place the smaller pieces further from the main heat source so that they will cook at a slower rate.
- Aromatic woods including alder, hickory, or maple, can be added to the coals during the grilling process to provide a distinctive flavor to the turkey, however not to the extent provided by barbecuing, which uses indirect heat, smoke, and a more lengthy cooking time to achieve a more pronounced flavor.
- In order to speed the grilling or broiling time, turkey pieces may be microwaved first to partially cook the pieces. The partially cooked turkey must be immediately grilled or broiled after microwaving to maintain the wholesomeness of the food. Finishing the cooking at a later time may allow bacteria to grow rapidly, causing food poisoning.
Barbecuing & Smoking
Barbecuing
People often use the terms barbecuing and grilling interchangeably, but they are two completely different cooking processes. While grilling refers to food that is cooked directly over high heat, barbecuing refers to foods that are cooked with a long, slow process using indirect, low-heat generated by smoldering logs or wood chips that smoke-cook the food.
The fuel and heat source are separate from the cooking chamber, but the cooking chamber contains enough heat to properly cook the food over a long period of time. The cooking chamber fills with smoke, giving the food its characteristic smoked flavor, which varies depending on the type of wood that is used for the fuel. A pan of liquid can be placed in the chamber to produce extra moisture and keep the turkey from drying out. The best temperature for barbecuing is between 200°F and 300°F, although for turkey and other poultry, the temperature should be closer to 300°F so that harmful bacteria, that may be present on the bird, is killed within a safe period of time.
It is safe to barbecue a turkey as long as it is not too large. A turkey of less than 12 pounds is best. Because of the lower temperature used in barbecuing, the internal temperature of a large turkey may not reach the proper level for a long period of time, which may result in the growth of harmful bacteria. A small turkey will cook more quickly. Turkey pieces may also be barbecued and will reach the proper doneness in a shorter period than a whole turkey. For a whole turkey of 12 pounds or less, allow 20 to 30 minutes of cooking time per pound.
Smoking
Another cooking method that is similar to barbecuing is smoking. The main difference with a smoker is that the heat source is from gas, electricity, or charcoal rather than from wood and a liquid is required to produce the moist heat and smoke that are necessary to cook the food. The liquid may be water, wine, juice, or just about anything that is desired. The smoker should be preheated to a minimum temperature of 250°F before the turkey is placed inside and the liquid must be replenished during the cooking process in order to maintain the proper temperature and moisture in the cooking chamber.
Other important points to consider when using a traditional barbecue or smoker:
- Never stuff a whole turkey that is going to be barbecued or smoked because the stuffing will require too much time to reach the proper safe temperature of at least 165°F. Stuffing that is barbecued or smoked will develop an unpleasant taste, which is another reason for omitting it.
- Turkey may require additional time to reach the proper doneness if it is barbecued or smoked on a cold day.
- A meat thermometer should be used to check the internal temperature of the turkey to ensure proper doneness.
- Never allow children or pets near the barbecue or smoker and have a fire extinguisher handy while the equipment is in use.
Sautéing
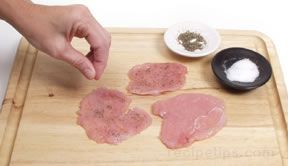
Sautéing is a cooking process using high heat that quickly browns and sears food in a small quantity of oil in a skillet. It is actually the same process as searing except that sautéing completely cooks the meat and searing is simply a means to brown the meat so that the cooking process can be completed with another method. Sautéing is best suited for thinly sliced turkey cutlets obtained from the breast.
Sautéing requires high heat, so it is best to use cooking oil that will not burn or smoke at high temperatures such as olive oil, corn oil, or canola oil. Butter can be used, but it burns easily with high heat, so it is best to use it in combination with a bit of oil.
| The turkey slices used for sautéing should not be more than ½ inch thick. The slices can also be pounded to tenderize them and flatten them so that they cook quickly. |
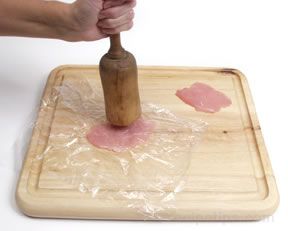 |
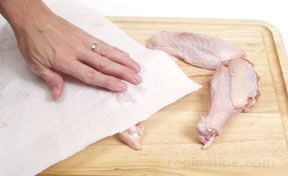
| The turkey can be patted with paper towels in order to remove excess moisture, which helps the meat brown more quickly. The slices can be seasoned in any way that is desired before they are placed in the pan. |
 |
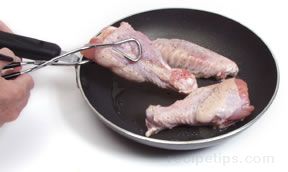
| In order to sauté turkey cutlets properly, the skillet must be preheated on the stove before adding any oil. Medium-high heat is sufficient to warm the pan to the proper temperature. The oil is then added and allowed to heat before the turkey is placed in the pan. Some cooks make the mistake of putting the oil in a cold pan and then heating it or worse still, adding the oil and the meat at the same time to a cold pan. This practice tends to make foods absorb the oil and stick to the pan. The oil should be allowed to get hot, but not so hot that it begins to smoke. The turkey slice should sizzle when it hits the pan. If it doesn't sizzle, the pan and oil are not hot enough. |
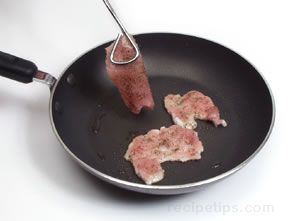 |
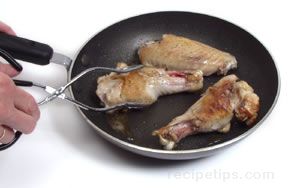
| A tongs or spatula should be used to turn the meat. Never use a fork because piercing the turkey with a fork may allow juices to escape, which will decrease the tenderness and flavor of the turkey. |
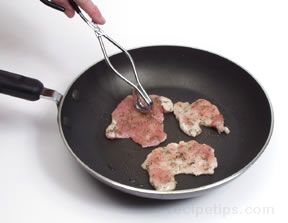 |
| It is best to turn the cutlets in the pan only once to achieve the best results. |
 |
Sautéed turkey may be served with a sauce made from the pan drippings. The turkey is removed from the pan and is covered to keep it warm. A small amount of liquid is added to the pan in order to loosen the flavorful caramelized bits that have stuck to the pan during cooking. This is known as deglazing. After the liquid has reduced to about half the original volume, other herbs and spices are added, depending on the type of sauce desired. Some sauces require that cream or butter be added in order to create a smoother flavor and texture. Most sauces require only 2 or 3 minutes to complete and are served with the sautéed turkey immediately so that the optimum flavor of the turkey and sauce can be enjoyed.
Pan-Frying
Pan-frying is similar to sautéing except that a little more oil is used, the turkey pieces are larger, and the cooking process usually requires more time. Like sautéing, high heat is used to sear the turkey pieces, sealing in the juices and flavor.
| The skillet should have a heavy bottom so that heat will be conducted more easily. A large, well-seasoned, cast-iron skillet works well or a heavy nonstick pan may be used. Make sure the pan is of adequate size so that there is plenty of room to brown the turkey. If the pan is crowded, the turkey will steam more than it will brown. Because of the size of a turkey, individual sections such as the breast or leg are usually cut down into smaller pieces to make them easier to handle and to allow the pieces to cook more quickly, but they may still be larger than the thin cutlets used when sautéing. Smaller pieces such as the wing parts may be fried whole. The turkey pieces are patted with paper towels to remove excess moisture and seasoning is added. |
 |
|
The turkey pieces are placed into a hot skillet containing heated oil. The turkey should sizzle when it hits the pan. If it doesn't sizzle, the pan and oil are not hot enough. |
 |
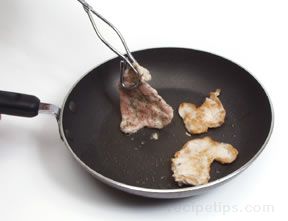
| Do not use a fork to turn the pieces because piercing the turkey allows juices to escape. A tongs is the best utensil to use for turning the pieces in the pan. Unlike sautéing, the turkey pieces can be turned more than once because the pieces are larger and require a longer cooking time. |
 |
| Turkey pieces should be cooked until the internal temperature reaches a minimum of 170°F to ensure that harmful bacteria have been destroyed. A meat thermometer should be used to check the internal temperature. A thick turkey steak may be removed from the pan, covered, and allowed to rest for a few minutes. The temperature will continue to rise an additional 5°F and the remaining juices will settle, resulting in tender, flavorful turkey. |
 |
Deep-Frying
Deep-frying, also known as deep-fat frying, is a process of immersing food in deep pot containing heated oil, which cooks the food quickly, producing a crispy surface over a tender and moist interior. It is becoming a popular method for cooking whole turkeys. It is best if the turkey is smaller than 10 pounds for ease of handling and better results. Large turkeys are difficult to handle, which increases safety concerns when cooking with hot oil. Large turkeys also take too long to cook, resulting in an exterior that may be burned while the interior is still undercooked. A whole turkey can be cooked as is or it may be covered with a seasoned crumb coating, a dry rub, or injected with a marinade.
A cooking basket is a helpful accessory, allowing the turkey to be safely lowered and raised in the cooking pot containing the hot oil. A special hook designed for lowering and lifting the turkey may be included with some deep-fryer models, eliminating the need for a cooking basket.
| Any cooking oil can be used for deep-frying as long as it does not smoke or burn at temperatures that may reach as high as 425°F. Oil low in saturated fat is best to use because the turkey will absorb a small quantity of oil while it cooks. |
| A temperature between 350°F and 375°F is an ideal range for deep-frying a turkey. Many deep-fryers have built in temperature gauges, but if no gauge is included, a candy thermometer can be used to determine the temperature of the oil. |
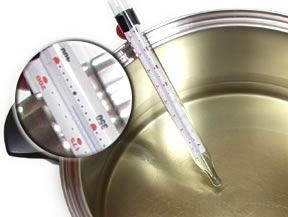 |
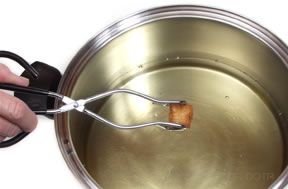
| Another method that can be used is to place a cube of bread into the oil and if it browns in 45 to 50 seconds, the oil is at the proper temperature. |
 |
It is extremely important to use the proper quantity of oil when deep-frying a turkey. If too little oil is used, the turkey may not be totally covered with the oil when it is placed into the pot. If too much oil is used, the oil may overflow the sides of the pot when the turkey is inserted creating an extremely dangerous situation. Many deep-fryer models have gauges to determine the correct volume of oil to use for various weights of turkey. If no gauge is included with the equipment, the following steps may be used for determining the correct volume of oil to use for any quantity of turkey:
- Place the turkey in the pot using the special hook that may be included with the deep-fryer or if a cooking basket will be used, make sure the turkey is placed in the basket and then place the basket into the pot.
- Add water until the turkey is totally immersed and there is at least 2 inches of water above the turkey.
- Remove the turkey from the pot and measure the distance from the top of the pot to the surface of the water.
- Remove the water from the pot and dry it thoroughly.
- Add the oil to the pot up to the same level where the water had been.
The oil may take as long as an hour to heat depending on the quantity of oil and the type of heating equipment used. The turkey should be as dry as possible before it enters the hot oil. After the turkey is inserted into the pot, the temperature of the oil will begin to drop, so it may be necessary to increase the heat for a short time to return the oil to the proper temperature.
A whole turkey of 10 pounds or less requires a cooking time of 3 minutes per pound. To check for the proper doneness, carefully remove the turkey from the oil and check the internal temperature with a meat thermometer. The temperature should reach at least 170°F in the breast and 180°F in the thigh.
Extreme care is necessary to ensure safety when deep-frying a whole turkey. Because the required equipment can be cumbersome and the large quantity of hot oil necessary for cooking a whole bird can be dangerous, deep-frying a whole turkey is much less safe than deep-frying food on a smaller scale. It is important to note that Underwriters Laboratories has refused to certify any turkey deep-frying equipment because of the dangers involved. Listed below are some important points to consider when deep-frying turkey:
- Because of the size of the cooking equipment and the large quantity of oil required, deep-frying a whole turkey should never be attempted indoors. Pieces of turkey meat can be safely deep-fried indoors using using traditional equipment such as a small pot on a stove top.
- When purchasing a deep-fryer designed for cooking whole turkeys, make sure the model has a solid base that will hold the cooking pot firmly. Models with tripod legs should be avoided because they can easily tip.
- The pot must be large enough to accommodate the turkey, but not so large that it becomes wobbly on the heating surface.
- Do not overfill the pot with oil. When the turkey is placed into the pot, the oil may spill over the sides and ignite on the heating unit.
- The temperature of the oil should be closely watched. If the oil overheats, it may ignite.
- If the turkey is not completely thawed when it is inserted into the hot oil, it may cause the oil to spill over because of the reaction of the hot oil to the frozen bird.
- Any utensils and equipment that come into contact with the hot oil must be thoroughly dried first. Moisture on the utensils will cause splattering when brought into contact with the hot oil, which can be dangerous.
- Make sure the turkey is as dry as possible before it enters the hot oil.
- The deep-frying equipment should be used a safe distance from all combustible substances. Never place the cooker on a deck, near any building, or on a table.
- The hot oil should not be left unattended and children and pets should NEVER be allowed near the cooking area.
- A fire extinguisher and heavy potholders should always be within reach.
- After the cooking is completed, the oil should not be transferred to another container or disposed of until it has completely cooled. It is extremely dangerous to pour the oil from the cooking vessel until it has cooled. Several hours may be required for the large quantity of oil to cool properly.
Stir-Frying
The stir-frying process requires high heat and the tossing and stirring of ingredients in a large pan to ensure quick and even cooking. A wok is the traditional type of pan used for stir-frying because it has deep tapered sides, which allows food to be stirred and tossed easily. If a wok is not available, a deep heavy skillet works very well for stir-frying and nonstick pans are also easy to use. Wood or metal utensils should be used to stir the food. Plastic utensils should be avoided because they can melt.
All of the ingredients must be prepared and within reach before the stir-fry process can begin. All vegetables should be chopped and ready to go. Precut vegetables can be purchased in most food stores, but they are more expensive. Herbs and spices and any liquid ingredients should be measured before beginning. It is helpful to place the ingredients in small bowls so that everything is organized.
The turkey for stir-fry recipes should be cut into small strips and the skin should be removed. It will be easier to cut the strips if the turkey is placed in the freezer for a short time to firm it up or if the turkey was already frozen, the strips can be cut before the turkey is fully thawed. The small strips will ensure that the turkey will cook thoroughly, even when it is only cooked for a short time. The turkey pieces can be marinated or coated with herbs and spices before they are cooked.
Only 1 or 2 tablespoons of oil per pound of ingredients is required as a cooking medium. Oil with a high smoke point should be used so that it will not burn. It is important to add different ingredients to the pan at the appropriate times to ensure that all the ingredients are cooked thoroughly, but not overcooked. Some ingredients require a longer cooking time than others so those ingredients need to be added to the pan first. If everything is placed in the pan at the same time, the results will be unsatisfactory.
The turkey should be stir-fried until it is thoroughly cooked and the other ingredients should be cooked until tender. None of the ingredients should be overcooked or the turkey strips will toughen and the remaining ingredients will become limp and soggy.
Poaching
The poaching process cooks turkey with the use of simmering liquid in a covered pan. The liquid is brought to a boil, the turkey is placed in the boiling liquid, the heat is reduced so that the liquid is at a gentle simmer, and the pan is covered. When the turkey is thoroughly cooked, the poaching liquid can be skimmed to eliminate any fat and impurities. Thinly sliced turkey may require only a few minutes to cook or it may require as long as half an hour depending on the size of the cut.
Poaching differs from boiling in which food is vigorously cooked for the duration of the cooking time. Boiling can toughen turkey meat and poaching allows the turkey meat to retain its tenderness, moisture, and flavor.
When poaching turkey, it is important to use small cuts such as slices of breast or thigh meat so that the gentle heat of the poaching process will cook the meat thoroughly. It is important that the meat be totally covered with the poaching liquid in order to achieve the proper results. Water is often used as the poaching liquid, but other ingredients can be added to the water to provide additional flavor to the turkey. Chopped aromatic vegetables such as carrots, onions, and celery can be added as well as herbs and spices. When the poaching process is completed, the liquid and vegetables can be used as a broth or it can be reduced and strained and used as a base for a sauce that can be served with the poached turkey.
Poaching is a healthy cooking method because no additional fat is required for cooking the turkey. The poached turkey can be eaten as part of a main meal or it can be cooled and used as an ingredient for various salads, sandwiches, or entrees.
Braising
Braising is basically a process of slow cooking tougher cuts of meat in liquid in order to add flavor and to moisten and tenderize the meat. It is a much better method for breaking down the tough fibers in the meat. Braising is not often used for cooking turkey, but it can provide excellent results.
In order to properly braise turkey, it is placed in a pot and liquid is added to a level of about half way up the meat. If the liquid completely covers the meat, it is considered stewing rather than braising. Turkey pieces are seared in the pot for a short time, which will brown the surface and add extra flavor. After the turkey is seared, liquid is added to the pot. Herbs, spices, and aromatic vegetables, such as onions, carrots, and celery, are also added to provide additional flavoring. The pot is covered and the turkey is allowed to cook until it is fork tender. The turkey can be braised on the stovetop or in the oven.
The moisture in the covered pot is a much more effective means for breaking down the meat fibers than any dry heat cooking method. The moisture in the pot prevents the outer portions of the turkey from drying out. When the cooking process is completed, the liquid in the pot can be strained, returned to the pot, and then reduced into a sauce as an accompaniment for the turkey.
Stewing
Stewing is a moist heat cooking process much like braising except that the turkey is totally submerged in liquid rather than being only partially immersed as it is with braising. Another difference is that the turkey used for stewing is usually cut into smaller pieces rather than being left whole or in large pieces. Like braising, the turkey is seared or sautéed in the pot before the liquid is added.
Often the turkey is stewed with other ingredients to produce an entire meal. Besides the pieces of turkey, several other ingredients may be added including vegetables, such as carrots, onions, celery, and potatoes. Herbs and spices are added and a generous quantity of water. As the ingredients slowly cook, the liquid becomes thicker and very flavorful from the combination of the various ingredients. White wine may be added to provide additional flavor and richness.
Steaming
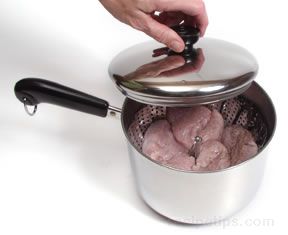
Like braising and stewing, steaming is a moist heat cooking method that results in tender and flavorful turkey through the use of steam. Unlike braising and stewing, the meat is not actually placed in heated water, but is suspended above it. The meat is placed on a collapsible steaming basket, which is placed inside a pan of water that has been brought to a low boil. The basket allows the turkey to be suspended above the water level. Steaming pots with inserts are also available. The cooking process is the same with both types of equipment: as the water boils, the steam rises and surrounds the meat with heat and moisture, cooking the meat until it is tender. It is best to use smaller cuts of turkey for steaming such as thinly sliced portions of the breast or thigh meat.
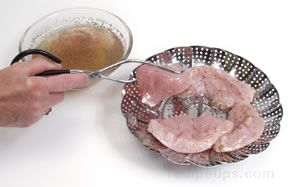
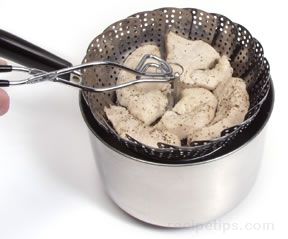
| The turkey pieces are placed on the steaming basket. As shown in the picture at the right, the turkey can be marinated first with any type of flavorings that are desired before being transferred to the steaming basket. |
 |
| The steaming basket is lowered into a pan of gently boiling water. |
 |
| When the water returns to a low boil, the pan is covered. |
 |
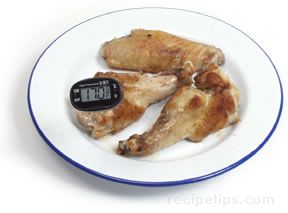
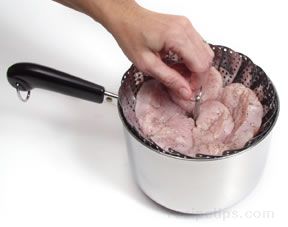
| The cooking process is complete when the turkey pieces are opaque and the juices run clear. The timing varies according to the number and size of the pieces that are being steamed. The slices of breast meat shown in the picture at the right required about 15 minutes to cook to the proper doneness. |
 |
Steaming is one of the most healthy cooking methods because no additional fat is necessary to cook the turkey. The turkey retains most of the beneficial nutrients because they do not leach out as is the case when meat is placed directly in water. Steaming is a cooking method often used for many Asian recipes.
Microwaving
One of the quickest and most convenient methods used for cooking turkey is with microwaving. Although the flavor and tenderness of the turkey may not be as good as with other cooking methods, the overall results can be very satisfying if the turkey is microwaved properly. It is best to follow the manufacturer's instructions because of the differences in various models of microwave ovens. The size and wattage of the microwave makes a difference in the cooking time.
The best results occur when cooking turkey pieces rather than a whole bird. Many microwave ovens cannot accommodate a whole turkey. The turkey pieces should be placed in a microwave safe container and loosely covered during cooking to help hold in moisture and speed the cooking. A few holes should be made in the film or paper or a corner of the container can be left uncovered for venting purposes. A medium to high setting should be used to cook the turkey pieces depending on the size. In most cases, the thicker the piece of turkey, the lower the setting should be in order to avoid the problem of overcooking the surface of the meat before the interior of the meat has cooked thoroughly. Removing the bones from the turkey will also help the meat to cook much more quickly and evenly.
Turkey pieces should be turned over and moved into different areas of the oven occasionally during the cooking process. A microwave oven equipped with a carousel-cooking base reduces some of the turning and movement of the pieces that may be required. A meat thermometer should be used to check the turkey for proper doneness.
Unsafe Cooking Methods
The only safe method of preparing and cooking turkey is to thaw it in the refrigerator (if frozen), cook it thoroughly, use a meat thermometer to verify the meat has cooked to the proper doneness, and promptly store leftovers in the refrigerator or freezer. The following methods for preparing and cooking turkey have been around for years, but are extremely unsafe and should never be tried.
Partial Cooking
Some cooks have the mistaken idea that time can be saved by partially roasting a turkey and placing it back into the refrigerator so that less time will be required for roasting on the day the meal will be served. This is a dangerous practice, which encourages harmful bacteria to multiply at a very rapid rate, resulting in food poisoning. Once begun, the cooking process should be allowed to continue until the turkey is cooked to the proper internal temperature.
Overnight Slow Cooking
This method is very dangerous because the turkey is cooked overnight for 12 to 14 hours at a temperature of about 200°F, which allows harmful bacteria to grow rapidly. Turkey should never be roasted at a temperature of less than 325°F.
Brown Paper Bag
The turkey is placed in a large brown shopping bag and cooked for a long period at a low temperature. This is extremely unsafe because the low cooking temperature allows bacteria to multiply rapidly. The paper bag is poor choice for use as a cooking vessel because the glue and ink that are used when the bag is manufactured may be toxic when heated and combined with food.
Trash Bag or Mississippi Trash Bag
The turkey is placed in a large plastic trash bag containing a marinade and is left at room temperature for several hours. Items such as trash bags that are not designated as being safe to use with food, should never be used as tools for food preparation. A turkey should NEVER be left at room temperature for long periods.
Tarducken
Tarducken is a recipe that consists of a boned turkey layer covering a boned duck layer, which covers a boned chicken layer. Stuffing is placed between each layer and it is then rolled and tied. It is slowly roasted for as long as 14 hours in a 190°F oven. Poultry should never be cooked at low temperatures for long periods of time. This dish can only be made safe by roasting it at a safe temperature of 325°F or above.
Doneness
The following points should be considered when determining the proper doneness of turkey:
- A whole turkey should be cooked until the internal temperature of the breast meat reaches 170°F and the deepest portion of the thigh reaches 180°F. White meat cooks faster than dark meat and it will dry out quickly if it is overcooked. It is always a good idea to check the temperature in both the breast and the thigh.
- A visual test to determine the proper doneness can be performed by piercing the turkey with a fork. If the turkey is thoroughly cooked, the juices should run clear. Doneness can also be determined by cutting into the thickest part of the turkey to check that the meat is completely opaque. The drumsticks should move up and down easily.
- If you cook a turkey that comes with a pop-up timer, the cooking process can be almost foolproof. However, if you stuff the turkey, you still need to use a meat thermometer to check the temperature of the stuffing to make sure it has reached a minimum temperature of 165°F.
- Leftover stuffing that was originally cooked inside the turkey and has been removed, should be reheated to a minimum temperature of 165°F.
- Stuffing that is placed inside the turkey is often undercooked because many cooks do not allow for the extra cooking time required for a stuffed bird. This increases the chances of food poisoning.
- When cooking turkey pieces such as breasts or thighs, a meat thermometer may not be necessary to determine the proper doneness. Turkey pieces are fully cooked when the meat is no longer pink and the juices run clear.
- The meat near the bones of a turkey (or any poultry) may still look a bit pink even if a meat thermometer indicates that the turkey is fully cooked. This is because younger turkeys have bones that are more porous than older turkeys, which allows red pigment to leach out from the bones to the nearby meat during the cooking process. The turkey is safe to eat as long as the proper internal temperature has been reached and the juices run clear.
Meat Thermometers
A meat thermometer should be used to verify that turkey meat has reached the proper doneness. An ovenproof thermometer can be placed into a whole turkey and remain there throughout the roasting process. An instant read thermometer can be used to check the temperature of the turkey, but it cannot be left in the bird during cooking because it is not heatproof. Some whole turkeys are sold with pop-up timers that indicate when the turkey is fully cooked, but a meat thermometer is still the most reliable tool for determining the proper doneness.
| Shown below are a dial face ovenproof thermometer and an instant read digital meat thermometer that can be used to check the internal temperature of turkey to ensure proper doneness. There are several varieties of ovenproof and instant read thermometers available. |
|

Ovenproof Thermometer |
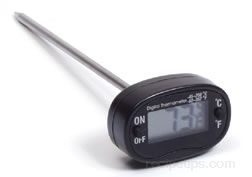
Digital Instant Read Thermometer |
|
The meat thermometer should be inserted 2½ inches into the thickest parts of the turkey, which includes the breast and the thigh. The thermometer should not be placed near a bone, which will result in a temperature reading that is inaccurate in terms of proper doneness. |
|
In order to make sure that a meat thermometer is accurate, it can be placed into water and ice for about 5 minutes and the temperature should read 32°F. For the most accurate measurement, the stem should be inserted about 2 ½ inches into the ice water and should not be allowed to touch the sides of the container. If the temperature does not register 32°F, the thermometer can be adjusted with a setscrew usually found on the back of the dial.
| Note: It is recommended that ground turkey dishes be checked for doneness with a meat thermometer. This is especially important when the meat has been blended with other ingredients or dark sauces that can mask the color of the meat, making it difficult to visually determine the proper doneness. If stuffing has been cooked inside the turkey, the temperature of the stuffing must be checked with a meat thermometer to ensure that it has reached a minimum temperature of 165°F. |
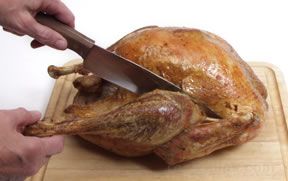
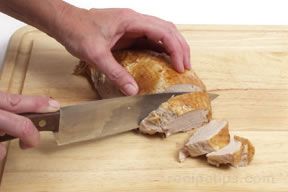
Carving
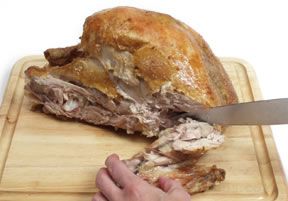
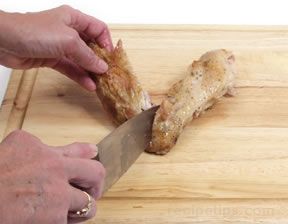
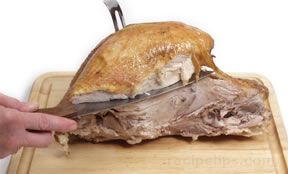
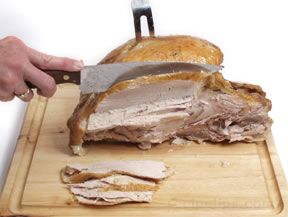
A roasted turkey should never be carved immediately after removing it from the oven. It should be allowed to rest for at least 20 minutes to allow the juices to settle and redistribute throughout the meat. This allows the meat to be as tender and flavorful as possible and it also makes carving much easier. The turkey should be tented with aluminum foil during the resting period to hold in the heat. More or less resting time may be required depending on the size of the turkey. It is important to use a sharp knife when carving. The following steps can be used for proper carving:
|